Dust buildup and musty smells often signal a neglected vacuum canister. Many owners skip cleaning and then wonder why suction drops fast. Learning how to clean vacuum canister restores strong pull and fresh air. This guide shows you every simple step to do it right.
You will learn safe removal steps, wash routines, and drying tips. We also cover filter care, odor fixes, and common mistakes to avoid. Regular care keeps your machine running smooth for years.
[
[EZ_UI_BLOCK_0]
]
📌 AT A GLANCE
- ✓Core Concept: A clean canister stops dust from recirculating into your home air.
- ✓Essential Step: Always unplug the vacuum before you open the canister housing.
- ✓Safety Rule: Wear gloves and a mask if you handle fine dust or moldy debris.
- ✓Efficiency Tip: Rinse the canister with cold water only and let it dry fully overnight.
In this article
Why How to Clean Vacuum Canister Matters for Daily Health
A dirty canister traps old dust, hair, and moisture inside the machine. Those trapped particles blow back into your room every time you vacuum. Clean air starts with a clean canister, so you breathe easier at home.
[
[EZ_UI_BLOCK_1]
]
Regular washing also stops bad smells from building up inside the housing. You save money too, because a well-maintained motor runs cooler and lasts longer. Taking a few minutes each week protects your whole family. For our complete category overview. Core buyer criteria, explore our cornerstone guide to Why Your Vacuum Cleaner Keeps Failing and Fixes.
Think about what you vacuum up every day. Fine dust, pet hair, food crumbs, and pollen all settle inside the canister. If you leave them there, they get blown back out. This is a big problem for kids and older adults. Their lungs are more sensitive to floating dust. A clean canister keeps those tiny particles locked inside. It also stops mold from growing in damp spots. Mold spores can trigger coughing and sneezing.
Cleaning the canister often cuts down on these health risks. You will notice fresher air right away. Your home will smell better too. A clean machine also works faster. It uses less power on each job. That means lower electric bills over time. Taking care of your canister is a simple way to protect your health and your wallet.
- Allergy Relief: Rinsing away fine dust stops pollen and pet dander from spreading.
- Motor Longevity: Less strain on the motor means fewer repair calls each year.
- Suction Power: A clear canister lets air flow fast and pick up debris easily.
- Odor Control: Washing removes trapped food crumbs and pet mess smells fast.
- Cost Savings: Proper care cuts the need for early machine spare.
Essential Tools and Supplies for How to Clean Vacuum Canister
Gathering the right items before you start makes the whole job faster and safer. You do not need fancy gear, just a few common home supplies and a soft brush. Having everything ready stops you from pausing mid-cleaning with wet hands.
For stubborn grime inside the seal groove, dip a cotton swab in warm soapy water. Twist it gently along the edge. This removes sticky residue that normal rinsing misses. Helps the canister sit flush when you reassemble it.
[
[EZ_UI_BLOCK_3]
]
Use only mild dish soap and warm water for washing parts. A microfiber cloth helps you wipe away sticky residue without leaving lint behind. Keep a dry towel nearby to catch drips and speed up drying time. A small tray or old newspaper works great to lay out parts. This keeps tiny screws from getting lost. It also keeps your workspace tidy. You should also have a flashlight handy. A flashlight helps you see deep corners inside the canister.
Old toothbrushes work well as cleaning brushes too. Their stiff bristles reach tight spots. A toothpick can help pry open stubborn latches. Never use steel wool or harsh scrub pads. They scratch plastic and ruin seals. Keep a bowl of clean water ready for rinsing. Run water through the canister to check for leaks. This simple test saves time later.
- Soft Bristle Brush: A small brush lifts dust from tight corners and seals.
- Microfiber Cloths: These cloths trap fine dust and dry without streaks or lint.
- Mild Dish Soap: A few drops cut through grease and grime on plastic parts.
- Warm Bowl of Water: Lukewarm water loosens dried dirt without melting plastic parts.
- Dry Towel: A thick towel absorbs excess water and protects the motor housing.
Step-By-Step Guide to How to Clean Vacuum Canister
Start by unplugging the vacuum cord from the wall outlet. This simple step protects you from electric shock while you handle wet parts. Next, twist or latch the canister release tab to pull the housing free. Make sure you work on a flat and dry surface. A wet floor is a slip risk. Lay down a towel before you begin. This catches any drips and keeps parts from rolling away.
Always check your vacuum model’s manual first. Some canisters detach easily. Others have hidden latches or screw-on caps. Knowing your model helps you avoid breaking parts. If you cannot find the manual, search online for your model name. Many brands offer free PDF manuals on their websites.
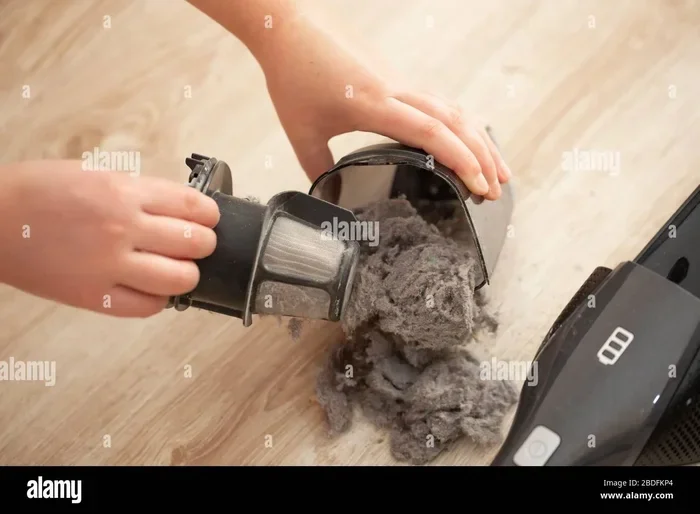
Tip the canister over a trash bin and tap the bottom gently. Use your soft brush to scrape away stuck-on dust along the inner rim. For heavy buildup, rinse the inside with warm water and a drop of mild soap. Let the soap sit for a few minutes. This softens grime so it rinses out easier. Do not force open any parts that feel stuck. Forcing them can break the latch or crack the housing.
If a seal is hard to remove, apply a little warm water around the edge. This helps loosen dried grime. Take your time. Rushing often leads to costly damage. Work on one section at a time. Check each part as you go. This keeps the job organized and stress-free.
- Unplug First: Always disconnect power before touching any internal parts of the machine.
- Release Canister: Find the latch or twist tab and pull the canister straight out.
- Empty Debris: Hold the canister over a bin. Tap it to drop out loose dirt.
- Brush Residue: Use a soft brush to scrape off fine dust from seams and edges.
- Rinse Gently: Run lukewarm water inside and add one drop of mild dish soap.
- Dry Fully: Shake out excess water. Let the canister air dry on a towel overnight.
Always work in a well-lit area. Good lighting helps you spot hidden dust and cracks. A bright lamp or open window works well. Never rush through this process. Slow and steady cleaning gives better results every time.
Washing and Drying Best Practices for How to Clean Vacuum Canister
Never put the canister in a hot dishwasher or near a radiator to dry. High heat can warp plastic lids and crack rubber seals. Instead, rinse all soap away with clean cool water and shake out the excess. Use your hands to feel for any sticky spots. Those spots often hold fine dust. Rinse them until the water runs clear.
Do not use hot water. It can warp thin plastic walls. Lukewarm water is always the safest choice. If your water is very cold, let it sit for a few minutes. Cold water does not clean as well. But it is still safer than hot water for plastic parts.
Place the canister upside down on a dry towel in a well-ventilated room. Leave it there for at least twelve hours so every drop of water evaporates. A fully dry canister stops mold from growing inside your vacuum. You can also use a fan to speed up drying. Point the fan near the canister but not directly on it. This moves air without pushing water around. Do not stack parts on top of each other while drying.
Trapped moisture between layers causes mold. Keep each part separated and visible. Check for leaks before drying is complete. Run a little water through the seams. If it leaks, you may need a new seal. Fixing this early saves bigger problems later. For broader testing and full category picks, explore our in-depth guide to Boost Suction How to Clean a Dyson Filter 2025 Easy.
- Cold Water Rinse: Cool water removes soap residue without stressing plastic seams.
- Air Dry Overnight: Letting parts dry naturally prevents warping and seal damage.
- No Heat Sources: Avoid hair dryers or heaters that can melt housing edges.
- Check Seals: Inspect the rubber gasket for cracks before you put the canister back.
- Lint-Free Wipe: Use a dry microfiber cloth to buff the outside before reassembly.
Mold grows fast in damp places. A canister that stays wet for just two days can develop mold. Always dry parts fully. If you smell musty air after drying, wash again with vinegar water. This kills mold spores and removes odors for good.
Filter Care and Replacement Tips Alongside How to Clean Vacuum Canister
The canister works hand in hand with your vacuum filter to trap fine dust. When the canister is clean but the filter is clogged, suction still drops. You should check the filter each time you wash the canister. Filters are often located near the motor or on the side of the machine. Some models have washable foam filters. Others use paper filters that cannot get wet. Knowing the type matters a lot.
It decides how you clean it. Take a moment to find your filter before you start. Look for a small cover or latch near the body. Remove it gently. If it resists, check your manual. Forcing it out can break the housing.
Most filters need rinsing every two to four weeks, but paper filters must stay dry. Foam filters can be washed with mild soap and tapped dry. Replacing old filters keeps your air clean and your motor safe. A clean filter also helps the motor run cooler. That means less wear on internal parts. You can often buy spare filters online.


Use your model number to find the right fit. Keep one or two spares at home. This way you are never stuck with a clogged filter. Filter care is a small task. It makes a big difference over time.
- Check Filter Type: Find out if your filter is foam, paper, or HEPA before washing.
- Rinse Foam Filters: Use cool water. Mild soap, then press gently to remove excess water.
- Never Wash Paper: Paper filters must stay dry or they fall apart inside the machine.
- Tap Out Dust: For dry filters, tap them lightly against a trash bin to free dust.
- Replace on Schedule: Swap old filters every six months for best motor protection.
Common Mistakes to Avoid When Cleaning Your Canister
Many people rush the drying step and snap the canister back on while still damp. Trapped moisture breeds mold and rust inside the housing. Others use strong solvents that crack plastic and melt rubber seals over time. Skipping the seal check is another frequent error that causes suction leaks. A small gap lets dirt blow right back into the room. Simple care habits save you from these costly and unhealthy mistakes. Some owners also forget to wash the outer shell. Dirt on the outside often transfers back inside. Wipe the whole canister with a damp cloth.
This removes surface dust and fingerprints. A clean exterior also makes the machine look newer. Another mistake is using too much soap. A little goes a long way. Excess soap leaves a film that blocks airflow. Always rinse soap away completely. Run water through the canister for at least thirty seconds. This ensures no residue remains inside.
- Skipping Drying: Never reassemble a wet canister or you invite mold growth inside.
- Using Harsh Solvents: Chemical cleaners damage plastic and leave fumes in your home.
- Forcing the Latch: If the canister sticks, check for debris on the seal before forcing it.
- Ignoring Cracks: A cracked canister loses suction and lets dust escape into the air.
- Over-Tightening: Screw or latch parts just until snug to avoid stripping plastic threads.
How to Remove Tough Odors From Your Vacuum Canister
Bad smells inside the canister are more than just annoying. They signal trapped moisture, food scraps, or pet accidents. These odors can spread through your room every time you vacuum. That is why removing smells is a key part of how to clean vacuum canister. Start by emptying all debris. Then rinse the canister with clean water. If the smell remains, use a natural odor fighter. Baking soda works very well. Sprinkle a small amount inside the canister. Let it sit for one hour. Then rinse it out completely.
Baking soda absorbs smells instead of covering them up. White vinegar is another great option. Mix one part vinegar with three parts water. Pour it into the canister and let it sit for ten minutes. Rinse well afterward. Do not use vinegar on rubber seals. It can dry them out over time. Avoid strong scented sprays. They mix with dust and create worse fumes. Natural solutions are always safer for your home.
Troubleshooting Suction Loss After How to Clean Vacuum Canister
If suction stays weak even after a clean canister, check the hose and wand next. A blockage in the hose stops airflow just as much as a full canister would. You can often fix this in minutes with a simple check. For broader testing and full category picks, explore our in-depth guide to Why a Vacuum Cleaner Loses Suction Over Time and How to Fix It.
Also look at the brush roll for tangled hair and string. A stuck roller drags and reduces pick-up power on carpets. Following these checks helps you pinpoint the real problem fast.
[
[EZ_UI_BLOCK_4]
]
Also look at the brush roll for tangled hair and string. A stuck roller drags and reduces pick-up power on carpets. Following these checks helps you pinpoint the real problem fast. Sometimes the issue is not the canister at all. It could be a broken seal or a cracked hose. Shine a flashlight through each connection point. Look for gaps or visible damage. A small crack can pull air and ruin suction.
Check the belt too. A worn belt makes the brush roll spin slowly. That reduces how well the vacuum picks up dirt. Replacing a belt is cheap and easy. Find your model number and order a new one. These quick fixes save you from calling a repair tech. Most suction problems come from simple causes. A little patience and a flashlight will help you find them fast.
- Check the Hose: Disconnect the hose and shine a flashlight through to spot blockages.
- Inspect the Wand: A thin wand can trap small coins or hair ties that restrict flow.
- Clean the Brush Roll: Cut away tangled hair with scissors wrapped in a cloth for safety.
- Reset the Motor: Some vacuums have a thermal reset button on the body or plug.
- Replace the Bag: If your model uses bags, a full bag causes instant suction loss.
Quick Comparison: Canister Wash Frequency by Household Type
[
[EZ_UI_BLOCK_2]
]
Building a Weekly Cleaning Habit for Your Vacuum
Making cleaning a habit keeps your vacuum in top shape all year. Set a day each week to check the canister and filter. It only takes five minutes. Put a note on your fridge or set a phone alarm. Steadiness is more key than perfection. Even a quick rinse adds up over time. A weekly habit also helps you spot small problems early. You might notice a tiny crack or a loose seal.
Fixing it right away stops bigger damage. You can also make it a family task. Kids can help empty the canister or wipe the shell. This teaches them to care for their tools. A clean machine works better and lasts longer. It also makes your home healthier for everyone. A simple routine saves you time, money, and stress in the long run.
If you notice a musty smell after washing, add one tablespoon of baking soda to the rinse water. Baking soda neutralizes odor-causing bacteria and leaves the canister smelling fresh. Never use harsh chemical cleaners or bleach on plastic parts.
Gather required tools and clear your work area before starting.
Confirm baseline specs and maker guidelines first.
Complete each stage in order without skipping safety checks.
Run a quick test pass and wipe down key parts after use.
| Household Type | Wash Frequency | Water Temp | Dry Time |
|---|---|---|---|
| Single Pet Home | Every 2 weeks | Lukewarm | 10 to 12 hours |
| Allergy Sufferer | Weekly | Cool | 12+ hours |
| High Traffic Home | Every 7 days | Lukewarm | 10 hours |
| Multi-Pet Home | Every 5 days | Cool | 12+ hours |
| Light Use Only | Monthly | Lukewarm | 8 hours |
Final Thoughts and Next Steps
Cleaning your vacuum canister regularly keeps your home air fresh and your machine strong. You now know the safe removal steps, the right washing method. How to dry parts without damage. These simple habits protect your investment and your family’s health.
Set a weekly reminder on your phone to check the canister and filter. A few minutes of care each week saves hours of troubleshooting later. Share this guide with friends who also want to learn how to clean vacuum canister the right way.
Start your next cleaning session with confidence and the right supplies ready. Your vacuum will pull stronger, smell better, and last for many more years. A clean home starts with a clean machine, so make this routine a habit today.
Frequently Asked Questions
How Often Should I Wash the Vacuum Canister?
Wash it every one to two weeks if you vacuum daily. Homes with pets or allergy sufferers should clean the canister weekly. Less frequent use still needs a monthly wash to prevent dust buildup.
Can I Put the Vacuum Canister in the Dishwasher?
No, you should never put the canister in a dishwasher. The high heat warps plastic and damages rubber seals. Hand wash with warm water and mild soap for the safest result.
What Causes Bad Smells Inside the Canister After Cleaning?
Moisture left behind after washing often causes musty smells. Mold grows when parts stay damp. Always let the canister air dry completely before you reassemble it.
Is It Safe to Use Vinegar to Clean the Canister?
White vinegar works well for removing odors and light grime. Mix one part vinegar with three parts water and rinse thoroughly after. Never use vinegar on rubber seals or gaskets.
Why Does My Vacuum Lose Suction Right After I Wash the Canister?
Suction loss usually means the canister or filter is still wet. Water blocks airflow and strains the motor. Make sure every part is fully dry before you turn the machine back on.