Dust bunnies hide in places you cannot see. Your stick vacuum works hard to pull them out. Over time, trapped dirt slows the motor and cuts suction power. Learning How to Clean a Stick Vacuum keeps your home fresh and your machine running strong.
Many people skip regular care until the vacuum stops working well. A little routine effort saves you money and stops bad smells. This guide shows you exactly how to clean a stick vacuum in simple steps. You will learn what to wash, what to replace. How to store your tool the right way.
We break every task into small, easy actions you can finish in minutes. The tips here work for most popular stick models in 2026. Follow along and your vacuum will feel like new again.
📌 AT A GLANCE
- ✓Core Concept: Regular wash cycles stop dust buildup and keep suction strong.
- ✓Essential Step: Unplug and disassemble before you touch any wet parts.
- ✓Safety Rule: Never submerge the motor body or charge the unit near water.
- ✓Efficiency Tip: Clean the filter right after each deep job to save future effort.
In this article
Why How to Clean a Stick Vacuum Matters for Daily Performance
A stick vacuum pulls air through small openings and tight tubes. Dirt, hair, and fine dust build up inside those paths fast. When airflow gets blocked, the motor works harder and wears out sooner.
Gather required tools and clear your work area before starting.
Confirm baseline specs and maker guidelines first.
Complete each stage in order without skipping safety checks.
Run a quick test pass and wipe down key parts after use.
Clean parts let the machine pull air at full speed. You get stronger suction, quieter use, and better dust removal. In fact, a well-maintained vacuum can last years longer than a neglected one. For our complete category overview. Core buyer criteria, explore our cornerstone guide to Why Your Vacuum Cleaner Keeps Failing and Fixes.
Regular care also stops dust from blowing back into your room. You keep your floors cleaner and your air fresher with very little effort.
- Airflow Pathway: Blocked tubes force the motor to pull harder and heat up faster.
- Motor Life: Clean filters reduce strain and help the motor run cooler for longer.
- Allergy Control: Washing the dust cup and filter traps more particles inside the machine.
- Smell Prevention: Removing wet dirt stops mold and musty odors from forming inside.
- Suction Power: A clean vacuum grabs more dust in one pass and saves you time.
Taking a few minutes to care for your vacuum pays off every day. Simple habits keep your home cleaner and your tool working at its best.
Your Stick Vacuum Cleaning Toolkit and Setup Guide
Before you start, gather the right items in one place. Having everything ready stops you from pausing mid-task. A clean workspace also helps you see dirt and damage more easily.
Always wash your filter at least once a week if you vacuum daily. A quick rinse extends filter life and keeps suction steady between deep cleans.
You do not need expensive cleaners or special tools. Most items you already have in your home. The right setup makes the whole process faster and safer.
- Mild Dish Soap: A few drops in warm water clean filters and bins without harsh residue.
- Soft Microfiber Cloth: This cloth wipes dust from the body. Picks up fine particles safely.
- Small Brush or Toothbrush: A soft brush clears hair. Dust from vents and brush rolls.
- Warm Water Bowl: Use a dedicated bowl for rinsing filters and washable parts only.
- Dry Towel or Stand: A towel catches drips. A storage stand keeps the vacuum upright.
Set up your toolkit on a dry, flat surface near a sink. Make sure the vacuum is unplugged and the battery is removed if possible. This simple setup protects you and your machine during cleaning.
Step-By-Step Disassembly and Deep Cleaning Routine
Start by removing the dust cup and any attached tools. Most stick vacuums click or twist free with light pressure. Check your manual if a part feels stuck or hard to remove.
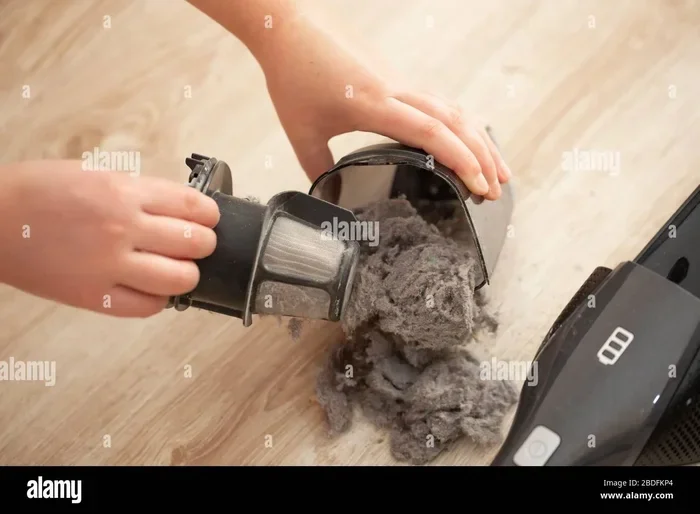
Next, tap the dust cup over a trash can to release loose debris. Use your soft cloth to wipe the inside and outside of the cup. For sticky spots, a quick rinse with warm water works well.
- Dust Cup Rinse: Hold the cup under warm water and swirl out remaining dust.
- Filter Check: Remove the filter and tap it gently to free trapped particles.
- Brush Roll Care: Use scissors or a comb to cut away hair wrapped around the roller.
- Tube Inspection: Shine a light through the tube to spot blockages or buildup inside.
- Body Wipe Down: Dampen a cloth with water. Wipe the outside to remove surface dust.
Let all washed parts air dry fully before you put them back together. Never use a hairdryer or heater to speed up drying. Heat can warp plastic parts and damage the filter material.
How to Clean a Stick Vacuum Filter and Washable Parts
The filter catches fine dust that passes through the dust cup. Over time, it fills up and slows airflow. A clean filter makes your vacuum pull harder and pick up more dirt.
Washable filters need gentle care to last longer. You rinse them under cool water and let them dry completely. Non-washable filters need regular tapping and gentle tapping to stay clear.
- Cool Water Rinse: Hold the filter under running water until the water runs clear.
- Gentle Squeeze: Press the filter softly to release water without bending the material.
- Air Dry Time: Leave the filter on a towel for at least 24 hours before reinstalling.
- Replacement Schedule: Swap out filters every 3 to 6 months for best suction results.
- Pre-Filter Screen: Rinse the mesh screen that covers the main filter to stop clogs early.
Check the filter after each deep clean to see if it looks worn or stiff. A damaged filter lets dust blow back into your room. Replacing it on time keeps your vacuum working like new.
Brush Roll and Tube Cleaning for Strong Suction
The brush roll spins fast to pull dirt from carpet fibers. Hair and string wrap around it fast, which slows the roll and strains the motor. Cleaning the roll keeps your vacuum grabbing dirt with ease. For broader testing and full category picks, explore our in-depth guide to Boost Suction How to Clean a Dyson Filter 2025 Easy.


Tubes and airways carry dust from the floor to the bin. When these paths get blocked, suction drops quickly. A little attention here fixes most common power loss issues.
- Hair Cutting: Use small scissors to cut long strands wrapped around the brush ends.
- Roller Spin Test: After cleaning, spin the roller by hand to check for free movement.
- Tube Check: Look through the tube and feel for stuck clogs with your fingers.
- Airway Blowout: Use the blower function or a gentle breath to clear loose dust from tubes.
- Suction Test: Run the vacuum on a clean floor. Feel the air pull at the nozzle.
Do these checks once a week if you vacuum daily. A few minutes of care prevents big suction drops later. Your vacuum works quieter and smoother with clear airways and a free-spinning roller.
Drying, Reassembly, and Storage Best Practices
After washing, all parts must dry completely before you put them back together. Moisture left inside causes mold and bad smells. It can also rust metal parts and damage the motor over time.
Set washed pieces on a dry towel in a well-ventilated spot. Keep the vacuum standing upright so water drains out naturally. Wait at least a full day before you use the vacuum again.
- Towel Drying: Pat parts dry with a clean towel before letting them air dry fully.
- Upright Storage: Store the vacuum standing up to stop dust from settling inside the tube.
- Battery Care: Remove the battery for long-term storage to protect the cells and prevent leaks.
- Charger Safety: Only plug the charger in when the battery is fully reinserted and dry.
- Cover Use: Use a dust cover or bag to keep the vacuum clean between uses.
Good storage habits protect your vacuum from dust and damage. A clean, dry vacuum starts working right away every time you need it. Keep your storage spot cool and dry for the best results.
Maintenance Frequency Quick Reference Table
| Task | After Each Use | Weekly | Monthly | Every 3 Months |
|---|---|---|---|---|
| Empty Dust Cup | Yes | Check | Deep Rinse | Replace if cracked |
| Washable Filter | No | Rinse | Full Dry | Replace if stiff |
| Brush Roll Check | No | Hair Cut | Deep Clean | Inspect for wear |
| Tube Clearance | No | Light Check | Full Inspection | Blowout cleaning |
| Body and Exterior | No | Wipe Down | Deep Wipe | Check for damage |
| Battery and Charger | No | Inspect Contacts | Clean Terminals | Full capacity test |
This table helps you build a simple care habit that fits your schedule. Follow the frequency that matches your home and usage level.
Common Stick Vacuum Problems and Quick Fixes
Even with good care, stick vacuums can show signs of wear. Most issues come from simple causes like blockages or full filters. Spotting the problem early helps you fix it fast.
Here is a quick look at common issues and what to check first. You can solve most problems without calling a repair service.
- Weak Suction: Check the filter, dust cup, and tube for blockages or full dirt.
- Loud Noise: A noisy vacuum often has hair stuck on the brush roll or a loose part.
- Bad Smell: A musty smell usually comes from a wet filter or trapped moisture inside.
- No Power: Check the battery charge, charging contacts, and power button for debris.
- Dust Spitting: A cracked dust cup or worn filter lets dust blow back into the air.
Fixing these issues early keeps your vacuum running smoothly and your floors cleaner. Regular checks stop small problems from turning into big repairs. For broader testing and full category picks, explore our in-depth guide to Why a Vacuum Cleaner Loses Suction Over Time and How to Fix It.
Best Practices for Long Lasting Stick Vacuum Care
Daily habits make the biggest difference in how long your vacuum lasts. Simple routines stop dirt from building up and keep parts working well. A little care each day saves you time and money later.
Never put the motorized base or battery pack in water. Water inside the motor causes short circuits and permanent damage. Always check that parts are bone dry before reassembly.
Follow these dos and donts to get the most from your stick vacuum. Good practices protect your investment and keep your home cleaner.
- Empty After Use: Always dump the dust cup after each cleaning session to keep suction strong.
- Check the Filter: Inspect the filter weekly. Rinse it when it looks dirty or gray.
- Clear the Brush: Cut away hair from the roller every week to keep it spinning freely.
- Store Upright: Keep the vacuum standing to stop dust from settling into the tube and motor.
- Avoid Wet Floors: Do not vacuum wet spills unless your model is fully sealed for wet and dry use.
- Charge Smart: Unplug the charger once the battery is full to protect battery health over time.
These best practices keep your vacuum running at top power. They also reduce wear on the motor and extend the life of your tool. A clean stick vacuum makes every cleaning session faster and more strong.
Frequently Asked Questions
How Often Should You Wash a Stick Vacuum Filter?
Wash a washable filter once a week if you vacuum daily. For light use, every two weeks works well. Always let the filter dry fully for 24 hours before putting it back in.
Can You Use Water to Clean the Dust Cup?
Yes, most dust cups are washable with warm water and mild soap. Rinse out all dust and let the cup dry completely before reattaching it. Never put the motorized base or battery in water.
Why Does My Stick Vacuum Lose Suction After a Few Minutes?
This usually happens because the filter or dust cup is full. Check the airflow path for blockages. Clean the filter if it looks gray or clogged. A full bin or blocked tube slows suction fast.
Is It Safe to Leave a Stick Vacuum Charging Overnight?
Most modern models stop charging when the battery is full. However, it is safer to unplug the charger once the light turns green. This protects battery health and stops overheating risks over time.
What Is the Best Way to Remove Hair From the Brush Roll?
Use scissors or a seam ripper to carefully cut hair wrapped around the roller ends. Pull the strands out slowly to avoid damaging the bristles. A clean brush roll spins freely and pulls dirt from carpet much better.
Do You Need to Replace the Filter If You Wash It Regularly?
Yes, filters wear out over time even with regular washing. Replace the filter every 3 to 6 months or when it looks stiff and cracked. A fresh filter keeps suction strong and traps fine dust better.
Final Thoughts and Next Steps
Cleaning a stick vacuum is simple when you break it into small steps. You protect your machine, keep suction strong, and make every cleaning session faster. A little care each week saves you time and money over the long run.
Follow the toolkit, taking apart, and drying steps from this guide. Stick to the frequency table and best practices to keep your vacuum in top shape. Your home stays cleaner and your air stays fresher with a well-maintained tool.
Start with one small habit today, like emptying the dust cup after each use. Add a weekly filter rinse and a monthly brush roll check. These simple actions keep your vacuum working like new. Your floors spotless all year long.