Replacing the belt on your Kirby vacuum cleaner is a straightforward process that anyone can master with a few simple tools and clear instructions. A functional belt is crucial for your vacuum’s performance, ensuring the brush roll spins effectively to deep clean your carpets. Don’t let a broken belt diminish your Kirby’s powerful cleaning ability; follow our step-by-step guide to quickly restore it to optimal condition. This DIY task not only saves you money but also extends the life of your trusted cleaning companion.
Hey there, fellow homeowner and Kirby enthusiast! We all know that a Kirby vacuum cleaner is a true workhorse, built to last for decades. These machines are renowned for their powerful suction and incredible durability, making them a staple in many homes. But even the best machines need a little TLC from time to time, and one of the most common maintenance tasks you’ll face is replacing the belt. Don’t worry, it’s not as daunting as it sounds! If your Kirby isn’t picking up like it used to, or if the brush roll has stopped spinning, chances are a worn-out or broken Kirby vacuum cleaner belt is the culprit.
A functional belt is the heart of your Kirby’s cleaning power when it comes to carpets. It’s responsible for transferring power from the motor to the brush roll, which agitates the carpet fibers and lifts out embedded dirt, dust, and pet hair. When the belt stretches, slips, or breaks, your vacuum’s effectiveness plummets. Instead of lugging your beloved Kirby to a repair shop, you can easily tackle this repair yourself. With a few simple tools and a bit of guidance, you’ll have your Kirby vacuum cleaner belt replaced and your machine cleaning like new in no time. Let’s roll up our sleeves and get started!
Key Takeaways
- Safety First: Always unplug your Kirby vacuum cleaner before starting any maintenance or repair work to prevent electric shock or injury.
- Right Belt Matters: Ensure you have the correct replacement belt for your specific Kirby model; using the wrong belt can lead to poor performance or further damage.
- Accessing the Belt: You’ll need to remove the nozzle and possibly the brush roll housing to gain full access to the worn or broken Kirby vacuum cleaner belt.
- Proper Installation: When installing the new belt, make sure it’s correctly seated on both the motor shaft pulley and the brush roll pulley to ensure proper tension and operation.
- Regular Inspection: Periodically check your Kirby vacuum cleaner belt for signs of wear, stretching, or damage to proactively replace it before it breaks completely.
- Tools Needed: While often simple, a flathead screwdriver and possibly a pair of pliers can be helpful for detaching stubborn parts or handling the belt.
- Test Thoroughly: After replacing the belt and reassembling your vacuum, perform a quick test to confirm the brush roll spins freely and the vacuum operates as expected.
Quick Answers to Common Questions
How often should I replace the belt on my Kirby vacuum cleaner?
It’s generally recommended to replace your Kirby vacuum cleaner belt every 6 to 12 months, or sooner if you notice a decrease in brush roll performance or if the belt breaks. Regular replacement ensures optimal cleaning power.
What happens if I use the wrong belt for my Kirby?
Using the wrong Kirby vacuum cleaner belt can lead to poor performance, as it might be too loose to effectively spin the brush roll or too tight, putting excessive strain on the motor. It could also cause premature belt breakage or damage to the vacuum.
Can I replace the belt without any special tools?
Yes, for most Kirby models, you can replace the belt with common household tools like a flathead screwdriver. Pliers can also be helpful for grasping the belt, but aren’t strictly necessary. No specialized Kirby tools are typically required for this task.
My new belt feels too tight to stretch. Is this normal?
Yes, new Kirby vacuum cleaner belts are designed to be very tight to ensure proper tension and efficient power transfer to the brush roll. It often requires a good amount of force to stretch it over the motor pulley, which is normal for a new belt.
What if my brush roll still isn’t spinning after replacing the belt?
First, double-check that the new belt is properly seated in the grooves of both the brush roll and the motor pulley. Also, ensure there are no obstructions like tangled hair in the brush roll. If the issue persists, there might be a problem with the brush roll bearings or the motor itself, which may require professional assessment.
📑 Table of Contents
Understanding Your Kirby and Why the Belt Matters
Before we dive into the nitty-gritty of replacing the Kirby vacuum cleaner belt, let’s briefly understand its role. Kirby vacuum cleaners are designed with a powerful motor that drives not only the suction fan but also a separate belt system that powers the brush roll. This brush roll is critical for deep cleaning, as its bristles agitate the carpet to loosen dirt for the vacuum to pick up. Over time, the constant friction and tension cause the belt to stretch, fray, or even snap. When this happens, the brush roll stops spinning, and suddenly your mighty Kirby feels a lot less mighty.
Recognizing the signs of a failing Kirby vacuum cleaner belt is the first step. You might notice that your vacuum isn’t picking up dirt as effectively, especially on carpets. You might also hear the motor running but not see the brush roll spinning, or perhaps you’ll hear a strange flapping noise. In some cases, the belt might simply snap, leaving the brush roll completely motionless. Fortunately, replacing the belt is a relatively inexpensive repair that significantly extends the life and performance of your Kirby. It’s a small part, but it makes a huge difference!
What You’ll Need Before You Start
Having the right tools and parts on hand makes the belt replacement process smooth and stress-free. Here’s a quick checklist:
- New Kirby Vacuum Cleaner Belt: This is crucial! Make sure you get the correct belt for your specific Kirby model. There are different types (e.g., standard, F-style, Ultimate G, Sentria, Avalir), and using the wrong one can lead to improper fit or damage. Check your owner’s manual or the belt itself for a part number.
- Flathead Screwdriver: For prying open latches or covers.
- Pliers (optional but helpful): Sometimes useful for grabbing stubborn parts or helping to stretch the new belt.
- Gloves (optional): To protect your hands from grease or sharp edges.
- A Clean Work Surface: Somewhere well-lit where you can lay out parts and not lose small screws.
- Owner’s Manual (recommended): If you have it, it can provide specific diagrams for your model.
Safety First: Preparing Your Kirby for Surgery
Before you even think about touching your Kirby with tools, the absolute most important step is to prioritize safety. You’re dealing with an electrical appliance, and accidents can happen if you’re not careful. This isn’t just a suggestion; it’s a non-negotiable rule.
Visual guide about How to Replace the Belt on a Kirby Vacuum Cleaner
Image source: indoorense.com
Unplug Your Kirby
Seriously, unplug it! Go to the wall outlet and pull the plug out completely. Don’t just turn it off; disconnect it from the power source. This prevents any accidental activation of the motor, which could cause serious injury.
Clear Your Workspace
Find a clean, well-lit area where you have enough space to maneuver your Kirby. A table or a sturdy workbench is ideal. Lay down a towel or an old sheet to protect both your surface and your vacuum from scratches or dirt. It also helps to keep small parts from rolling away.
Remove the Bag or Collection Bin
Depending on your Kirby model, you might have a cloth bag or a newer style collection bin. Removing this makes the vacuum lighter and easier to handle. It also gives you better access to certain areas, although it’s not always strictly necessary for belt replacement, it’s good practice.
Accessing the Old Belt: Getting to the Heart of the Problem
Now that your Kirby is unplugged and ready, it’s time to get down to business. The belt is located inside the nozzle assembly, which is the part that touches the floor. You’ll need to remove this from the main vacuum body first.
Detaching the Nozzle
First, lay your Kirby down on its back, so the nozzle is facing upwards. Look for the nozzle release pedal or lever, usually located near the base where the nozzle connects to the main vacuum unit. Press or flip this, and then gently pull the nozzle away from the main vacuum body. It should detach with a bit of a wiggle. Set the main vacuum body aside for a moment.
Flipping Over the Nozzle Assembly
With the nozzle detached, you’ll need to flip it over so that the underside, where the brush roll is located, is facing up. You’ll see the brush roll, which is a cylindrical brush, and often a metal or plastic plate covering the belt housing.
Removing the Brush Roll Cover (If Applicable)
Some Kirby models have a metal plate or plastic cover over the brush roll itself. This cover usually has two or three small screws holding it in place. Use your Phillips head screwdriver to remove these screws and carefully lift off the cover. Keep the screws in a safe place – you’ll need them later!
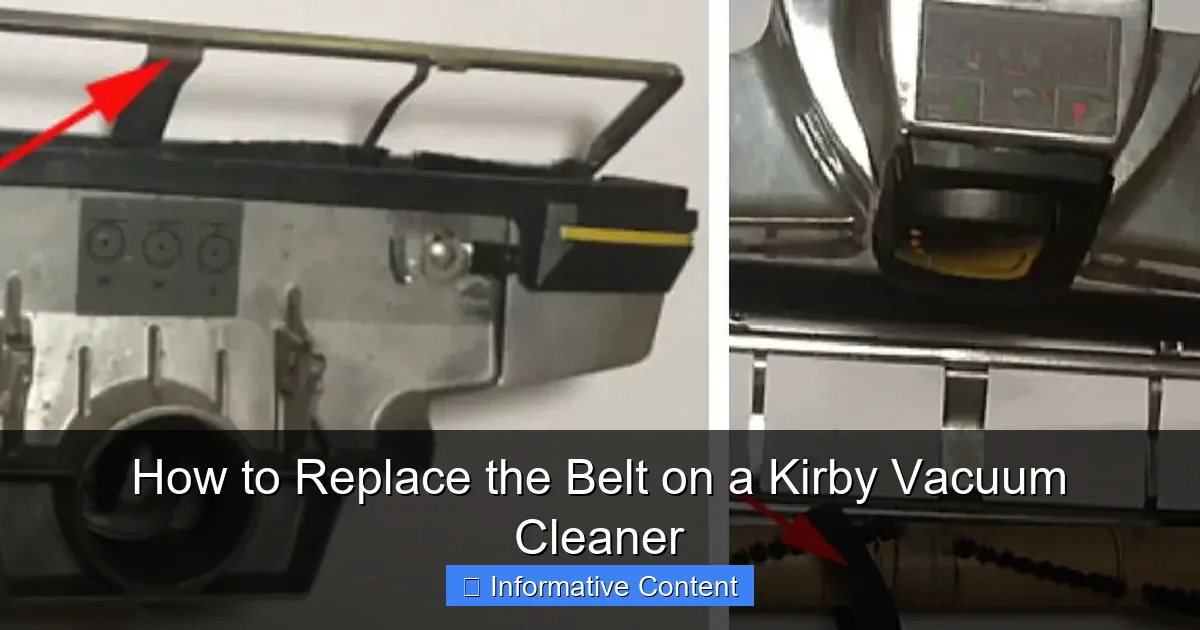
Releasing the Brush Roll Housing (for Older Models)
On many older Kirby models (like the G series or Ultimate G), the entire brush roll housing needs to be unlatched. Look for two levers on either side of the nozzle, usually black or silver, which are designed to release the housing. You might need to use your flathead screwdriver to gently pry these levers outwards or downwards. Once unlatched, the entire brush roll housing should lift up and out. Be careful as the old belt, if still intact, might be stretched and release suddenly.
Locating the Old Belt
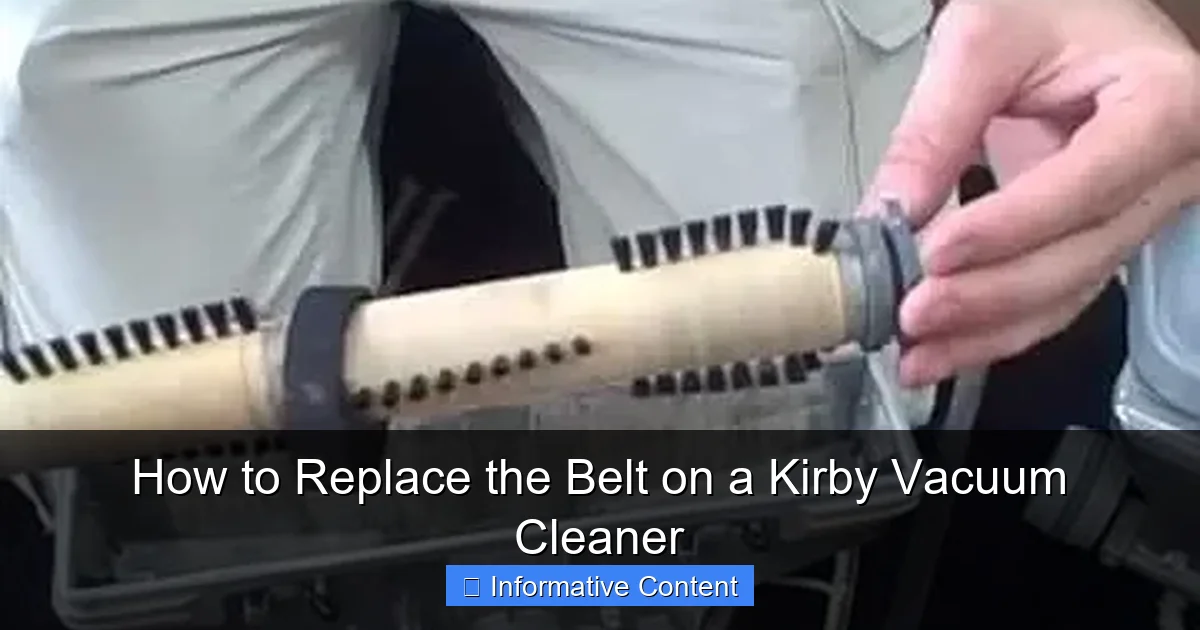
Once the brush roll housing is open or the cover is removed, you should clearly see the brush roll and the belt. The belt will be wrapped around one end of the brush roll and also around a small pulley connected to the motor shaft. It might be stretched, frayed, or completely broken and detached.
Replacing the Old Belt with a New One
This is the main event! Now that you’ve accessed the belt mechanism, it’s time to remove the old one and install its replacement. This part requires a little finesse, especially with getting the new belt stretched properly.
Removing the Old Belt
If the old belt is broken, simply remove any remaining pieces from the brush roll and the motor pulley. If it’s still intact but stretched, carefully pull it off the motor pulley first, and then slide it off the end of the brush roll. Take a moment to inspect the old belt – seeing how it was routed can help you understand how to put the new one on.
Cleaning the Area (Optional but Recommended)
Before installing the new Kirby vacuum cleaner belt, take a moment to clean any accumulated dust, hair, or debris from around the motor pulley and the brush roll ends. A clean surface ensures better belt performance and longevity. You can use a small brush or even a vacuum cleaner hose (from another vacuum!) to clear out the area.
Installing the New Kirby Vacuum Cleaner Belt
- Attach to Brush Roll: First, slide one end of the new belt onto the designated groove on the brush roll. Ensure it sits snugly.
- Position Brush Roll: Now, carefully position the brush roll back into its place within the nozzle housing. Make sure the brush roll’s end caps fit correctly into their slots.
- Stretch to Motor Pulley: Here’s the tricky part. With the brush roll in place, you need to stretch the new belt over the motor shaft pulley. This often requires a good amount of force, as new belts are designed to be tight.
- Tip for Stretching: Some people find it easier to use the flathead screwdriver to gently pry the belt over the motor pulley. Be very careful not to puncture or damage the new belt. Hook one side of the belt onto the pulley, then use the screwdriver to lever the other side over. You might hear a “snap” as it seats into place.
- Alternative Method (for some models): If your brush roll housing fully detaches, you might be able to put the belt onto the brush roll, then hook it onto the motor pulley, and then snap the entire brush roll assembly back into place. This can sometimes be easier than stretching the belt over the pulley once the brush roll is seated. Refer to your Kirby’s specific manual if unsure.
- Check Tension and Seating: Once the belt is on, rotate the brush roll by hand a few times to ensure the belt is properly seated on both the brush roll and the motor pulley. It should feel taut and not loose. The brush roll should spin freely when you turn it manually.
Reassembling Your Kirby and Testing
You’re almost there! With the new Kirby vacuum cleaner belt in place, it’s time to put everything back together and test your hard work.
Reinstalling the Brush Roll Housing/Cover
If you removed the entire brush roll housing, carefully lower it back into place. Make sure all the tabs and slots line up, then push down firmly until the locking levers click into place. If you only removed a cover plate, put it back on and secure it with the screws you set aside.
Reattaching the Nozzle
Line up the nozzle with the main vacuum body. There are usually guide rails or slots that help you align it correctly. Push the nozzle firmly onto the main unit until you hear a click or feel it lock into place. Give it a gentle tug to ensure it’s secure.
Reinsert the Bag/Collection Bin
If you removed the bag or collection bin earlier, now’s the time to put it back on.
Final Test Run
Plug your Kirby back into the wall outlet. Turn it on and lower the nozzle to the floor or into the carpet cleaning position. The brush roll should now be spinning vigorously! Listen for any unusual noises and check that the suction is restored. If the brush roll isn’t spinning, immediately unplug the vacuum and re-check the belt installation. It might not be fully seated on one of the pulleys, or you might have the wrong type of belt.
Troubleshooting and Maintenance Tips
Even after a successful Kirby vacuum cleaner belt replacement, a few tips can help you maintain your machine and troubleshoot minor issues.
Brush Roll Not Spinning After Replacement
- Is the belt properly seated? Double-check that the belt is fully in the grooves of both the brush roll and the motor pulley.
- Is it the right belt? Ensure the belt is the correct part number for your Kirby model. An incorrect belt might be too loose or too tight.
- Is the brush roll obstructed? Check for hair, string, or debris wrapped around the brush roll ends or bearings that might prevent it from spinning freely.
- Motor or other issues? If the belt is correctly installed and the brush roll is clear, but it still won’t spin, there might be a more serious issue with the motor or brush roll bearings. At this point, it might be best to consult a professional.
When to Replace the Belt
Kirby recommends replacing your belt periodically, even if it hasn’t snapped. A stretched or worn belt will still allow the brush roll to spin, but with less force, reducing cleaning effectiveness. Most Kirby belts should be replaced every 6-12 months, especially with frequent use. If you notice a reduction in brush roll performance, it’s a good indicator it’s time for a new Kirby vacuum cleaner belt.
Brush Roll Cleaning
Regularly check your brush roll for tangled hair, thread, or fibers. These can wrap around the brush roll and reduce its effectiveness, put extra strain on the belt, or even damage the motor. Use scissors to carefully cut and remove any tangles.
Congratulations! You’ve successfully replaced the belt on your Kirby vacuum cleaner. You’ve not only saved yourself money on a repair, but you’ve also gained valuable knowledge about your appliance. Your Kirby is now ready to tackle dirt and debris with its full, legendary power once again. Enjoy your sparkling clean floors!
Frequently Asked Questions
How do I know if my Kirby vacuum cleaner belt needs replacing?
You’ll typically know your Kirby vacuum cleaner belt needs replacing if the brush roll stops spinning, even though the motor is running and suction is present. Other signs include a reduction in cleaning effectiveness on carpets, a flapping noise from the nozzle area, or visible signs of wear, stretching, or breakage on the existing belt.
Are all Kirby belts the same, or do I need a specific type?
No, not all Kirby belts are the same. Kirby has produced many models over the years, and each often requires a specific belt type (e.g., standard, F-style, for Ultimate G, Sentria, Avalir models). Always check your owner’s manual or the existing belt for a part number to ensure you purchase the correct replacement Kirby vacuum cleaner belt for your specific model.
Can a stretched belt cause damage to my Kirby vacuum?
While a stretched Kirby vacuum cleaner belt might not cause immediate catastrophic damage, it significantly reduces the effectiveness of your brush roll, meaning your carpets won’t get as clean. It can also put a slight, continuous strain on the motor as it tries to compensate, potentially shortening its lifespan over a very long period. It’s best to replace it as soon as you notice it stretching.
What is the easiest way to stretch a new belt onto the motor pulley?
The easiest way to stretch a new Kirby vacuum cleaner belt onto the motor pulley is often to use a flathead screwdriver. Hook one side of the belt onto the pulley, then use the screwdriver to gently pry and lever the other side of the belt over the pulley edge until it seats correctly. Be careful not to damage the belt with the screwdriver.
Should I clean the brush roll and nozzle while replacing the belt?
Yes, absolutely! While you have the nozzle disassembled to replace the Kirby vacuum cleaner belt, it’s an excellent opportunity to clean the brush roll, remove tangled hair and debris, and clear out any gunk from the nozzle housing. This ensures optimal performance and extends the life of your new belt and brush roll.
Where can I purchase a new Kirby vacuum cleaner belt?
You can purchase a new Kirby vacuum cleaner belt from authorized Kirby distributors, most vacuum cleaner repair shops, or online retailers. Always ensure you are buying a genuine Kirby part or a high-quality, compatible replacement specifically designed for your model to guarantee proper fit and performance.