Emptying your Shark Navigator vacuum cleaner is a simple yet crucial task for maintaining its top performance and ensuring a truly clean home. This guide provides easy-to-follow, step-by-step instructions on how to properly empty the dust cup and offers valuable insights into regular maintenance and filter care to keep your Shark Navigator running efficiently for years. Follow these tips to prevent clogs, preserve suction power, and enjoy a fresher living space.
How Do You Empty a Shark Navigator Vacuum Cleaner
Ah, the trusty Shark Navigator! It’s a favorite in many homes, known for its powerful suction and ability to tackle dirt, dust, and pet hair with impressive ease. But even the best vacuum cleaner needs a little TLC to keep it running at its peak, and one of the most fundamental tasks is emptying its dust cup. If you’re new to the world of Shark Navigator vacuum cleaners or just need a refresher, you might be wondering, “How exactly do you empty a Shark Navigator vacuum cleaner?”
Don’t worry, you’re in the right place! Emptying your Shark Navigator is a surprisingly quick and simple process, designed for convenience. It’s a vital step not just for hygienic reasons, but also to ensure your vacuum maintains its powerful suction and long-term efficiency. An overfilled dust cup can lead to decreased performance, strain on the motor, and even re-release dust back into your clean air. Let’s dive in and make sure you’re getting the most out of your fantastic cleaning companion.
Understanding Your Shark Navigator’s Dust Cup
Before we get to the “how-to,” let’s quickly understand what we’re working with. Most Shark Navigator vacuum cleaners feature a bagless design, meaning they collect all the dirt and debris in a transparent dust cup or canister. This design is great because it saves you money on replacement bags and lets you see exactly how much grime you’ve collected – which can be surprisingly satisfying!
Why Regular Emptying Matters
Think of your vacuum cleaner’s dust cup like a car’s gas tank. You wouldn’t drive on fumes, would you? Similarly, an overfilled dust cup chokes your Shark Navigator, reducing its ability to suck up new dirt. Here’s why regular emptying is so crucial:
- Maintains Suction Power: A clean, empty dust cup allows for optimal airflow, which is essential for powerful suction.
- Extends Filter Life: When the dust cup is full, more debris is forced towards your filters, making them get dirty faster and requiring more frequent cleaning or replacement.
- Prevents Overheating: Reduced airflow can cause the motor to work harder, leading to potential overheating and shortening the lifespan of your Shark Navigator vacuum cleaner.
- Ensures Hygienic Cleaning: You don’t want old dust and allergens lingering in your vacuum, potentially recirculating into your home. Emptying ensures you’re always starting fresh.
Identifying When It’s Full
Your Shark Navigator is designed with a clear dust cup, so it’s usually easy to see when it’s getting full. Many models also have a “Max Fill” line. As a general rule, it’s best to empty the dust cup when debris reaches or just passes this line. For optimal performance, especially if you have pets or do a lot of cleaning, consider emptying it after every major cleaning session, even if it’s not completely full. This simple habit keeps your Shark Navigator vacuum cleaner ready for action.
Step-by-Step Guide to Emptying the Dust Cup
Now for the main event! Emptying your Shark Navigator vacuum cleaner is a breeze. Just follow these steps:
Preparation and Safety First
Before you do anything, make sure your Shark Navigator vacuum cleaner is unplugged. Safety first, always! You don’t want any accidental power-ups while you’re handling the dust cup. Choose a good spot for emptying, ideally directly over a trash can to minimize dust dispersion. If you’re sensitive to dust or have allergies, you might even consider doing this outdoors or wearing a dust mask.
Detaching the Dust Cup
This step can vary slightly depending on your specific Shark Navigator model, but the general principle is the same. Look for a release button or latch.
- For Upright Models: On many Shark Navigator upright models (like the Navigator Lift-Away series), the dust cup is located on the front of the main body. You’ll typically find a release latch or button near the top handle of the dust cup. Press this button, and the entire dust cup assembly should lift straight up and off the vacuum base.
- For Canister Models: If you have a Shark Navigator canister vacuum, the dust cup might be integrated into the main canister body, and you’ll usually press a button to detach it from the cleaning head or open a flap directly. Consult your specific model’s manual if you’re unsure.
Once detached, hold the dust cup securely.
Emptying the Debris
With the dust cup in hand, you’re ready to release the dirt.
- Locate the Bottom Release Latch: Most Shark Navigator dust cups have a bottom flap that opens to release the contents. Look for a release button or lever, usually at the very bottom or side of the dust cup. It might be clearly labeled with an arrow or “Empty.”
- Position Over Trash Can: Hold the dust cup directly over your trash can. This is important to catch all the falling debris and prevent dust clouds.
- Press the Release Button: Press the bottom release button firmly. The flap at the bottom of the dust cup will swing open, allowing all the accumulated dirt, dust, and pet hair to fall directly into the trash.
- Tap Gently (Optional): Sometimes, hair or stubborn debris might cling to the inside of the dust cup. You can gently tap the side of the dust cup against the rim of the trash can to dislodge it. Be careful not to tap too hard or damage the plastic.
Reattaching the Dust Cup
Once the dust cup is empty, close the bottom flap securely until you hear an audible click. This confirms it’s latched properly. Then, simply place the dust cup back onto your Shark Navigator vacuum cleaner, aligning it with the base. Push down gently until you hear or feel it click securely into place. Give it a gentle tug to ensure it’s firmly attached before plugging your vacuum back in.
Beyond Just Emptying: Keeping Your Shark Navigator Clean
Emptying the dust cup is a great start, but true vacuum cleaner longevity comes from a little extra care. Let’s talk about those next steps.
Tapping Out Residual Dust
Even after emptying, fine dust can coat the inside of the dust cup. After emptying, you can gently tap the sides of the dust cup against the trash can again to dislodge any remaining fine particles. Some people even use a soft brush or a dry cloth to wipe out the inside, ensuring maximum cleanliness. Just make sure it’s completely dry before reattaching if you use a damp cloth.
Wiping Down the Dust Cup Interior
Every now and then, especially if you’ve vacuumed up particularly dirty areas, you might notice a film of dust inside the dust cup. You can use a slightly damp cloth (ensure it’s not dripping wet) to wipe down the interior of the dust cup. *Crucial Tip: Allow the dust cup to air dry completely for at least 24 hours before reattaching it to your Shark Navigator vacuum cleaner. Moisture can damage the motor or create mold inside the vacuum.*
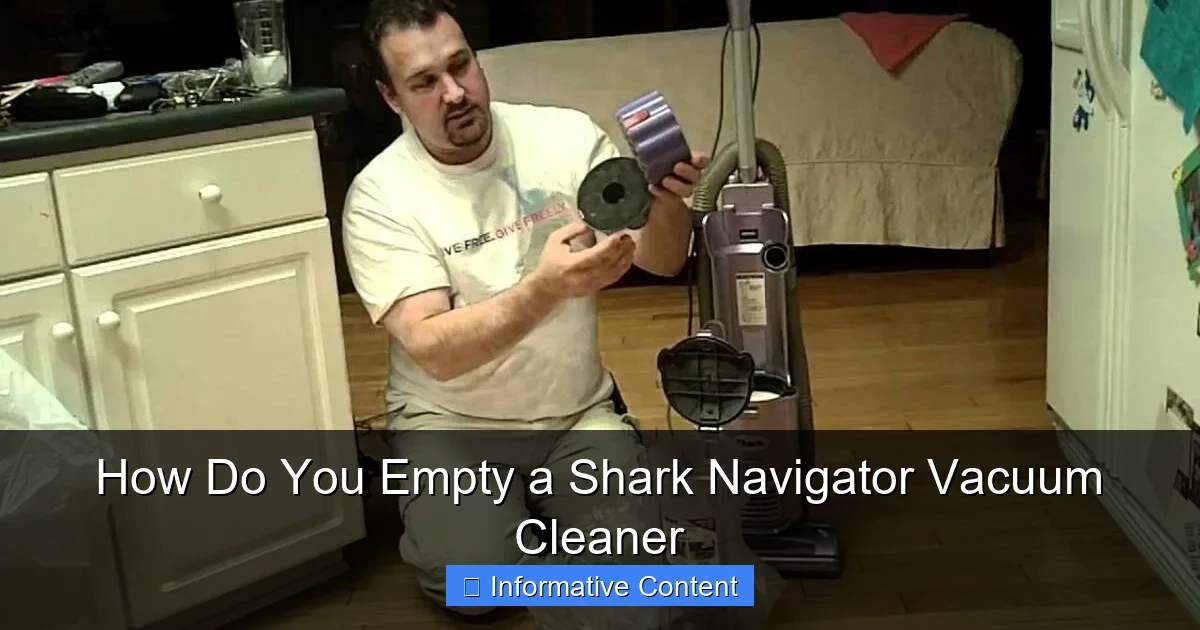
Checking and Cleaning Filters (Foam & Felt)
Your Shark Navigator vacuum cleaner comes with filters that need regular attention. Most models have foam and felt filters, usually located just above the dust cup.
- Locate Them: Once you’ve removed the dust cup, you’ll typically see the round foam and felt filters.
- Remove and Rinse: Pull them out. Rinse them thoroughly under cool, running water until the water runs clear. Gently squeeze them to remove excess water.
- Air Dry Completely: This is arguably the most important step. Lay them flat to air dry for at least 24 hours, or until they are completely, absolutely dry. Never put them back in wet!
- Frequency: Shark recommends rinsing these filters every 3 months, or more often if you use your vacuum frequently or have pets.
Checking the HEPA Filter (if applicable)
Many Shark Navigator models also feature a HEPA (High-Efficiency Particulate Air) filter, often located at the base of the vacuum or sometimes behind a removable cover on the main body.
- Locate and Remove: Refer to your manual for the exact location and removal instructions.
- Cleaning: HEPA filters are usually not rinsed with water. Instead, tap them gently over a trash can to dislodge fine dust. Some Shark HEPA filters are washable; always check your specific model’s manual for confirmation. If washable, ensure it’s completely dry before reinserting.
- Frequency: HEPA filters typically need to be cleaned (tapped) every 1-2 years, or replaced as needed.
Dealing with Clogs and Stubborn Debris
Even with regular emptying, your Shark Navigator vacuum cleaner can sometimes encounter a clog. Reduced suction is often the first sign.
Identifying a Clog
Beyond reduced suction, listen for unusual noises, like a higher-pitched whine from the motor, or notice if debris isn’t being picked up effectively.
Checking the Hose and Attachments
Often, clogs happen in the hose or attachments.
- Remove Attachments: Detach all hoses and nozzles. Look through them for any visible blockages.
- Use a Tool: A broom handle, a straightened coat hanger (be careful not to scratch the inside), or a specialized cleaning tool can help dislodge stubborn clogs in the hose.
Inspecting the Brush Roll
Hair, strings, and carpet fibers frequently get tangled around the brush roll.
- Flip Your Vacuum: Unplug the vacuum, then carefully flip the main cleaning head over.
- Cut Away Entanglements: Using scissors (be very careful not to cut the bristles or belt!), snip away any tangled hair or debris from the brush roll. This can significantly improve cleaning performance and airflow.
Best Practices for Maintenance and Longevity
Emptying and cleaning filters are foundational, but here are some additional tips to keep your Shark Navigator vacuum cleaner performing its best for years to come.
Emptying Frequency: The Golden Rule
As mentioned, aim to empty your Shark Navigator after every major cleaning session. If you only do quick spot cleans, at least empty it when the debris reaches the “Max Fill” line. Don’t let it go beyond that! This is the single easiest way to ensure consistent, powerful suction.
The “No Overfill” Rule
Never allow the dust cup to overfill. When debris surpasses the “Max Fill” line, it starts to restrict airflow significantly. This not only reduces suction but also forces the motor to work harder, generating more heat and potentially shortening its lifespan. It also means more fine dust gets pushed towards your filters, clogging them faster.
Avoiding Wet Debris
Your Shark Navigator is designed for dry vacuuming. Never attempt to pick up wet spills, liquids, or damp debris. Doing so can seriously damage the motor, electrical components, and filters, and it can also create a safety hazard. If you accidentally suck up something wet, immediately unplug the vacuum and let all affected parts dry completely, but honestly, it’s best to avoid it altogether.
Regular Deep Cleans
Periodically, give your Shark Navigator a more thorough inspection. This might include:
- Checking the wheels for tangled hair.
- Wiping down the exterior with a damp cloth.
- Inspecting the power cord for any damage.
- Ensuring all attachments are clean and free of blockages.
This kind of comprehensive check every few months can catch small issues before they become big problems.
Conclusion
There you have it! Emptying your Shark Navigator vacuum cleaner isn’t just about getting rid of dirt; it’s a vital part of its ongoing care and maintenance. By following these simple steps for detaching, emptying, and reattaching the dust cup, and by taking a few extra moments to clean your filters and check for clogs, you’re ensuring that your Shark Navigator remains a powerful, efficient cleaning tool for your home.
Think of it as a small investment of your time that pays off handsomely in superior cleaning performance, improved air quality, and the extended lifespan of your beloved vacuum. So go ahead, empty that dust cup, clean those filters, and enjoy the pristine power of your well-maintained Shark Navigator vacuum cleaner! Happy vacuuming!
Key Takeaways
- Regular Emptying is Key: For your Shark Navigator vacuum cleaner to perform its best, empty the dust cup after every use or when debris reaches the “Max Fill” line to prevent loss of suction.
- Safety First: Always unplug your Shark Navigator before detaching the dust cup or performing any maintenance to avoid accidental power-ups.
- Locate the Release Button: The dust cup is typically removed by pressing a release latch near the handle or at the top of the canister, allowing it to lift away easily.
- Empty Over a Trash Can: To minimize dust and allergens, position the dust cup directly over a trash can when pressing the bottom release button to open the flap and empty contents.
- Clean Filters Regularly: Beyond emptying, remember to regularly rinse the foam and felt filters (usually every 3 months) and tap out the HEPA filter (every 1-2 years) to maintain powerful suction and air quality.
- Prevent Clogs: Periodically check the hose, brush roll, and nozzle for tangled hair or blockages, as these can severely impact your Shark Navigator’s effectiveness.
- Avoid Overfilling: Never let the dust cup overfill past the maximum indicator, as this strains the motor and reduces cleaning efficiency of your Shark Navigator vacuum cleaner.
Quick Answers to Common Questions
How often should I empty my Shark Navigator dust cup?
You should empty your Shark Navigator dust cup after every major cleaning session or whenever the debris reaches the “Max Fill” line, whichever comes first, to maintain optimal suction.
Can I wash the entire dust cup of my Shark Navigator?
Yes, you can usually wash the dust cup itself with mild soap and water, but ensure it is completely dry (air dry for at least 24 hours) before reattaching it to the vacuum cleaner.
What should I do if the dust cup doesn’t detach easily?
Double-check that you are pressing the correct release button or latch. If it’s still stuck, consult your Shark Navigator’s user manual for specific instructions for your model, as location can vary slightly.
My Shark Navigator smells bad after emptying; what can I do?
A persistent smell usually indicates dirty filters or possibly something stuck in the hose or brush roll. Clean all filters thoroughly (foam, felt, and HEPA if applicable) and check for any remaining debris or clogs in the vacuum’s pathways.
Is it okay to vacuum fine powder like drywall dust with my Shark Navigator?
While your Shark Navigator can pick up some fine dust, regularly vacuuming large amounts of very fine powder (like drywall dust, fireplace ash, or plaster) is not recommended. These tiny particles can quickly clog filters and may pass through the filtration system, potentially damaging the motor.
Frequently Asked Questions
How do I know where the “Max Fill” line is on my Shark Navigator?
The “Max Fill” line is usually clearly marked on the side of the clear dust cup of your Shark Navigator vacuum cleaner. It indicates the maximum amount of debris the dust cup can hold before performance starts to decline and it needs to be emptied.
What if hair gets tangled inside the dust cup and won’t fall out?
If hair or fibrous debris gets tangled and sticks inside the dust cup even after opening the bottom flap, you can use your fingers, a long brush, or a slender tool to gently pull or dislodge it. Always ensure the vacuum is unplugged before reaching into the dust cup.
How often should I clean the foam and felt filters in my Shark Navigator?
Shark generally recommends rinsing the foam and felt filters every 3 months. However, if you use your Shark Navigator vacuum cleaner frequently or have pets, you might need to clean them more often to maintain optimal suction and air quality.
Can I put my Shark Navigator filters in a washing machine or dryer?
Absolutely not. Shark Navigator filters, especially the foam and felt ones, should only be rinsed by hand under cool water. They must then be air-dried completely for at least 24 hours. Washing machines and dryers can damage the filter material and render them ineffective.
My Shark Navigator has a HEPA filter. How do I clean it?
For most Shark Navigator HEPA filters, cleaning typically involves tapping them gently over a trash can to remove loose dust. Some specific models might have washable HEPA filters, but always consult your user manual for exact instructions, and ensure it’s bone-dry if washed.
What are the signs that my Shark Navigator’s filters need cleaning, even if I empty the dust cup regularly?
Even with regular emptying, signs that your Shark Navigator filters need cleaning include noticeably decreased suction power, a change in the sound of the vacuum (e.g., a higher-pitched whine), or if the vacuum starts emitting a dusty or stale odor during operation.