Getting the most out of your Shark vacuum cleaner is simpler than you might think, but understanding its unique features and proper care is key. This guide walks you through everything from initial setup and mastering versatile cleaning modes to utilizing specialized attachments and performing essential maintenance. Follow these steps to ensure your Shark delivers powerful, consistent cleaning performance and keeps your home sparkling.
How to Use Shark Vacuum Cleaner
Welcome to the family of Shark vacuum owners! You’ve made a smart choice. Shark vacuum cleaners are renowned for their powerful suction, innovative features, and impressive versatility, making household chores feel a little less daunting. Whether you’ve just unboxed a brand-new Shark or you’re looking to get more out of your trusty companion, understanding how to use it effectively is the key to a truly spotless home.
This comprehensive guide is designed to transform you into a Shark vacuum expert. We’ll walk you through everything from the initial setup to advanced cleaning techniques and essential maintenance tips. Think of this as your friendly owner’s manual, but much more engaging and packed with practical advice. Get ready to unleash the full potential of your Shark vacuum cleaner and experience a new level of clean!
Key Takeaways
- Initial Setup is Crucial: Proper assembly and understanding your specific Shark model’s components are the first steps to effective cleaning.
- Master Your Model’s Features: Familiarize yourself with unique Shark technologies like Lift-Away, DuoClean, and various power settings to optimize cleaning for different surfaces.
- Utilize Attachments Wisely: Each accessory, from pet power brushes to crevice tools, is designed for specific tasks, enhancing versatility and cleaning efficiency.
- Regular Maintenance is Non-Negotiable: Consistently emptying the dust cup, cleaning filters, and inspecting brush rolls prevents clogs, maintains suction, and prolongs your vacuum’s lifespan.
- Troubleshoot Common Issues: Be prepared to address minor problems like loss of suction or strange noises by checking for clogs and cleaning components.
- Store Your Vacuum Properly: Ensure your Shark is stored in a clean, dry place to prevent damage and keep it ready for action.
Quick Answers to Common Questions
How often should I clean my Shark vacuum filters?
The foam and felt filters (pre-motor) should be rinsed every 3 months, and the HEPA filter (post-motor) once a year. If you vacuum frequently or have pets, you might need to clean the foam/felt filters more often.
Can I wash the dust cup of my Shark vacuum cleaner?
Yes, you can wash the dust cup with mild soap and water to remove any lingering odors or stubborn grime. Ensure it is completely dry before reattaching it to the vacuum.
What should I do if my Shark vacuum suddenly loses suction?
First, check if the dust cup is full and empty it. Then, inspect all filters for dirt and clean them if necessary. Finally, check the hose, wand, and floor nozzle for any clogs or obstructions.
How do I know which attachment to use for specific tasks?
Refer to your vacuum’s manual for specific attachment descriptions. Generally, the crevice tool is for tight spaces, the dusting brush for delicate surfaces, and the pet power brush for pet hair on upholstery and stairs.
Is it safe to use my Shark vacuum on wet surfaces?
No, Shark vacuum cleaners are designed for dry vacuuming only. Using them on wet surfaces can damage the motor and poses an electrical hazard.
📑 Table of Contents
Getting Started: Unboxing and Initial Setup
Before you can start tackling dust bunnies and pet hair, your Shark vacuum needs a little attention right out of the box. Don’t worry, it’s usually a straightforward process.
Unpacking and Identifying Components
Carefully open your Shark vacuum cleaner box. Lay out all the components and refer to your specific model’s manual – it’s your best friend for identification. You’ll typically find the main vacuum body, a wand, a floor nozzle, a handle, and various attachments. Make sure nothing is missing.
Assembling Your Shark Vacuum
Most Shark vacuum cleaners are designed for easy, tool-free assembly.
- Connect the Floor Nozzle: Start by attaching the floor nozzle to the main vacuum body or wand. It usually clicks securely into place.
- Attach the Wand and Handle: Next, connect the wand to the floor nozzle and then the handle to the top of the wand. Listen for those reassuring clicks!
- Secure the Dust Cup: Ensure your dust cup is properly seated and latched onto the main unit.
- Plug It In: If you have a corded model, unravel the power cord and plug it into a suitable electrical outlet. For cordless models, ensure the battery is fully charged before first use. Refer to your manual for initial charging times.
Once assembled, take a moment to look at your Shark vacuum cleaner. Familiarize yourself with the power button, surface selector, and release buttons for attachments.
Understanding Your Shark’s Key Features
Visual guide about How to Use Shark Vacuum Cleaner
Image source: pngall.com
Shark offers a range of vacuum cleaner models, each boasting unique technologies designed to make cleaning easier. Knowing what your model can do is crucial for maximizing its performance.
Different Shark Models and Their Specialties
- Upright Vacuums: These are often powerful and robust, excellent for deep cleaning carpets and hard floors. Many feature Shark’s Lift-Away technology.
- Stick Vacuums: Lightweight and versatile, stick vacuums are perfect for quick clean-ups, smaller spaces, and reaching high areas. They often convert to handhelds.
- Cordless Vacuums: Offering ultimate freedom of movement, cordless models are great for homes with many stairs or large areas without easily accessible outlets.
- Robot Vacuums: For hands-free daily maintenance, Shark robot vacuums navigate your home, collecting dust and debris automatically.
Key Shark Technologies to Look For
- DuoClean Technology: If your Shark has DuoClean, it means it has two brush rolls working in tandem – a soft front brush for polishing hard floors and picking up large debris, and a bristled brush for deep cleaning carpets. This feature eliminates the need to switch floor heads.
- Lift-Away Technology: Found on many upright models, Lift-Away allows you to detach the canister from the upright frame. This transforms your vacuum into a portable cleaner, perfect for stairs, upholstery, or above-floor cleaning with attachments.
- Anti-Allergen Complete Seal: Many Shark vacuums feature this system along with a HEPA filter, trapping 99.9% of dust and allergens inside the vacuum, preventing them from being released back into the air. This is a huge benefit for allergy sufferers.
- Self-Cleaning Brushroll: Some advanced models come with a self-cleaning brush roll, designed to actively remove hair wrap as you clean, saving you the hassle of manually untangling hair.
Mastering Cleaning Modes and Attachments
Your Shark vacuum cleaner isn’t just a floor cleaner; it’s a versatile cleaning system. Understanding its different modes and when to use specific attachments will elevate your cleaning game.
Selecting the Right Surface Setting
Most Shark vacuums have a surface selector switch, typically located on the handle or main body.
- Hard Floor/Bare Floor Setting: This setting is ideal for wood, tile, laminate, and linoleum. It usually spins the brush rolls at a slower speed or stops them entirely to prevent scattering debris and protect delicate surfaces. For DuoClean models, the soft front brush effectively picks up fine dust and large crumbs.
- Carpet/Low Pile Carpet Setting: This increases the brush roll speed to agitate carpet fibers and lift embedded dirt.
- Thick Carpet/Area Rug Setting: For plush carpets or thicker area rugs, this setting often reduces suction slightly or adjusts brush roll speed to make pushing easier and prevent the vacuum from “sucking down” too hard on the carpet.
Always choose the appropriate setting to prevent damage to your floors and ensure optimal cleaning performance.
Unleashing the Power of Attachments
Shark vacuums come with a range of specialized tools. Don’t let them sit in the closet!
- Crevice Tool: This long, slender tool is perfect for reaching into tight corners, along baseboards, between couch cushions, and around car seats.
- Dusting Brush: With soft bristles, this attachment is ideal for cleaning delicate surfaces like blinds, lampshades, bookshelves, electronics, and intricate moldings without scratching.
- Pet Power Brush/Motorized Pet Tool: If you have pets, this is a game-changer. It has a rotating brush designed to lift stubborn pet hair and dander from upholstery, stairs, and pet beds.
- Upholstery Tool: A wider, non-motorized tool designed to clean larger fabric surfaces like sofas, chairs, and curtains.
- Under-Appliance Wand: Some models include a flexible, flat wand specifically designed to reach under low-lying appliances like refrigerators and ovens.
Tip: When using attachments, especially with Lift-Away mode, always ensure the main floor nozzle is disconnected and the appropriate accessory is securely attached to the wand or hose.
Essential Maintenance for Longevity
A Shark vacuum cleaner is an investment, and like any investment, it requires proper care to perform its best and last for years. Regular maintenance isn’t just about cleaning your vacuum; it’s about maintaining its powerful suction and efficiency.
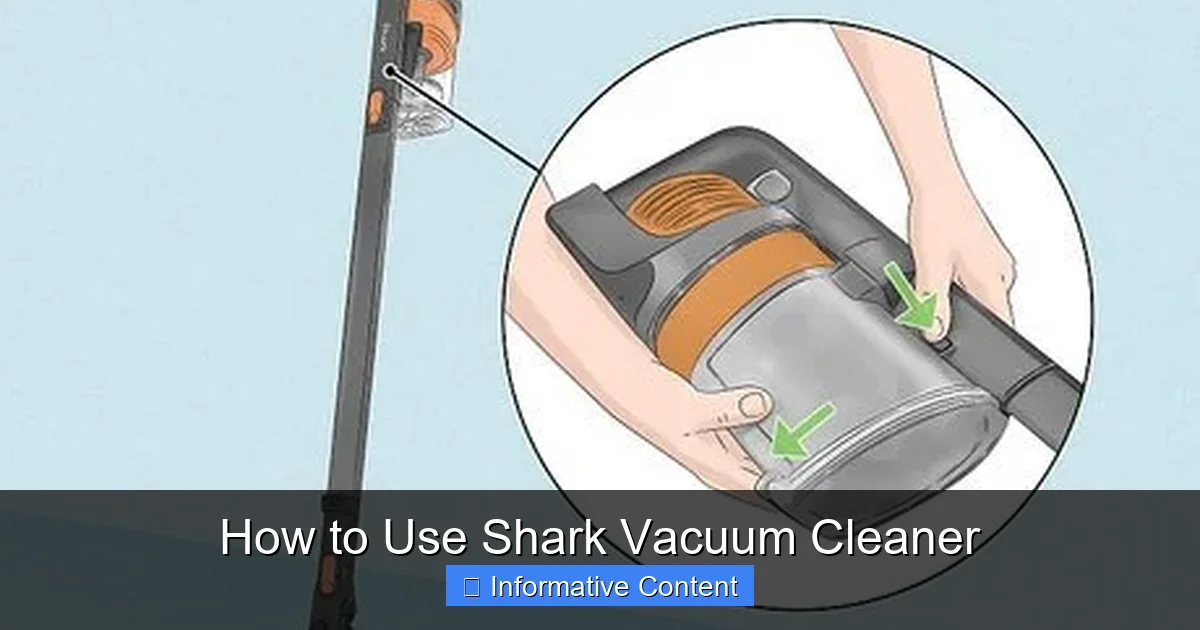
Emptying the Dust Cup
This is perhaps the most frequent maintenance task.
- How Often: Aim to empty the dust cup after every use, or when the debris reaches the “Max Fill” line, whichever comes first. Overfilling reduces suction.
- The Process: Locate the dust cup release button (usually near the top of the canister). Remove the dust cup, position it over a trash can, and press the bottom release latch. Some models have a top release as well for more thorough emptying.
Cleaning Filters
Shark vacuums typically have multiple filters that need regular cleaning.
- Foam and Felt Filters (Pre-Motor): These are usually located above the dust cup.
- Frequency: Rinse every 3 months, or more often if you vacuum frequently or have pets.
- How To: Remove the filters and rinse them under cold running water until the water runs clear. Gently squeeze out excess water.
- Drying: IMPORTANT! Allow filters to air-dry completely for at least 24 hours before reinserting them. Never use a hairdryer or place them in a dryer.
- HEPA Filter (Post-Motor): This filter is usually located at the very bottom or back of the vacuum.
- Frequency: Rinse once a year, or as recommended by your specific model’s manual.
- How To: Rinse under cold water, filter-side down, until water runs clear.
- Drying: Allow to air-dry for at least 24 hours.
Caution: Never operate your Shark vacuum cleaner without all filters properly installed and completely dry. This can damage the motor and void your warranty.
Brush Roll Maintenance
Hair and debris can easily get wrapped around your brush rolls, hindering their performance.
- Inspection: Regularly flip over the floor nozzle and visually inspect the brush rolls.
- Removing Tangled Hair: Use scissors (carefully!) to cut away any hair or strings wrapped around the brush rolls. Some Shark models have a groove for easy cutting. For models with a soft “DuoClean” brush, check for debris stuck between the bristles.
- Self-Cleaning Brushroll: Even with self-cleaning brush rolls, a periodic check is a good idea to ensure they are functioning optimally.
Troubleshooting Common Issues
Even the most reliable Shark vacuum cleaner can encounter minor hiccups. Here are some quick fixes for common problems.
Loss of Suction
This is the most common complaint and usually the easiest to fix.
- Check the Dust Cup: Is it full? Empty it!
- Inspect Filters: Are your foam and felt filters dirty? Give them a thorough rinse and let them dry completely.
- Look for Clogs:
- Hose: Detach the hose and carefully look through it for blockages. Use a broom handle or similar blunt object to push through any clogs.
- Wand/Attachments: Check these for obstructions.
- Floor Nozzle/Brush Rolls: Remove the brush roll cover (if applicable) and check the air pathway for blockages.
Brush Roll Not Spinning
If your brush roll isn’t doing its job, here’s what to check:
- Surface Setting: Ensure you’re on the correct carpet setting (not hard floor) where the brush roll is designed to spin.
- Power: Is the vacuum powered on and plugged in?
- Clogs/Hair Wrap: Excessive hair or debris wrapped around the brush roll can prevent it from spinning. Clear any obstructions.
- Belt: While less common in newer Shark models, a broken or worn belt could be the issue. Refer to your manual for specific model advice.
- Motor Overheat: If the vacuum overheated, it might have shut off the brush roll. Turn off and unplug the vacuum, clear any clogs, and let it cool for at least an hour before trying again.
Vacuum Smells Bad
A foul odor usually indicates trapped organic matter.
- Empty and Clean Dust Cup: Thoroughly wash the dust cup with mild soap and water, then dry completely.
- Clean Filters: Rinse all filters as described above.
- Inspect Brush Rolls and Hose: Check for anything stuck and rotting – especially pet hair, food particles, or mold.
- Clean the Vacuum Body: Wipe down the exterior of your Shark vacuum cleaner with a damp cloth.
Conclusion: Keep Your Shark Roaring!
You’re now equipped with the knowledge to not only use your Shark vacuum cleaner effectively but also to maintain it, troubleshoot common issues, and harness its full cleaning power. Remember, consistent cleaning and proper care are the best ways to ensure your Shark remains a powerful ally in your fight against dirt and dust.
Regular maintenance extends your vacuum’s lifespan and keeps its suction strong, providing you with a clean, healthy home environment. So go ahead, tackle those messes with confidence – your Shark vacuum is ready for action! Happy cleaning!
Frequently Asked Questions
How do I assemble my Shark vacuum cleaner out of the box?
Most Shark vacuum cleaners feature snap-together components. Start by connecting the floor nozzle to the main body or wand, then attach the wand to the handle. Ensure all parts click securely into place. Consult your specific model’s manual for detailed, step-by-step instructions.
What is the “Lift-Away” feature on my Shark vacuum, and how do I use it?
The Lift-Away feature, common on many upright Shark models, allows you to detach the main canister from the floor nozzle frame with a push of a button. This transforms your vacuum into a portable cleaner, perfect for easily cleaning stairs, upholstery, or high areas with attachments.
My Shark vacuum cleaner isn’t picking up debris effectively. What could be wrong?
Ineffective pickup is often due to a full dust cup, dirty filters needing a rinse, or a clog in the hose, wand, or floor nozzle. Ensure all components are clear of obstructions and filters are clean and completely dry before trying again.
How do I clean pet hair off my upholstery with a Shark vacuum?
For pet hair on upholstery, utilize your Shark’s specialized pet power brush or motorized pet tool attachment. These tools feature rotating brushes designed to agitate and lift stubborn pet hair from fabric surfaces more effectively than standard attachments.
Can I use my Shark vacuum on both carpet and hard floors?
Yes, most Shark vacuum cleaners are designed for multi-surface cleaning. Many models include a surface selector switch, allowing you to optimize suction and brush roll speed for either hard floors (slower or off brush roll) or carpets (faster brush roll agitation).
What does it mean if my Shark vacuum cleaner smells like burning?
A burning smell often indicates that the brush roll is obstructed and struggling to spin, or the motor is overheating due to a severe clog or very dirty filters. Immediately turn off and unplug the vacuum, check for blockages in the brush roll and air pathways, and clean all filters to prevent damage.