Learning how to use a Shark vacuum cleaner can transform your cleaning routine, making it efficient and hassle-free. This guide covers everything from understanding your model and initial setup to mastering different cleaning modes, utilizing specialized attachments, and performing essential maintenance for long-lasting performance. You’ll gain practical tips to tackle various surfaces and common issues, ensuring your home stays spotless with ease.
You’ve just unboxed your shiny new Shark vacuum cleaner, and you’re ready to tackle that dust and debris. But wait! Before you plunge into a cleaning frenzy, taking a moment to truly understand how to use a Shark vacuum cleaner can make all the difference. These powerful machines are renowned for their innovative features, strong suction, and adaptability, but unlocking their full potential requires a little know-how.
Whether you’re dealing with stubborn pet hair, fine dust on hardwood floors, or embedded dirt in plush carpets, a Shark vacuum is designed to handle it all. From their iconic Lift-Away technology to specialized anti-hair wrap brush rolls, there’s a lot under the hood. This comprehensive guide will walk you through every step, ensuring you get the most out of your Shark, making your cleaning routine not just effective, but genuinely satisfying. Let’s transform your cleaning game and learn exactly how to use a Shark vacuum cleaner like a pro!
Key Takeaways
- Understand Your Model: Shark offers various vacuum types (upright, stick, handheld, robot). Familiarize yourself with your specific model’s features and components by checking the user manual.
- Proper Assembly is Key: Ensure all parts are securely connected according to the instructions. This prevents common issues and ensures optimal performance from day one.
- Master Floor Settings: Adjust your Shark vacuum cleaner’s floor settings (hard floor, carpet, area rug) to match the surface you’re cleaning, maximizing suction and preventing damage.
- Utilize Attachments Wisely: Don’t overlook the specialized tools! Crevice tools, dusting brushes, upholstery tools, and pet multi-tools significantly enhance cleaning effectiveness for different areas and debris.
- Regular Maintenance is Crucial: Consistently empty the dust cup, wash and replace filters, and clear brush rolls. This prevents loss of suction, extends the lifespan of your Shark vacuum, and maintains peak cleaning power.
- Troubleshoot Common Issues: Be prepared to address minor problems like loss of suction or brush roll jams. Often, these can be resolved with simple checks and cleaning procedures.
Quick Answers to Common Questions
How often should I clean my Shark vacuum filters?
You should wash your pre-motor foam and felt filters at least once a month, or more often if you have pets or allergies. The post-motor HEPA filter (if washable) typically needs cleaning annually, but always check your specific model’s manual.
Can I use my Shark vacuum on wet surfaces?
No, Shark vacuum cleaners are designed for dry vacuuming only. Using them on wet surfaces can damage the motor and electrical components, and could pose a safety hazard.
My Shark vacuum cleaner has lost suction, what should I check first?
First, check if the dust cup is full and needs emptying. Next, inspect all filters to see if they are dirty and need washing or replacing. Finally, check the hose, wand, and brush roll for any blockages or clogs.
What is the Lift-Away feature on a Shark vacuum?
The Lift-Away feature allows you to detach the main canister from the upright floor nozzle, transforming your vacuum into a portable canister for easy cleaning of stairs, furniture, and hard-to-reach areas above the floor.
How do I prevent pet hair from tangling in the brush roll?
Many newer Shark vacuums feature anti-hair wrap technology. For older models or persistent tangles, regularly check and manually remove hair from the brush roll using scissors. Using specialized pet tools can also help manage pet hair effectively.
📑 Table of Contents
Understanding Your Shark Vacuum Model
Before you even think about plugging it in, the very first step in learning how to use a Shark vacuum cleaner is to understand the specific model you own. Shark offers a diverse range of vacuums, each with unique features tailored for different cleaning needs. Knowing your model will help you use it most effectively.
Different Shark Vacuum Types
- Upright Vacuums: These are the classic, powerful workhorses, great for whole-house cleaning, especially larger carpeted areas. Many Shark uprights feature the popular Lift-Away technology.
- Stick Vacuums: Lightweight and versatile, stick vacuums are perfect for quick clean-ups and smaller spaces. Many are cordless, offering ultimate maneuverability.
- Handheld Vacuums: Compact and portable, these are ideal for small messes, car interiors, and upholstery.
- Robot Vacuums: For hands-free cleaning, Shark’s robot vacuums navigate your home autonomously, keeping daily dust at bay.
- Canister Vacuums: While less common in the Shark lineup, some models offer a canister design, providing strong suction with a lightweight wand.
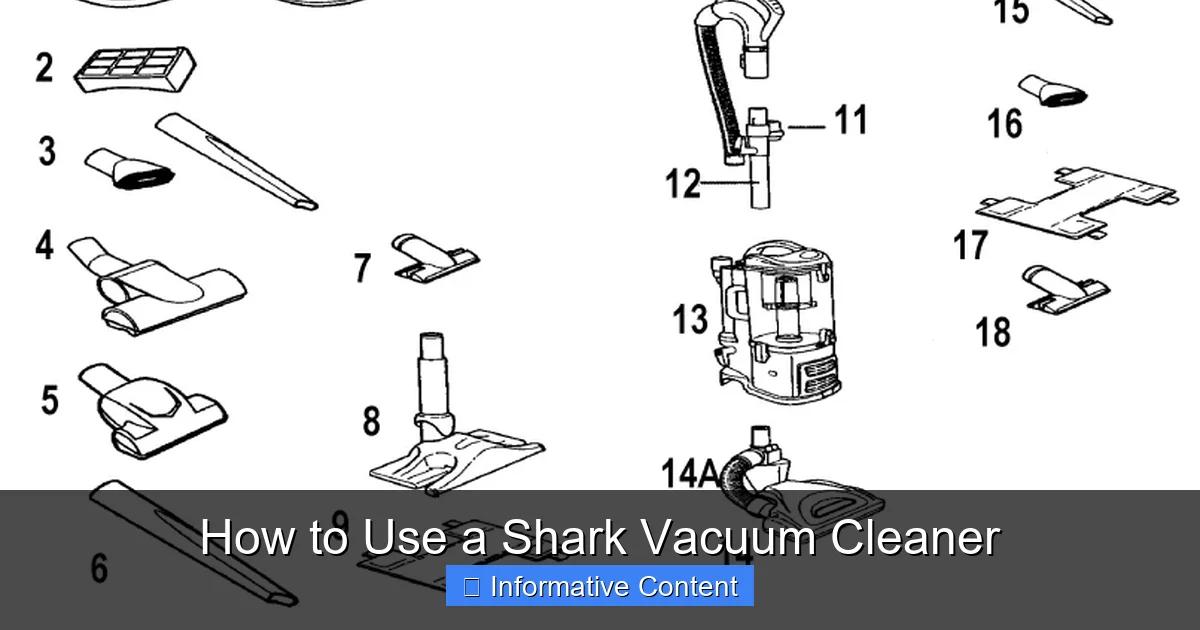
Key Components to Know
No matter your model, several components are common across most Shark vacuum cleaners. Familiarizing yourself with these parts is crucial for proper operation and maintenance.
- Power Button: Sounds obvious, right? But some models have multiple power settings or floor mode selectors integrated.
- Dust Cup/Dirt Bin: This is where all the debris gets collected. Knowing how to detach, empty, and reattach it is fundamental.
- Filters: Shark vacuums typically have several filters (pre-motor foam and felt filters, post-motor HEPA filter). These are vital for trapping dust and allergens.
- Brush Roll(s): Located at the base, these motorized brushes agitate carpet fibers to lift dirt. Many Shark models feature different brush rolls for various surfaces, or innovative anti-hair wrap technology.
- Hose and Wand: For above-floor cleaning and accessing tight spaces, the hose and detachable wand are indispensable.
- Attachments/Tools: Every Shark vacuum cleaner comes with a suite of tools like a crevice tool, dusting brush, and upholstery tool. We’ll dive deeper into these later!
Reading Your User Manual: Your First Best Friend
Yes, we know, who reads manuals? But seriously, your Shark vacuum cleaner’s user manual is packed with model-specific instructions, safety warnings, and assembly diagrams. It’s your definitive guide to how to use a Shark vacuum cleaner correctly and safely. Take a few minutes to skim through it – you might discover features you didn’t even know you had!
Getting Started: Assembly and First Use
Alright, let’s get this show on the road! Once you’ve familiarized yourself with the parts, it’s time to put your Shark vacuum cleaner together and get it ready for its inaugural clean.
Visual guide about How to Use a Shark Vacuum Cleaner
Image source: m.media-amazon.com
Unboxing and Basic Assembly
Shark vacuums are generally straightforward to assemble. Most models snap together in just a few steps. You’ll typically connect the main body to the floor nozzle, then attach the handle or wand. For cordless models, the battery usually clicks into place. Always refer to your manual for specific assembly instructions, as some models might have unique requirements. Ensure all connections are secure; loose parts can affect performance and potentially cause damage.
Powering Up Your Shark
- Corded Models: Simply plug your Shark vacuum cleaner into a grounded electrical outlet. Ensure the cord is long enough to reach your cleaning area or use an extension cord rated for the vacuum’s wattage. Be mindful of tripping hazards.
- Cordless Models: If you have a cordless stick or handheld Shark vacuum, you’ll need to ensure the battery is charged. Many cordless models come with a partial charge, but a full charge before the first use is recommended to optimize battery life.
Initial Charge for Cordless Models
For cordless Shark vacuum cleaners, battery care starts from day one. Place the battery on its charging dock or plug the vacuum directly into its charger. Check the indicator lights on the battery or vacuum – they will typically show when charging is in progress and when it’s complete. A full charge can take a few hours, so plan accordingly.
Mastering Cleaning Modes and Attachments
This is where the real magic happens! Your Shark vacuum cleaner isn’t just a one-trick pony. It’s designed with versatility in mind. Knowing when and how to switch modes and use attachments will elevate your cleaning prowess.
Floor Settings: Hardwood, Carpet, Area Rug
Most Shark upright and stick vacuums offer different floor settings to optimize cleaning for various surfaces. These settings adjust the brush roll speed and sometimes suction power.
- Hard Floor Setting: On this setting, the brush rolls typically spin at a lower speed or even pause completely. This prevents scratching delicate floors and scattering debris. Some Shark models have soft brush rolls specifically for hard floors.
- Carpet Setting (Low Pile/Area Rug): This setting is ideal for most carpets, providing sufficient brush roll agitation to lift dirt without being too aggressive.
- Thick Carpet/High Pile Setting: For deeper pile carpets, some Shark vacuums have a dedicated setting that increases brush roll speed and suction. Be careful not to use this on delicate rugs, as it could cause damage.
Always switch settings when moving between different floor types. You’ll usually find these controls on the handle or floor nozzle.
Using Specialized Attachments
The attachments that come with your Shark vacuum cleaner are not just extras; they are powerful tools designed to tackle specific cleaning challenges. Learning how to use a Shark vacuum cleaner effectively means leveraging these tools.
- Crevice Tool: This long, narrow tool is perfect for reaching into tight corners, along baseboards, between couch cushions, and inside your car. It’s excellent for picking up crumbs and fine dust.
- Dusting Brush: With soft bristles, this tool is ideal for delicate surfaces like blinds, lamp shades, shelves, and electronics. It gently removes dust without scratching.
- Upholstery Tool: Designed for fabrics, this tool often has a wider mouth and sometimes includes lint strips to pick up pet hair, crumbs, and dust from sofas, chairs, and curtains.
- Pet Multi-Tool (or similar): Many Shark vacuums come with a specialized tool for pet owners. These often combine an upholstery tool with stiff bristles to effectively remove embedded pet hair from furniture and stairs.
- Under-Appliance Wand: If your model includes one, this long, flat tool is fantastic for reaching under refrigerators, stoves, and other heavy appliances to grab dust bunnies and crumbs that hide out of sight.
- Motorized Pet Tool: Some models feature a mini motorized brush roll tool, perfect for deep cleaning pet beds, stairs, and upholstery where a full-sized brush roll can’t reach.
To attach these tools, simply detach the main hose or wand from the floor nozzle and click the desired attachment into place. For Lift-Away models, you can carry the canister around for easy above-floor cleaning.
Lift-Away Feature (if applicable)
Many Shark upright models boast the incredible Lift-Away feature. This allows you to detach the canister from the main floor nozzle, turning your upright vacuum into a portable canister vacuum. This is brilliant for cleaning stairs, high ceilings, curtains, or under furniture without lugging the entire unit around. Simply press the “Lift-Away” button, lift the canister, and attach your chosen tool to the hose or wand.
Effective Cleaning Techniques for Different Surfaces
Now that you know your machine, let’s talk technique. Proper cleaning methods will not only give you better results but also help prolong the life of your Shark vacuum cleaner.
Tackling Hard Floors
When cleaning hard floors (hardwood, tile, laminate), always use the hard floor setting. This prevents the powerful brush roll from scattering debris or scratching delicate surfaces. For best results:
- Go Slow: Move at a steady pace to allow the vacuum to pick up all the dust and dirt.
- Overlap Strokes: Slightly overlap each pass to ensure no spots are missed.
- Edges and Corners: Use the crevice tool for baseboards and tight corners where the main nozzle can’t reach.
- Don’t Forget Under Furniture: If your Shark allows, use the wand or an under-appliance tool to reach hidden dusty spots.
Conquering Carpets and Rugs
For carpets, switch to the appropriate carpet setting. The brush roll is key here, agitating the fibers to release trapped dirt and debris.
- Multiple Passes: For heavily trafficked areas or deeply embedded dirt, make several passes over the same spot.
- Change Directions: Vacuuming in different directions (e.g., perpendicular to your initial passes) can help lift more dirt from carpet fibers.
- Area Rugs: Be cautious with delicate or fringed area rugs. You might need to use a lower suction setting or even switch to a hard floor setting if the brush roll is too aggressive. The Lift-Away feature with a gentle attachment can also be a good option.
Above-Floor Cleaning and Tight Spots
This is where the attachments truly shine. When learning how to use a Shark vacuum cleaner for these tasks, remember versatility is your friend.
- Ceilings and Vents: Attach the dusting brush to the wand to reach high cobwebs and dust vents.
- Curtains and Blinds: Use the dusting brush on a low suction setting to gently clean blinds and curtains without pulling them down.
- Upholstery: The upholstery tool or pet multi-tool is perfect for sofas, chairs, and pet beds. Work in small sections, overlapping your strokes.
- Stairs: The Lift-Away feature combined with a motorized pet tool or crevice tool makes stair cleaning much easier and more effective.
Dealing with Pet Hair: A Shark Specialty
Shark vacuums are famous for their ability to handle pet hair. Many models feature anti-hair wrap technology, preventing hair from tangling around the brush roll. For maximum pet hair removal:
- Use Pet-Specific Tools: Always use the specialized pet power brush or multi-tool for upholstery, stairs, and pet beds.
- Consistent Vacuuming: Regular, even daily, vacuuming can prevent pet hair from building up and becoming embedded.
- Check Brush Roll: Even with anti-hair wrap, it’s good practice to periodically check the brush roll for any residual tangles.
Maintaining Your Shark for Optimal Performance
Your Shark vacuum cleaner is an investment. Proper and regular maintenance is crucial to ensure it continues to perform at its peak and has a long lifespan. This is a vital part of knowing how to use a Shark vacuum cleaner effectively.
Emptying and Cleaning the Dust Cup
This is perhaps the most frequent maintenance task. A full dust cup reduces suction power. Always empty it after each significant use, or when the debris reaches the max fill line.
- How-To: Press the dust cup release latch, lift it off, position it over a trash can, and press the bottom release button. Some models have a top release too.
- Deep Clean: Periodically, wipe the inside of the dust cup with a damp cloth to remove fine dust buildup. Ensure it’s completely dry before reattaching.
Washing and Replacing Filters
Filters are your vacuum’s lungs. Clogged filters dramatically reduce suction and can put a strain on the motor. Shark vacuums typically have washable foam and felt filters (pre-motor) and sometimes a HEPA filter (post-motor).
- Pre-Motor Filters (Foam & Felt): These should be washed at least once a month (more often if you have pets or allergies). Rinse them under cold running water until the water runs clear. Squeeze out excess water and let them air dry completely for at least 24 hours before reinstalling. Never put them in a dryer.
- Post-Motor HEPA Filter: Check your manual for specific instructions. Some HEPA filters are washable annually, while others are designed for replacement. If washable, follow the same cold water rinsing and air-drying process.
- Replacement: Even washable filters need replacing every 1-2 years, or more frequently if you notice a persistent odor or loss of suction even after cleaning.
Checking and Clearing Brush Rolls
Even with anti-hair wrap technology, things can get tangled. Inspect your brush rolls regularly for hair, strings, or debris that might be wrapped around them.
- How-To: Unplug the vacuum. Flip the floor nozzle over. Use scissors or a seam ripper to carefully cut away any tangled hair or threads. Be careful not to damage the bristles or the brush roll itself.
- Soft Rollers (DuoClean/PowerFins): If your Shark has a soft front roller, check it for debris and wipe it clean with a damp cloth.
Inspecting Hose and Attachments
Loss of suction can often be traced back to a clog in the hose or attachments. Regularly check these areas.
- How-To: Detach the hose and attachments. Look through them for any blockages. Use a broom handle or a long, blunt object to carefully push out any clogs. Never use sharp objects that could puncture the hose.
Battery Care (for cordless models)
To maximize the life of your cordless Shark vacuum cleaner’s battery:
- Don’t Overcharge: Once the battery is full, remove it from the charger if recommended by the manual (some smart chargers manage this automatically).
- Store Properly: If storing the vacuum for an extended period, ensure the battery has a partial charge (around 50%) rather than being fully charged or completely drained.
- Avoid Extreme Temperatures: Don’t store or charge the battery in very hot or very cold environments.
Troubleshooting Common Shark Vacuum Issues
Even the best machines can run into minor hiccups. Knowing how to troubleshoot common problems can save you a service call and get you back to cleaning quickly.
Loss of Suction
This is the most common complaint, and usually the easiest to fix.
- Check Dust Cup: Is it full? Empty it!
- Inspect Filters: Are they dirty? Clean or replace them.
- Look for Clogs: Check the hose, wand, floor nozzle, and attachments for blockages.
- Brush Roll: Is the brush roll spinning freely? Excessive hair or debris can impede its rotation and affect suction.
- Seals: Ensure all parts are securely assembled, as loose connections can cause suction leaks.
Unusual Noises or Odors
- Grinding/Rattling: Could be an obstruction in the brush roll or a foreign object picked up in the hose. Unplug and inspect.
- Burning Smell: Immediately turn off and unplug the vacuum. This could indicate a motor issue, a severely clogged filter, or something wrapped tightly around the brush roll causing friction. Clean filters, clear brush roll, and if it persists, contact support.
- Musty Odor: Usually indicates dirty filters or a dirty dust cup. Clean or replace filters and wash the dust cup thoroughly.
Brush Roll Not Spinning
- Power/Floor Setting: Ensure the vacuum is on and the correct floor setting is selected (some hard floor settings pause the brush roll).
- Obstruction: Turn off and unplug the vacuum. Check the brush roll for tangled hair, strings, or debris that might be jamming it.
- Belt: Less common in modern Shark vacuums, but if there’s a drive belt, it might be broken or dislodged. Consult your manual or contact support.
Power Problems
- No Power (Corded): Check the plug, the outlet, and your circuit breaker. Inspect the power cord for any damage.
- No Power (Cordless): Is the battery charged? Is it properly inserted? Is the charger working?
Conclusion
Congratulations! You’re now equipped with the knowledge of how to use a Shark vacuum cleaner to its fullest potential. From selecting the right floor setting to utilizing those clever attachments and performing essential maintenance, you’re ready to tackle any cleaning challenge your home throws at you. Remember, a well-maintained Shark vacuum cleaner isn’t just a cleaning tool; it’s a powerful ally in keeping your home spotless and allergen-free for years to come. Happy cleaning!
Frequently Asked Questions
How do I know which floor setting to use on my Shark vacuum?
Most Shark vacuums have clear indicators for hard floor and carpet settings. For hard floors, select the setting that either stops or slows down the brush roll to prevent scattering debris and scratching. For carpets, choose the appropriate carpet setting to engage the brush roll for effective deep cleaning.
Can I wash my Shark vacuum’s dust cup?
Yes, you can typically wash the dust cup with mild soap and water. Ensure it is completely dry before reattaching it to the vacuum to prevent mold or mildew growth and damage to the electrical components.
What are the benefits of using the different attachments with my Shark vacuum?
Attachments like the crevice tool, dusting brush, and upholstery tool significantly enhance your Shark vacuum’s versatility. They allow you to clean tight spaces, delicate surfaces, furniture, and tackle specific messes like pet hair more effectively than the main floor nozzle alone.
How often should I empty the dust cup of my Shark vacuum cleaner?
It’s best practice to empty the dust cup after each cleaning session, or whenever debris reaches the “max fill” line. An overfilled dust cup can reduce suction power and efficiency, making your vacuum work harder.
My cordless Shark vacuum isn’t holding a charge. What could be wrong?
If your cordless Shark vacuum isn’t holding a charge, first ensure the battery is properly seated and the charger is working correctly. Over time, all rechargeable batteries degrade; it might be time to replace the battery pack if it’s several years old or consistently performing poorly.
Is it necessary to use genuine Shark replacement parts for my vacuum?
While third-party replacement parts might be cheaper, using genuine Shark replacement parts (especially filters and brush rolls) is generally recommended. Genuine parts are designed to fit perfectly and maintain your vacuum’s performance and warranty, ensuring optimal suction and filtration.