Is your Shark vacuum cleaner’s brush roll no longer spinning? It’s likely a broken belt! This 2025 guide provides an easy, step-by-step process to help you replace the belt on your Shark vacuum cleaner, saving you time and money. Learn to restore your vacuum’s powerful cleaning performance quickly and efficiently, ensuring your home stays spotless.
How to Replace the Belt on a Shark Vacuum Cleaner 2025 Easy
Hey there, fellow homeowner! Is your trusty Shark vacuum cleaner suddenly acting sluggish? Perhaps the brush roll has stopped spinning, leaving behind stubborn dirt and debris? Don’t fret! A common culprit for this problem is a broken or stretched vacuum cleaner belt. The good news is, learning how to replace the belt on a Shark vacuum cleaner is a simple and rewarding DIY task that can save you a trip to the repair shop and some hard-earned cash.
As of 2025, Shark continues to be a popular brand known for its powerful suction and innovative designs. While their vacuums are built to last, wear and tear on components like the drive belt are inevitable. This comprehensive guide will walk you through every step of replacing the belt on your Shark vacuum cleaner. We’ll make it easy, clear, and ensure you get your vacuum back to its peak cleaning performance in no time.
You don’t need to be a vacuum repair expert to tackle this. With a few basic tools and these straightforward instructions, you’ll be well on your way to a fully functional Shark vacuum. Let’s dive in and get that brush roll spinning again!
Key Takeaways
- Safety First: Always unplug your Shark vacuum cleaner before attempting any repairs to prevent electric shock or accidental starts.
- Identify Your Model: Shark vacuum cleaner belt types can vary significantly between models. Check your vacuum’s label or manual to get the correct replacement belt for your specific model.
- Gather the Right Tools: You’ll likely need a Phillips head screwdriver, a flathead screwdriver (sometimes), new belt(s), and maybe some gloves for a smooth belt replacement process.
- Clean Thoroughly: Before installing the new belt, take the opportunity to clean hair, debris, and dirt from the brush roll and belt path. This prevents future issues and extends the life of your new belt.
- Proper Belt Tension: Ensure the new belt is installed correctly around both the motor spindle and the brush roll. It should be snug but not overly stretched, allowing the brush roll to spin freely without slippage.
- Test Carefully: After reassembling, perform a quick test to confirm the brush roll spins properly and that all components are securely in place before resuming normal cleaning.
- Save Money and Time: Learning how to replace the belt on a Shark vacuum cleaner yourself is a cost-effective and quick solution compared to professional repairs or buying a new unit.
Quick Answers to Common Questions
What if my new belt seems too tight?
A new belt should be snug, but if it feels excessively tight to the point where it’s very difficult to stretch onto the brush roll or the brush roll can’t spin freely, you might have the wrong size belt. Double-check your Shark vacuum cleaner model number and compare it with the belt specifications. A belt that’s too tight will wear out quickly or even snap upon first use.
Can I use any universal vacuum belt?
No, it’s highly recommended to use a belt specifically designed for your Shark vacuum cleaner model. Universal belts often have incorrect lengths, widths, or thicknesses, leading to poor performance, excessive wear, or incompatibility. Always match the belt to your specific Shark model number to ensure proper function and longevity.
How often should I replace the belt on my Shark vacuum cleaner?
There’s no fixed schedule; it depends on usage. A belt typically needs replacement when the brush roll stops spinning, spins slowly, or if the belt appears stretched, cracked, or frayed. For heavy users or homes with lots of pet hair, proactive replacement every 6-12 months might be beneficial, but for most, it’s done “on demand” when performance dips.
What if the brush roll still doesn’t spin after installing a new belt?
First, reconfirm the belt is correctly installed and not twisted. Then, check for any remaining hair, string, or debris that might be jamming the brush roll or its bearings. Also, ensure the motor spindle spins freely. If all these checks pass, there might be an issue with the brush roll’s internal bearings or the vacuum’s motor, requiring further inspection or professional help.
Should I lubricate anything during the belt replacement?
Generally, no. The belts themselves don’t require lubrication, and applying oil or grease to the belt or its path can actually attract more dirt and debris, potentially damaging the belt or motor. The brush roll bearings in Shark vacuums are typically sealed and do not require user lubrication. Keep the area clean and dry.
Safety First: Always Unplug Your Vacuum!
Before you even think about touching your Shark vacuum cleaner, safety must be your absolute top priority. This is an electrical appliance, and working on it while it’s still connected to power can be extremely dangerous. You could risk electric shock or accidental activation of the machine.
- Step 1: Unplug the Vacuum. Locate the power cord and disconnect it completely from the wall outlet. Give the plug a firm pull, not the cord itself.
- Step 2: Ensure No Power. Take a moment to double-check that the vacuum is indeed unplugged. This simple step prevents serious accidents and protects both you and your appliance.
Once your Shark vacuum cleaner is safely unplugged, you can proceed with confidence. Always prioritize your well-being!
Gather Your Tools and the New Belt
Before you begin the replacement process, it’s wise to have everything you need laid out. This will make the job much smoother and quicker. You don’t want to be scrambling for tools in the middle of a repair!
Visual guide about How to Replace the Belt on a Shark Vacuum Cleaner 2025 Easy
Image source: sharkvacuum.blog
- The New Replacement Belt: This is the most crucial item. You absolutely must get the correct belt for your specific Shark vacuum cleaner model. Belts vary in size, thickness, and material. Check your vacuum’s user manual or the label on the vacuum itself (often on the back or bottom) for the model number. Then, search online or visit a vacuum parts store for a compatible belt. Using the wrong belt can lead to poor performance or even damage your vacuum.
- Phillips Head Screwdriver: Most Shark vacuums use Phillips head screws to secure the brush roll cover.
- Flathead Screwdriver (Optional): Sometimes useful for prying open stubborn covers or removing the old belt.
- Pliers (Optional): Can be helpful for gripping small parts or pulling out tangled hair.
- Utility Knife or Scissors (Optional): For cutting away very tangled hair or string from the brush roll.
- Work Gloves (Recommended): To protect your hands from dirt, sharp edges, or old debris.
- Clean Cloth or Paper Towels: For cleaning the brush roll area.
- Small Container: To keep screws safe so they don’t get lost.
Having these items ready will ensure a seamless experience when you replace the belt on your Shark vacuum cleaner.
Understanding Your Shark Vacuum Cleaner Model and Belt Type
Shark produces a wide array of vacuum cleaner models, from uprights to stick vacuums, and even robot vacuums. While this guide focuses on models with a replaceable brush roll belt, it’s important to understand that not all Shark vacuums have the same belt system. Some newer models might feature “no-maintenance” brush rolls or sealed units where the belt isn’t designed for user replacement. Always consult your specific Shark vacuum cleaner manual if you are unsure.
For models where the belt is replaceable, you’ll typically find two main types:
- Flat Belts: These are common and are designed to stretch and grip around the motor spindle and brush roll. They come in various lengths and widths.
- V-Belts or Ribbed Belts: Less common in Shark brush rolls, but some motor-driven components might use these. For brush rolls, flat belts are the standard.
Knowing your model number (e.g., Shark Navigator NV356, Shark Rotator NV501, Shark Apex AZ1002) is paramount for purchasing the correct replacement part. A quick search for “Shark [Your Model Number] replacement belt” will usually yield the right results. When you replace the belt on your Shark vacuum cleaner, using the OEM (Original Equipment Manufacturer) part or a high-quality aftermarket equivalent is always recommended.
Step-by-Step Guide: How to Replace the Belt on a Shark Vacuum Cleaner
Step 1: Prepare Your Shark Vacuum Cleaner
You’ve already unplugged it – excellent! Now, let’s get your Shark vacuum cleaner ready for surgery.
- Lay it Down: Carefully lay your vacuum cleaner on its front or side on a clean, flat surface. A table or the floor works well. Placing an old towel or a blanket underneath can prevent scratches to your vacuum and your floor.
- Clear Obstructions: Check the brush roll area for any obvious blockages like large pieces of debris, socks, or toys. Remove anything you can easily pull out. This might already reveal a visible broken belt or simply a mass of tangled hair.
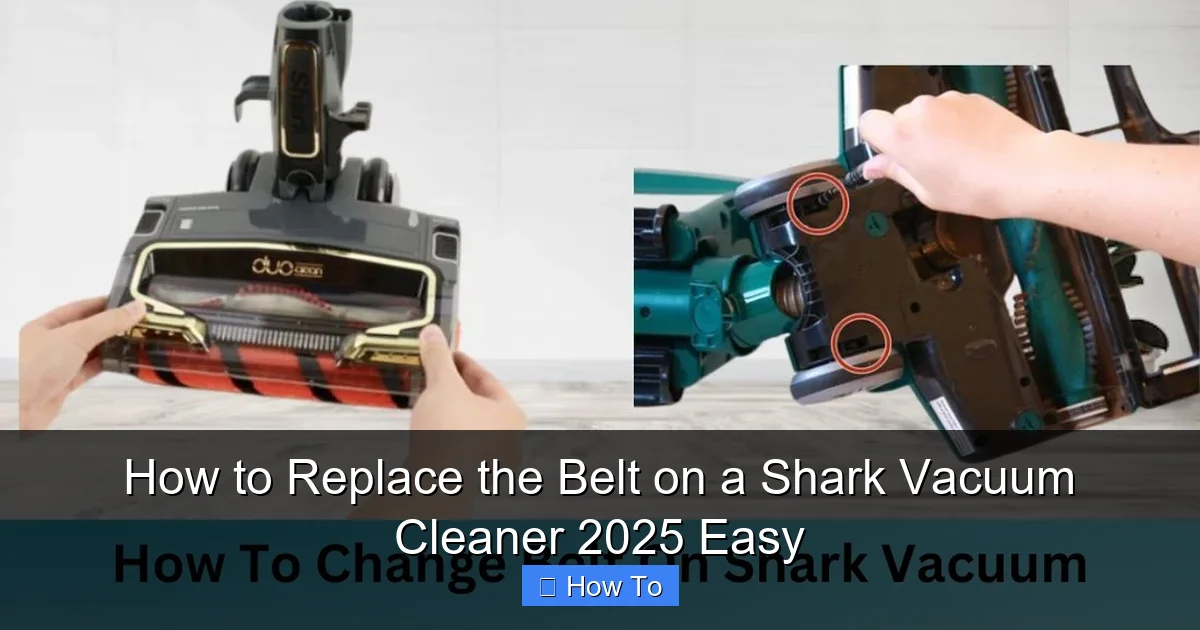
Step 2: Access the Brush Roll Area
This is where your screwdriver comes in handy. The way you access the brush roll will vary slightly depending on your Shark vacuum cleaner model.
- Locate the Brush Roll Cover: On most upright and some stick Shark models, the brush roll is housed within a removable bottom plate or cover. This cover is usually secured by several screws.
- Remove the Screws: Use your Phillips head screwdriver to carefully remove all the screws holding the brush roll cover in place. There are typically 4 to 8 screws. Place them in your small container immediately to avoid losing them.
- Remove the Cover: Once all screws are out, gently lift or pry off the brush roll cover. It might be a single plate or separate pieces. Be gentle, as plastic tabs can break. Some models might have small tabs or clips in addition to screws; carefully release these if present.
- Remove the Brush Roll (if necessary): In many Shark models, once the cover is off, the brush roll itself can be lifted out. This provides better access to the belt and allows for thorough cleaning. Note which end connects to the belt and how it sits in its housing.
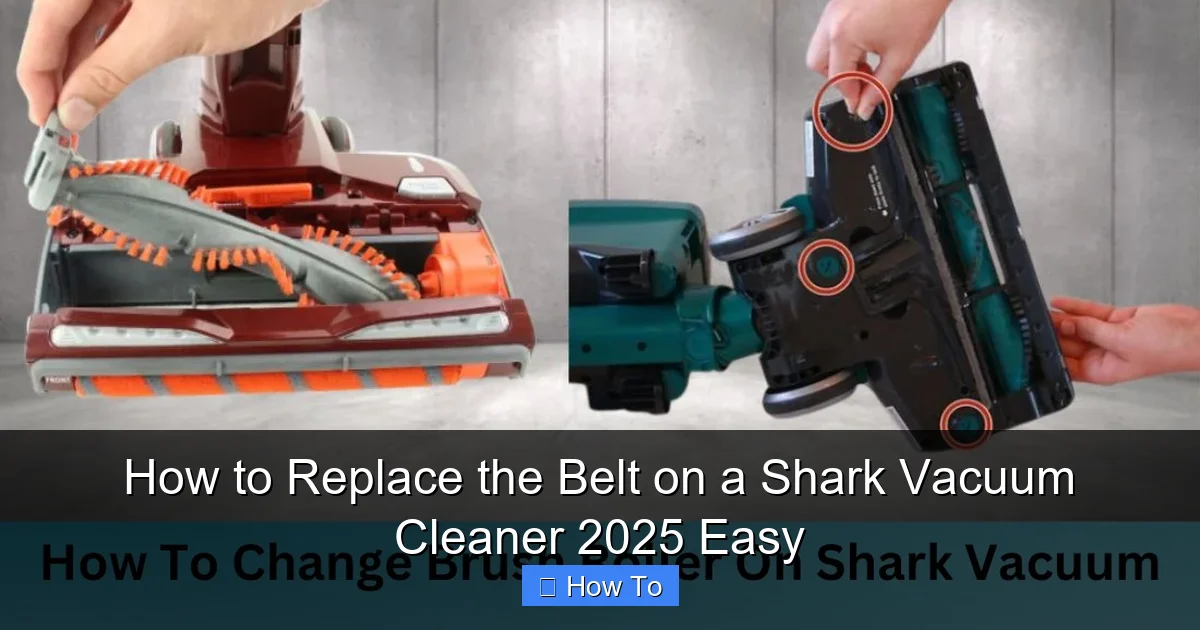
Step 3: Remove the Old or Broken Belt
Now that you have clear access, you can address the old belt.
- Locate the Belt: The belt typically wraps around one end of the brush roll and a small metal spindle or pulley connected to the motor. If it’s broken, you might see two pieces or just a loose, stretched loop.
- Remove the Old Belt: If the belt is still in one piece but loose, simply pull it off the brush roll and the motor spindle. If it’s broken, remove all remaining pieces. You might need your flathead screwdriver to gently pry it off the spindle if it’s stuck.
- Inspect the Motor Spindle: While the belt is off, briefly check the motor spindle for any damage or debris. It should spin freely and smoothly.
This is a critical step when you replace the belt on your Shark vacuum cleaner. Taking the old one out clears the path for the new one.
Step 4: Clean the Brush Roll and Belt Path
This is an excellent opportunity to perform some much-needed maintenance. A clean brush roll and clear belt path will ensure your new belt lasts longer and your vacuum performs better.
- Clean the Brush Roll:
- Use your scissors or utility knife to carefully cut away any hair, string, or fibers tangled around the brush roll bristles and ends. Be careful not to cut the bristles themselves.
- Remove any debris that’s wrapped tightly around the brush roll bearings or end caps.
- Wipe down the brush roll with a cloth to remove dust and dirt.
- Clean the Belt Path and Housing:
- Use your fingers or a flathead screwdriver to scrape out any accumulated dirt, dust bunnies, or hair from the channels where the brush roll sits and where the belt travels.
- Ensure the motor spindle is clean and free of any debris that could impede the new belt.
- Vacuum the area if you have a shop vac or small handheld.
A clean environment is key to a successful replacement when you replace the belt on your Shark vacuum cleaner.
Step 5: Install the New Belt
This is the main event! Installing the new belt requires a bit of finesse to ensure it’s properly seated and tensioned.
- Position the New Belt:
- Take your new Shark vacuum cleaner belt.
- First, loop the new belt around the small motor spindle. Make sure it’s sitting securely in the groove.
- Next, carefully stretch the other end of the belt around one end of the brush roll. This can sometimes be the trickiest part, as new belts are tight.
- Reinstall the Brush Roll (if removed):
- If you removed the brush roll, carefully lower it back into its housing. Ensure the end of the brush roll that has the belt looped around it aligns with the motor spindle.
- You might need to pull the belt slightly to guide it into place around the brush roll and ensure it’s not twisted. The belt should be flat against the brush roll and the spindle.
- Check Tension: The new belt should feel snug and tight, but not overly stretched to the point of snapping. When you try to spin the brush roll by hand, it should offer resistance but still turn. The belt should be centered on both the brush roll groove and the motor spindle.
Proper installation of the new belt is vital to ensure your Shark vacuum cleaner functions correctly.
Step 6: Reassemble Your Shark Vacuum Cleaner
You’re almost there! Now, it’s time to put everything back together in reverse order.
- Replace the Brush Roll Cover: Carefully align the brush roll cover over the brush roll and the vacuum’s base. Make sure all tabs or clips (if any) line up correctly.
- Secure the Screws: Use your Phillips head screwdriver to reinsert and tighten all the screws you removed earlier. Do not overtighten, as this can strip the plastic threads. Just tighten them until they are snug.
- Ensure Secure Fit: Give the cover a gentle shake to make sure it’s securely attached and doesn’t rattle.
Step 7: Test Your Shark Vacuum Cleaner
The moment of truth! Let’s see if your hard work has paid off.
- Plug It In: Reconnect your Shark vacuum cleaner to the wall outlet.
- Turn it On: Power on the vacuum. If your model has a separate switch for the brush roll, activate that as well.
- Check the Brush Roll: Observe the brush roll. It should now be spinning vigorously. If it’s working, fantastic! Your mission to replace the belt on your Shark vacuum cleaner is complete.
Troubleshooting Common Issues After Belt Replacement
Sometimes, things don’t go perfectly the first time. Here are a few common issues and their solutions after you replace the belt on a Shark vacuum cleaner:
- Brush Roll Still Not Spinning:
- Is the belt installed correctly? Double-check that the belt is firmly seated on both the motor spindle and the brush roll groove, and not twisted.
- Is the belt too loose or too tight? A belt that’s too loose will slip, and one that’s too tight can snap quickly or prevent the motor from turning the brush roll. Ensure you have the correct belt size.
- Is there still a blockage? Even after cleaning, a small piece of debris might be lodged, preventing free movement. Remove the cover again and inspect thoroughly.
- Motor issue? In rare cases, the motor itself might be faulty, or the brush roll bearings might be seized. Try spinning the brush roll by hand when the belt is off; it should spin freely.
- New Belt Breaks Quickly:
- Wrong Belt Size: A belt that’s too short will be under excessive tension and prone to snapping. Ensure you purchased the exact correct belt for your model.
- Overheating: If the brush roll is frequently getting jammed with hair or debris, it puts strain on the motor and belt, causing it to overheat and fail. Regular cleaning is crucial.
- Misalignment: If the belt isn’t perfectly aligned on the motor spindle and brush roll, it can rub against housing components, causing premature wear.
- Vacuum Making Strange Noises:
- Ensure all screws are tight and the brush roll cover is securely fastened. Loose components can vibrate and cause noise.
- Check if the brush roll itself is seated properly and not rubbing against the housing.
Don’t get discouraged if you encounter a minor setback. Often, it’s a simple fix, and the effort to replace the belt on a Shark vacuum cleaner is worth it!
Maintenance Tips to Prolong Belt Life
Now that you know how to replace the belt on a Shark vacuum cleaner, here are some tips to keep your new belt in top shape:
- Regularly Clean the Brush Roll: This is the most important tip. Hair, threads, and debris tangled around the brush roll are the primary cause of belt strain and failure. Make it a habit to inspect and clean your brush roll after every few uses.
- Avoid Vacuuming Large Items: Steer clear of vacuuming up large objects like toys, socks, or thick paper clips. These can immediately jam the brush roll and snap the belt.
- Check for Blockages: If your vacuum suddenly stops picking up, check for blockages in the hose and brush roll area before assuming it’s the belt. Clearing blockages reduces strain.
- Store Properly: When not in use, ensure your vacuum isn’t left in a way that puts unnecessary tension on the belt.
- Replace When Worn: Don’t wait for the belt to break completely. If you notice reduced brush roll performance or if the belt looks stretched or cracked, it’s time for a proactive replacement.
Conclusion
Congratulations! You’ve successfully learned how to replace the belt on a Shark vacuum cleaner. It’s a satisfying feeling to fix something yourself and restore your appliance to its former glory. By following these easy steps, you’ve not only saved money but also gained valuable knowledge about your vacuum cleaner.
Your Shark vacuum cleaner is now ready to tackle dust, dirt, and pet hair with renewed vigor, ensuring your home stays impeccably clean. Remember, regular maintenance, especially cleaning the brush roll, will significantly extend the life of your new belt and keep your vacuum performing efficiently for years to come. Happy cleaning in 2025 and beyond!
🎥 Related Video: Changing out a vacuum belt on the shark UV900
📺 Kimberly Meloche