Replacing the belt on your Kirby vacuum cleaner is a simple, essential maintenance task that anyone can do at home. This comprehensive guide walks you through each step, from preparing your vacuum and removing the old belt to installing a new one and testing your machine. With clear instructions and practical tips, you’ll have your Kirby operating with peak cleaning performance in no time, extending its lifespan and ensuring powerful suction.
Learn How to Replace a Belt on a Kirby Vacuum Cleaner 2025
Welcome, fellow Kirby owner! If you’re reading this, chances are your trusty Kirby vacuum cleaner isn’t quite picking up dirt like it used to, or perhaps the brush roll has stopped spinning altogether. Don’t worry, you’re not alone, and the solution is often much simpler than you might think: it’s likely time to replace the belt.
The belt on your Kirby vacuum cleaner is a critical component. It’s what transfers power from the motor to the brush roll, allowing it to agitate carpets and lift dirt effectively. Over time, these belts can stretch, wear out, or even break, leading to a significant drop in cleaning performance. The good news? Replacing a belt on a Kirby vacuum cleaner is a straightforward DIY task that you can easily tackle at home, even if you’re not a seasoned repair person.
In this comprehensive guide, we’ll walk you through every single step of how to replace a belt on a Kirby vacuum cleaner, complete with practical tips, troubleshooting advice, and everything you need to know to get your machine back to its powerful best in 2025. By the end of this tutorial, you’ll be a pro at Kirby belt replacement, saving you time and money on professional repairs. Let’s get started and restore your Kirby’s legendary cleaning power!
Key Takeaways
- Safety First: Always unplug your Kirby vacuum cleaner before starting any maintenance or repair work to prevent accidental startup and electric shock.
- Right Tools & Parts: Ensure you have the correct replacement belt for your specific Kirby model and basic tools like a screwdriver and possibly gloves for a smooth process.
- Accessing the Brush Roll: You’ll need to disengage the “toe touch control” or height adjustment and unlatch the front nozzle to gain access to the brush roll and old belt.
- Proper Belt Installation: Kirby vacuums use a unique flat belt system; correctly looping the new belt around both the motor shaft and the brush roll with proper tension is crucial for function.
- Test Thoroughly: After installation, plug in and briefly test your Kirby to ensure the brush roll spins freely and there are no unusual noises, confirming correct installation.
- Troubleshooting Common Issues: Be prepared to address common problems like the belt not staying seated or the brush roll not spinning by re-checking connections and belt tension.
- Regular Maintenance: Keeping your brush roll clean and inspecting the belt periodically can significantly extend its lifespan and maintain optimal vacuum performance.
Quick Answers to Common Questions
What causes a Kirby vacuum belt to break?
Kirby vacuum belts primarily break due to wear and tear over time, stretching from repeated use, or excessive strain from brush roll jams caused by large debris or tangled hair. Incorrect installation of a new belt can also lead to premature breakage.
How often should I replace my Kirby vacuum belt?
While there’s no fixed schedule, most experts recommend replacing your Kirby vacuum cleaner belt every 6 to 12 months, or sooner if you notice a significant drop in brush roll performance, visible wear, or a complete stop of the brush roll.
Can I use any vacuum belt for my Kirby?
No, it’s crucial to use a genuine Kirby replacement belt specifically designed for your model. Kirby vacuums often use a unique flat belt system that requires specific dimensions and materials for proper function and longevity. Using a generic or incorrect belt can lead to poor performance or damage.
What if my brush roll still doesn’t spin after replacing the belt?
If your brush roll isn’t spinning, immediately unplug the vacuum. Double-check that the new belt is properly seated on both the motor shaft and the brush roll, and ensure the brush roll’s drive shaft is fully engaged. Also, look for any persistent hair or debris jamming the brush roll.
Is it normal for a new Kirby belt to feel very tight?
Yes, it’s completely normal for a new Kirby vacuum cleaner belt to feel very tight and require significant stretching during installation. This tension is essential for the brush roll to agitate and clean effectively. The belt will loosen slightly over its initial uses.
Before You Begin: Safety First!
Before you even think about touching a tool or fiddling with your Kirby vacuum cleaner, safety must be your absolute top priority. Skipping these crucial steps could lead to injury or damage to your machine.
Always Unplug Your Kirby
This is non-negotiable. Locate the power cord and completely disconnect your Kirby vacuum cleaner from the electrical outlet. This prevents any accidental startups while your hands are inside the machine, protecting you from potential electric shock or injury from moving parts.
Allow Your Vacuum to Cool Down
If you’ve recently used your Kirby, the motor and some internal components might be warm. Give it a few minutes to cool down before you start working.
Consider Gloves
While not strictly necessary for safety from electricity after unplugging, wearing a pair of work gloves can protect your hands from sharp edges, dirt, and grime that accumulates inside the vacuum. It also helps with grip.
What You’ll Need: Tools and Supplies
Visual guide about Learn How to Replace a Belt on a Kirby Vacuum Cleaner 2025
Image source: i.ytimg.com
Gathering your tools beforehand makes the belt replacement process much smoother and quicker. You won’t have to stop mid-task to hunt for something.
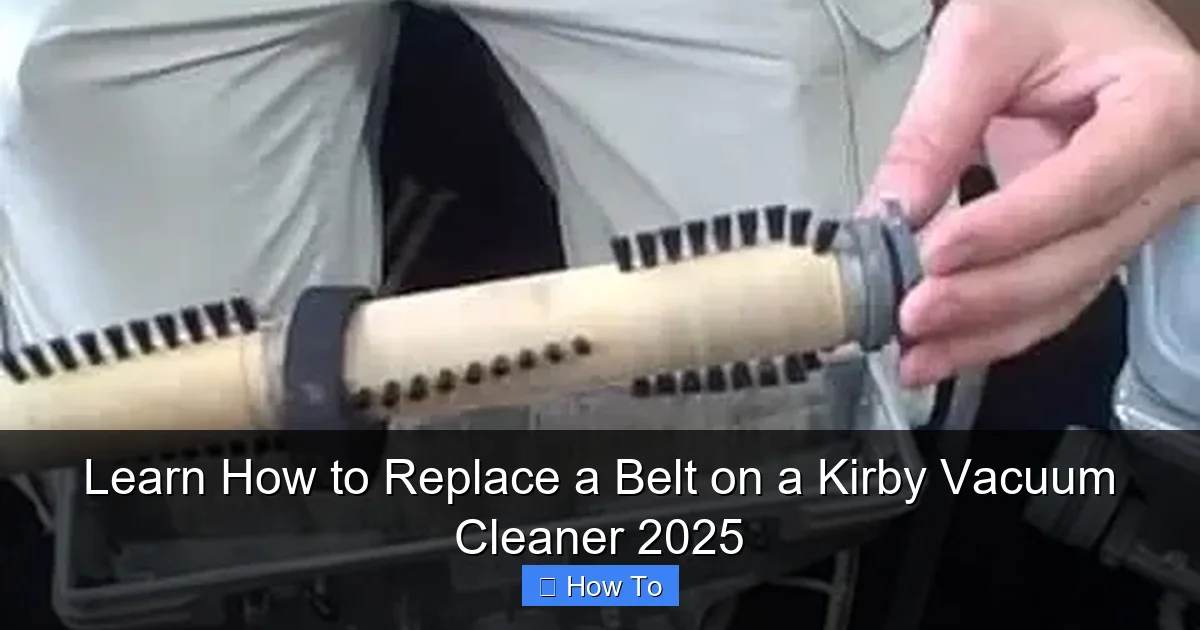
The New Kirby Belt
This is the most important item! Ensure you purchase the correct replacement belt for your specific Kirby model. Kirby vacuums often use a unique flat belt design, and using an incorrect belt can lead to poor performance or further damage. Check your vacuum’s user manual or the Kirby website for the exact part number. Generic belts might fit, but genuine Kirby parts often offer better longevity and performance.
Screwdriver(s)
Depending on your Kirby model, you might need a Phillips-head or a flat-head screwdriver. Some newer models might use Torx screws, though this is less common for belt access. Have both standard types on hand just in case.
Work Surface
A clean, flat, well-lit work surface is ideal. This could be a kitchen table, workbench, or even a sturdy floor where you have plenty of room to maneuver your Kirby vacuum cleaner.
Cleaning Supplies (Optional but Recommended)
A small brush, a rag, or even a can of compressed air can be incredibly useful for cleaning out accumulated dust, hair, and debris from around the brush roll and belt path while you have the vacuum open. This is a great opportunity for some preventative maintenance!
Scissors or Utility Knife (Optional)
If your old belt is tangled or difficult to remove, a pair of scissors or a utility knife can help cut it away safely.
Step 1: Prepare Your Kirby Vacuum Cleaner
Let’s get your Kirby ready for its minor surgery.
Unplug and Lay Flat
Confirm your Kirby is unplugged. Then, carefully lay your Kirby vacuum cleaner down on its front, so the brush roll housing is facing upwards. This position gives you the best access to the components you’ll be working with.
Remove the Dirt Bag/Outer Shell (If Necessary)
Depending on your specific Kirby model and how much clearance you need, you might find it easier to remove the outer bag or even the entire dirt collection system. For most belt replacements, this isn’t strictly necessary, but if it’s obstructing your view or access, feel free to temporarily detach it.
Step 2: Access the Brush Roll Housing
This is where we start opening up the Kirby to get to the belt.
Locate the “Toe Touch Control” or Height Adjustment Lever
Your Kirby has a unique system for engaging and disengaging the brush roll. This is typically controlled by a foot pedal often called the “Toe Touch Control” or a height adjustment lever.
Engage the “Neutral” or “Drive” Position
For many Kirby models, you’ll need to set the machine to the “neutral” or “drive” position. On older models, you might simply lift the front nozzle slightly. The goal here is to release the tension on the brush roll housing. For models with the “Toe Touch Control,” cycle it until the brush roll cover is able to be lifted.
Unlatch the Front Nozzle
Look for two latches, usually on either side of the front nozzle housing, that secure it to the main body of the vacuum. Flip these latches to the open position. They might be metal clips or plastic levers.
Lift and Remove the Front Nozzle Cover
Once unlatched, you should be able to lift the entire front nozzle cover straight up and off. Set it aside carefully in a safe place where its underside won’t get scratched.
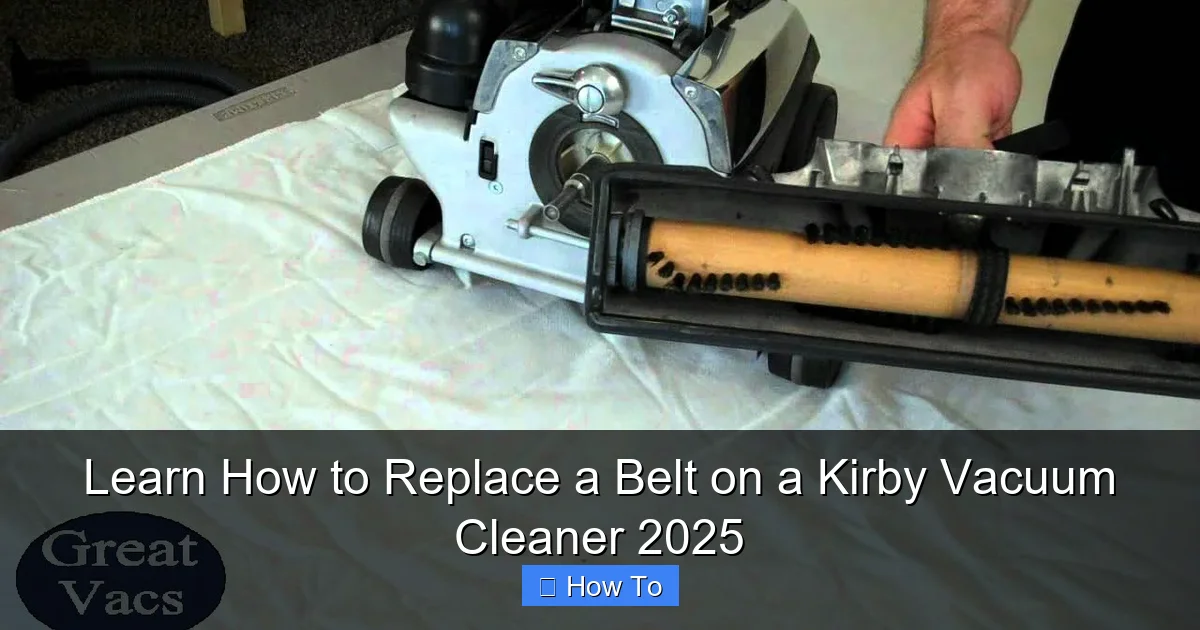
Step 3: Remove the Brush Roll
With the front nozzle housing removed, the brush roll should now be visible and accessible.
Disconnect the Brush Roll Drive Shaft
The brush roll is typically connected to a small drive shaft at one end. Carefully slide the brush roll away from this connection point. It often has a small, keyed shaft that slots into the brush roll.
Lift the Brush Roll Out
Once disconnected, you can simply lift the entire brush roll assembly straight out of its compartment.
Clean the Brush Roll
This is an excellent opportunity to clean the brush roll thoroughly. Remove any tangled hair, strings, threads, or debris that have wrapped around the bristles or the shaft. Use your scissors or utility knife if needed, being careful not to cut the bristles themselves. A clean brush roll spins more efficiently and prolongs the life of your new belt.
Step 4: Remove the Old Belt
Now that the brush roll is out of the way, the old belt is fully exposed.
Inspect the Old Belt
Take a moment to look at the old belt. Is it stretched, frayed, cracked, or completely broken? This inspection can confirm that the belt was indeed the source of your vacuum’s problem. Note how it was originally installed, especially if it’s not completely broken.
Cut It If Necessary
If the old belt is still somewhat intact but severely stretched or tangled, you might find it easiest to simply cut it with scissors or a utility knife to remove it from the motor shaft.
Remove Any Belt Debris
Carefully pick out any remaining pieces of the old belt from the motor shaft or the belt path. Ensure there are no small rubber fragments left behind.
Clean the Belt Path
Using a small brush, rag, or compressed air, clean the area around the motor shaft and where the belt sits. Dust, hair, and grime can build up here, potentially interfering with the new belt’s operation.
Step 5: Install the New Kirby Belt
This is arguably the trickiest part, as Kirby belts require a specific installation technique due to their flat design and how they interact with the motor shaft and brush roll.
Identify the Correct Orientation
New Kirby belts are typically flat and smooth. There isn’t usually a specific “inside” or “outside,” but ensure it’s not twisted before installation.
Loop It Around the Motor Shaft First
The belt needs to be stretched quite a bit. Start by looping one end of the new belt around the small metal pulley or shaft that protrudes from the motor housing. This is usually the smaller of the two points the belt connects to. Make sure it’s seated firmly.
Loop It Around the Brush Roll (The Kirby Method)
This is where Kirby vacuums differ from many other brands. Instead of just placing the belt around the brush roll ends, you’ll often need to stretch the belt over the brush roll itself.
The Flat Belt Challenge
The Kirby flat belt is designed to sit directly on the brush roll, rather than in a groove at the end. To install it, you’ll typically:
- Hold the brush roll with one hand.
- With the other hand, stretch the new belt around the brush roll.
- Position the belt in the center of the brush roll. It needs to be very taut.
- Once around the brush roll, carefully align one end of the brush roll with its seating in the vacuum’s base.
- Keeping the belt stretched and centered on the brush roll, carefully guide the other end of the brush roll back towards the motor shaft.
The key is to maintain tension and ensure the belt doesn’t slip off the brush roll while you’re trying to reseat it. It will feel very tight, which is normal for a new Kirby belt.
Ensuring Proper Tension
Once the belt is around both the motor shaft and the brush roll, ensure it’s perfectly flat and not twisted. The belt should be under significant tension. This tension is vital for the brush roll to spin effectively. A new belt might feel very stiff and difficult to stretch, but this tightness is what gives your Kirby its powerful cleaning action.
Step 6: Reinstall the Brush Roll
With the new belt in place, it’s time to put the brush roll back into its proper position.
Carefully Place the Brush Roll Back
Lower the brush roll (with the new belt now around it) back into its compartment in the vacuum’s base.
Ensure the Belt is Properly Seated and Not Twisted
Double-check that the belt is still flat, centered on the brush roll, and securely wrapped around the motor shaft. A twisted belt will quickly break or cause performance issues.
Connect the Drive Shaft
Carefully re-engage the brush roll drive shaft into its connection point. This usually involves aligning a small square or keyed end on the brush roll with a matching slot in the vacuum’s base. Give it a gentle twist or push to ensure it’s fully seated.
Step 7: Reattach the Front Nozzle Housing
Almost done! Now we just need to close everything up.
Align the Housing
Carefully place the front nozzle housing back onto the vacuum cleaner. Ensure all edges and tabs align correctly with the main body.
Secure the Latches
Flip the latches you opened in Step 2 back into their closed position. They should snap firmly into place, holding the front nozzle housing securely.
Ensure a Tight Fit
Give the front nozzle a gentle wiggle to ensure it’s tightly secured and doesn’t feel loose. A loose nozzle can affect suction and brush roll performance.
Step 8: Test Your Kirby Vacuum Cleaner
The moment of truth!
Plug It In
Now, and only now, plug your Kirby vacuum cleaner back into an electrical outlet.
Turn It On (Briefly)
With the vacuum still laid down on its front, briefly turn it on. Observe the brush roll. It should immediately begin spinning rapidly and smoothly.
Check Brush Roll Spin
Ensure the brush roll is spinning consistently and without hesitation. If it struggles or stops, immediately turn off and unplug the vacuum.
Listen for Unusual Noises
Listen carefully for any grinding, squealing, or unusual noises. A smoothly operating Kirby should produce its normal hum, and the brush roll spin should be relatively quiet.
If everything looks and sounds good, you’ve successfully completed your Kirby vacuum cleaner belt replacement!
Troubleshooting Common Issues
Sometimes, things don’t go perfectly on the first try. Here are some common problems you might encounter and how to fix them.
Belt Not Staying Seated
If the new belt keeps slipping off the brush roll or the motor shaft, immediately unplug the vacuum.
- Check Alignment: The most common cause is improper alignment. Ensure the belt is perfectly flat and centered on the brush roll and the motor shaft. Even a slight twist or off-center placement can cause it to slip.
- Tension: While new belts are tight, ensure it’s not *too* stretched or loose. If it feels excessively loose, you might have the wrong belt for your model.
- Debris: Re-check for any small pieces of the old belt or other debris that might be preventing the new belt from seating properly.
Brush Roll Not Spinning
If you turn on your Kirby and the brush roll doesn’t spin at all, unplug it immediately.
- Belt Installation: The belt might not be correctly installed around the motor shaft or the brush roll. Revisit Step 5 and ensure the belt is properly looped around both components and under tension.
- Brush Roll Connection: Ensure the brush roll’s drive shaft is fully engaged with its socket (Step 6). It needs to be firmly connected to receive power.
- Obstruction: Check for any hair, string, or debris that might be jamming the brush roll itself. Even if you cleaned it, something might have fallen in during reassembly.
Unusual Noises After Replacement
Grinding, squealing, or scraping noises are red flags. Unplug the vacuum.
- Belt Rubbing: The belt might be rubbing against an internal component due to misalignment or being twisted. Check the belt path carefully.
- Brush Roll Jam: The brush roll itself might not be seated correctly or might be rubbing against the housing. Remove the front nozzle again and ensure the brush roll spins freely by hand within its compartment.
- Debris: A foreign object might have fallen into the brush roll housing during reassembly.
New Belt Breaks Quickly
If your brand-new belt snaps shortly after installation, unplug the vacuum.
- Wrong Belt Size: The belt might be too small for your model, causing excessive tension and premature breakage. Double-check your Kirby model and the belt part number.
- Brush Roll Jam: A severe jam in the brush roll (e.g., something very thick wrapped around it) can put too much strain on the new belt and cause it to snap.
- Motor Issue (Rare): In very rare cases, an issue with the motor or its shaft could be causing excessive friction, leading to belt failure. This usually requires professional repair.
Maintenance Tips for Belt Longevity
To keep your new belt and your Kirby vacuum cleaner in top shape, consider these maintenance tips:
- Regular Brush Roll Cleaning: Make it a habit to periodically remove and clean your brush roll. Removing tangled hair and debris reduces strain on the belt.
- Avoid Vacuuming Large Objects: Try not to vacuum up large, hard objects or thick debris that could jam the brush roll and overstress the belt.
- Store Properly: Store your Kirby in a way that doesn’t put unnecessary pressure on the brush roll or belt.
- Check Belt Periodically: Every few months, quickly inspect your belt for signs of wear, stretching, or fraying. Early detection can prevent a complete belt failure.
Conclusion
Congratulations! You’ve successfully learned how to replace a belt on a Kirby vacuum cleaner. It might have seemed daunting at first, but by following these detailed steps, you’ve not only saved yourself time and money but also gained valuable knowledge about maintaining your powerful cleaning machine.
With a fresh, properly installed belt, your Kirby vacuum cleaner is now ready to tackle dirt and debris with renewed vigor, restoring its legendary performance. Regular maintenance, like belt replacement, is key to extending the life of your Kirby and ensuring it continues to be a reliable workhorse for years to come. Now, go forth and enjoy your perfectly refreshed Kirby!
🎥 Related Video: How to Easily Replace Your Kirby Vacuum Belt
📺 Great Vacs
Before you visit our site, make sure you grab this DISCOUNT CODE “YT5%OFF” for 5% off your order!