Keep your Dyson Animal vacuum cleaner performing at its peak with this comprehensive guide. Learn step-by-step instructions to deep clean every essential component, from washable filters to the brush bar, ensuring powerful suction and extending your machine’s lifespan. Restore your Dyson’s original brilliance and efficiency today, making it feel like new!
Pro Tips How to Clean a Dyson Animal Vacuum Cleaner 2025
Is your beloved Dyson Animal vacuum cleaner not picking up dirt like it used to? Does it sound a bit louder, or does it leave behind more dust than it collects? Even the most powerful vacuum cleaners need a little TLC to keep them in top shape. Over time, dust, debris, hair, and even microscopic particles build up inside, reducing suction power and efficiency.
Don’t worry! Giving your Dyson Animal a thorough clean is easier than you think. It’s an investment in your home’s cleanliness and your vacuum’s longevity. This comprehensive guide will walk you through every step of deep cleaning your Dyson Animal vacuum cleaner, making it feel brand new again. We’ll cover everything from emptying the bin to tackling stubborn brush bar tangles and washing those crucial filters. By following these pro tips, you’ll restore your Dyson’s legendary suction power and ensure it continues to be your best friend in the fight against dirt for years to come. Let’s get started!
Key Takeaways
- Regular Cleaning is Essential: To maintain optimal suction and extend the life of your Dyson Animal vacuum cleaner, a routine deep clean every 3-6 months is crucial.
- Safety First: Always unplug your Dyson Animal from the power outlet before starting any cleaning or maintenance to prevent accidents.
- Proper Filter Care: Your Dyson Animal has washable filters that require cold water cleaning and a minimum of 24-48 hours of air-drying before reinsertion to avoid damage and mold growth.
- Tackle the Brush Bar: The brush bar is a magnet for hair and debris. Regularly removing and cleaning it prevents tangles, maintains effective agitation, and is key for any Dyson Animal vacuum cleaner.
- Don’t Forget the Cyclone: The clear cyclone assembly can accumulate fine dust. Gentle wiping and tapping (never washing) will help maintain airflow and suction for your Dyson Animal.
- Check for Blockages: While cleaning, thoroughly inspect the wand, hose, and attachments for any hidden blockages that could reduce airflow and performance.
- Avoid Harsh Chemicals: Use only plain cold water for washable parts. Harsh detergents, dish soap, or abrasive cleaners can damage plastic components and delicate filter membranes.
Quick Answers to Common Questions
How often should I clean the brush bar on my Dyson Animal?
You should check your Dyson Animal’s brush bar regularly, ideally after every few uses, especially if you have long hair or pets. A deep clean, including removal and untangling, is recommended every 3-6 months as part of your comprehensive vacuum maintenance.
Can I use soap to wash my Dyson Animal’s filters?
No, you should never use soap, detergent, or any cleaning solutions on your Dyson Animal’s washable filters. Only use cold tap water. Soaps can damage the filter material, reduce its effectiveness, and potentially leave residue that clogs the filter over time.
What if my Dyson Animal vacuum cleaner still smells after cleaning?
The most common reason for a lingering smell after cleaning is that the filters were not completely dry before reinsertion. Re-wash them with cold water, shake out excess, and ensure they air dry for a full 48 hours in a well-ventilated area before putting them back. Also, ensure the dust bin is thoroughly wiped clean.
How long does it take for Dyson filters to dry completely?
Dyson filters typically need a minimum of 24 hours to air dry completely. However, depending on humidity and airflow, it can take up to 48 hours. It is crucial they are bone dry before being put back into your Dyson Animal vacuum cleaner to prevent mold and motor damage.
Is it normal for my Dyson Animal to lose some suction over time?
Yes, it’s normal for any vacuum cleaner, including your Dyson Animal, to experience a gradual decrease in suction due to accumulated dust, clogged filters, or tangled brush bars. Regular cleaning and maintenance, as outlined in this guide, are designed to restore and maintain peak suction performance.
Tools You’ll Need
Before you begin, gather these simple items. They will make your cleaning process much smoother for your Dyson Animal vacuum cleaner:
- A soft, dry cloth or microfiber towel
- Scissors or a seam ripper (for cutting tangled hair)
- An old toothbrush or small brush (for stubborn grime)
- A sink or basin with cold running water
- A small garbage can or bag
- Safety gloves (optional, for hygiene)
Safety First: Unplug and Disassemble
Your safety is our top priority! Before touching any internal parts of your Dyson Animal vacuum cleaner, you must take this crucial step:
Visual guide about Pro Tips How to Clean a Dyson Animal Vacuum Cleaner 2025
Image source: i.ytimg.com
- Always Unplug: Make sure your Dyson Animal vacuum cleaner is completely unplugged from the wall outlet. For cordless models, remove the battery. This prevents accidental power-ups and potential injury.
- Find a Good Workspace: Choose a clean, well-lit area, preferably outdoors or over a trash can, as dust can be messy.
- Allow Cooling (If Used Recently): If you’ve just used your Dyson, give it a few minutes to cool down before handling the motor or other components.
Step 1: Empty the Dust Bin Thoroughly
This might seem obvious, but it’s the foundation of a good deep clean. A full bin severely restricts airflow and reduces suction for your Dyson Animal vacuum cleaner.
1.1 Detach the Dust Bin
Most Dyson Animal models have a simple release mechanism for the dust bin. Locate the red lever or button (usually near the top of the bin) and press it firmly. The bin should detach from the main body of the vacuum.
1.2 Empty into a Trash Can
Hold the bin over a trash can. Press the second red lever or button (usually at the bottom) to open the base of the bin. Let all the dust and debris fall out. Give it a few gentle taps to dislodge any stuck particles.
1.3 Wipe the Interior (Optional)
For an extra clean, use a damp cloth to wipe the inside of the dust bin. Make sure it’s completely dry before reattaching it. You can also use a dry cloth to wipe away any dust clinging to the exterior of the bin and the cyclone shroud.
Step 2: Clean the Cyclone Assembly
The cyclone assembly is the clear plastic cone section where the magic of separating dirt happens. Fine dust often gets trapped here, reducing efficiency of your Dyson Animal vacuum cleaner.
2.1 Locate the Cyclone
The cyclone assembly is usually integrated with the dust bin or sits directly above it. In many Dyson Animal models, it’s the colorful, multi-coned section.
2.2 Do NOT Wash the Cyclone
This is extremely important: never wash the cyclone assembly with water. Water can damage the delicate internal components and filters, leading to irreparable damage to your Dyson Animal.
2.3 Gentle Cleaning for the Cyclone
Use a dry, soft cloth or a dry toothbrush to gently wipe away any dust or debris clinging to the interior and exterior of the cones. You can also gently tap the assembly over a trash can to dislodge fine dust. For stubborn bits, a soft, dry brush can help. Pay attention to any narrow crevices where dust might accumulate.
Step 3: Wash the Filters
Your Dyson Animal vacuum cleaner has at least one, often two, crucial filters. These trap microscopic particles and need regular washing to maintain suction and air quality. Refer to your specific Dyson Animal model’s manual for exact filter locations and recommended cleaning frequency.
3.1 Locate Your Filters
- Pre-Motor Filter (usually washable): This filter is typically located at the top of the cyclone assembly or near the handle. It might be blue, purple, or grey. This is the filter Dyson usually recommends washing monthly.
- Post-Motor/HEPA Filter (often washable, but check manual): Some Dyson Animal models have a second filter, often at the back of the machine or under the ball (for uprights). This filter is usually larger and may have a different washing schedule (e.g., every 3-6 months). Not all models have a washable post-motor filter; some are sealed for life. Always check your Dyson Animal’s manual.
3.2 Remove the Filters
Twist or pull the filters according to your model’s instructions. They should come out fairly easily.
3.3 Wash with Cold Water Only
This is a critical step for your Dyson Animal vacuum cleaner’s filters:
- Hold each filter under cold running water.
- Gently squeeze and twist the filter to release trapped dirt. The water coming out of the filter will look cloudy and dirty at first.
- Continue rinsing and squeezing until the water runs completely clear.
- Do NOT use any detergents, dish soap, or cleaning solutions. These can damage the filter material and void your warranty.
3.4 The Crucial Drying Process (24-48 Hours!)
This is perhaps the most important part of filter maintenance for your Dyson Animal:
- Shake Excess Water: After rinsing, shake off as much excess water as possible.
- Air Dry ONLY: Place the filters in a warm place with plenty of airflow. A windowsill, near a fan, or even just on a drying rack will work.
- Absolutely NO Heat: Do NOT use a tumble dryer, microwave, open flame, or any other heat source to dry your filters. This will permanently damage them.
- Wait 24-48 Hours: Your filters must be completely, 100% dry before you put them back into your Dyson Animal vacuum cleaner. Reinserting a damp filter can lead to mold growth, foul odors, and severe damage to the motor. If in doubt, wait longer. Having a spare set of filters can be very handy during this waiting period.
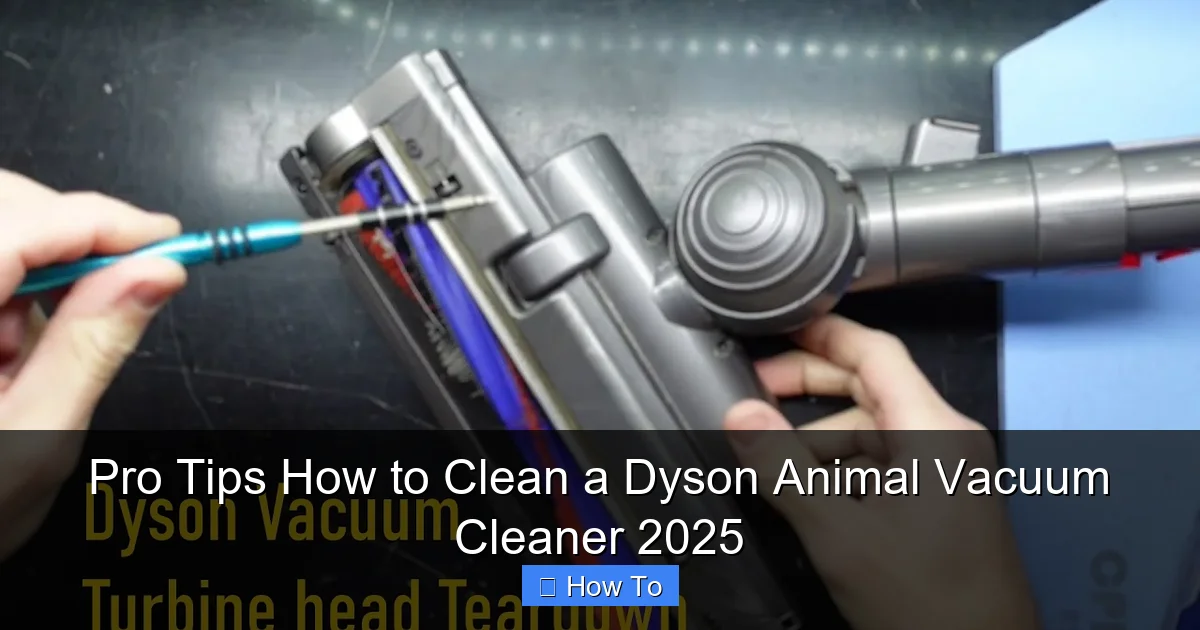
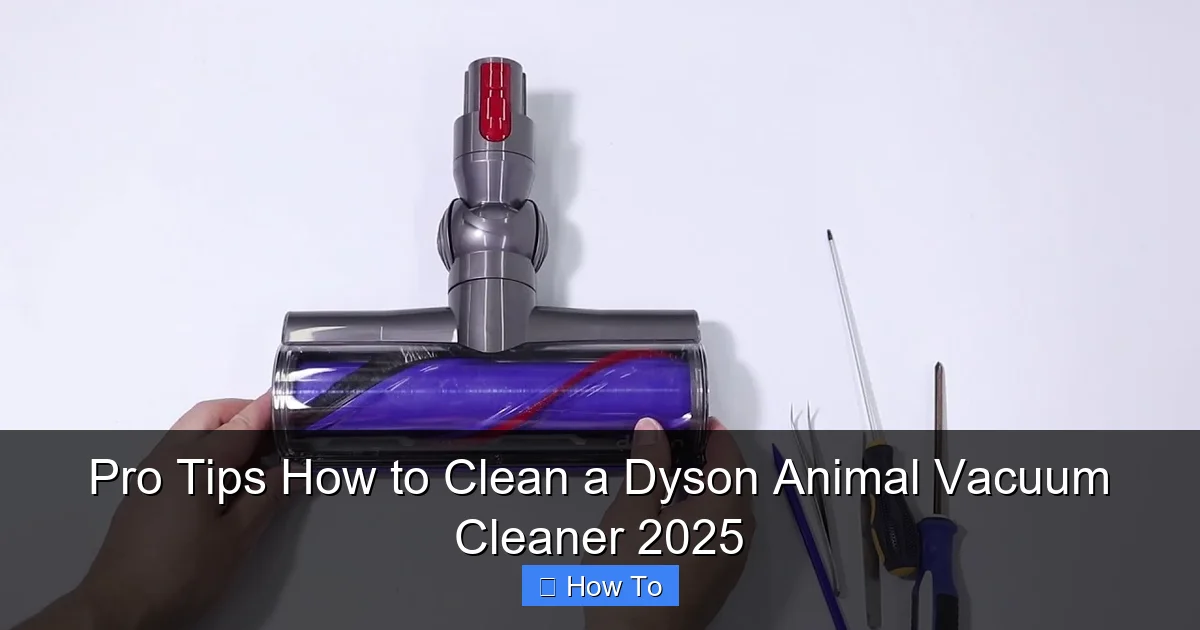
Step 4: Clean the Brush Bar
The brush bar (or beater bar) is where your Dyson Animal vacuum cleaner does its heavy lifting, agitating carpets to lift dirt. It’s also where hair, string, and fibers love to get tangled, significantly reducing cleaning performance.
4.1 Access the Brush Bar
This varies by model. For upright Dyson Ball Animal models, you’ll usually tilt the machine back and look underneath. For cordless stick Dyson Animal vacuums (like V10 Animal, V11 Animal, V15 Detect Absolute), the brush bar is located in the cleaner head.
- For Cordless Stick Vacuums: Look for a small red or grey tab/latch on the side of the cleaner head. Twist or slide this latch to release the end cap. The brush bar should then slide out.
- For Upright/Canister Vacuums: You might need to use a coin or flathead screwdriver to unlock retaining clips or screws on the bottom plate of the cleaner head to access the brush bar. Consult your specific Dyson Animal vacuum cleaner manual if unsure.
4.2 Remove Tangled Debris
Once the brush bar is removed, use scissors or a seam ripper to carefully cut away any tangled hair, string, or carpet fibers. Be gentle and avoid cutting the bristles themselves. Pull the debris off the brush bar.
4.3 Wipe and Clean the Brush Bar
Use a dry cloth to wipe down the brush bar. If it’s particularly dirty or has sticky residue (though this is rare with proper use), you can gently wipe it with a slightly damp cloth, but ensure it’s completely dry before reinserting. Do not immerse the entire brush bar in water, especially if it contains electronic components.
4.4 Clean the Cleaner Head Cavity
While the brush bar is out, inspect the cavity in the cleaner head. Use a dry cloth or a small brush to remove any accumulated dust, dirt, or debris. Check the airway opening for any blockages.
4.5 Reinsert the Brush Bar
Slide the clean brush bar back into the cleaner head. Ensure it’s properly seated and the end cap/retaining clips are securely locked back in place. It should spin freely.
Step 5: Clean the Wand and Attachments
Don’t forget these vital components of your Dyson Animal vacuum cleaner! Blockages in the wand or dirty attachments can also affect suction.
5.1 Detach and Inspect
Remove the wand (if applicable) and all attachments from your Dyson Animal. Visually inspect them for any blockages. Hold them up to a light source to check if you can see through them. Sometimes, socks, large debris, or pet toys can get stuck.
5.2 Remove Blockages
If you find a blockage, use a broom handle, a long stick, or another object to carefully push it through. Do NOT use your hands if the blockage is deep and you can’t see it clearly.
5.3 Wipe Down
Use a damp cloth to wipe down the exterior of the wand and all attachments. Pay attention to the brush bristles on upholstery or pet hair tools, ensuring they are free of debris. Let them air dry completely.
Step 6: Wipe Down the Exterior
Now that the internal components are sparkling, give the outside of your Dyson Animal vacuum cleaner some attention.
6.1 Use a Damp Cloth
Take a slightly damp (not wet) cloth and wipe down the main body of your Dyson Animal vacuum cleaner, the handle, and any other external surfaces. This will remove dust and grime, making it look shiny and new.
6.2 Dry Thoroughly
Follow up with a dry cloth to ensure no moisture remains. Avoid getting water into any openings, vents, or electrical components.
Step 7: Reassemble Your Dyson Animal Vacuum Cleaner
Once all parts are completely dry and clean, it’s time to put your Dyson Animal back together.
- Reinsert the dry filters, twisting or pushing them into place until they click securely.
- Attach the clean dust bin to the main body, ensuring it locks firmly.
- Reattach the cleaner head, wand, and any other components you removed.
Double-check that everything is securely in place before proceeding.
Troubleshooting Common Cleaning Issues
Even after a thorough clean, you might encounter a minor issue. Here are some quick fixes for your Dyson Animal vacuum cleaner:
Still No Suction After Cleaning?
- Check Filters Again: Are they 100% dry? Even a little dampness can severely restrict airflow. If in doubt, let them dry longer.
- Recheck for Blockages: Sometimes, debris can get lodged deep in the hose or main air intake where it’s hard to see. Disconnect all parts and visually inspect every section again.
- Ensure All Parts are Sealed: Make sure the dust bin is properly clicked into place and the filters are securely seated. Leaks in the seal will reduce suction.
Dyson Animal Smells Bad After Cleaning?
- Filters Not Dry Enough: This is the most common cause. Damp filters can quickly grow mold and mildew. Re-wash and dry them for an extended period (48+ hours).
- Lingering Odors in Bin: Sometimes odors can cling to the plastic of the dust bin. Wipe it down with a diluted white vinegar solution (then rinse well and dry) to neutralize smells.
- Pet Accidents: If your Dyson Animal vacuum cleaner picked up a pet “accident,” some odor might be trapped in non-washable parts. A professional service might be needed if the smell persists.
Maintenance Schedule for Your Dyson Animal Vacuum Cleaner
To keep your Dyson Animal performing at its best, follow this general schedule:
- After Every Use: Empty the dust bin.
- Monthly: Wash the pre-motor filter (the smaller, usually colorful one).
- Every 3-6 Months: Perform a full deep clean as outlined in this guide – wash all washable filters, clean the brush bar, cyclone, wand, and attachments. This is crucial for optimal performance of your Dyson Animal.
- Annually: Consider replacing filters entirely, even if washable, to ensure peak performance and filtration.
Conclusion
Congratulations! You’ve successfully deep cleaned your Dyson Animal vacuum cleaner. You should now notice a significant improvement in suction power, a cleaner exhaust, and overall better performance. Regular maintenance not only keeps your home cleaner but also extends the life of your valuable appliance, saving you money in the long run. Embrace these pro tips for 2025 and beyond to ensure your Dyson Animal remains a powerful ally against dirt and dust. Enjoy your like-new Dyson, ready to tackle any mess!
🎥 Related Video: Cleaning Your Dyson Air Filter | How to Clean the Dyson V8 Filter #diy #dyson #vacuum
📺 DIY for Home and Life
Here is a step-by-step break down of how to dismantle and fully clean your Dyson air filter. These steps are practically identical for …