
Disassembling your Shark vacuum cleaner can significantly extend its lifespan and improve performance, especially when dealing with clogs or needing a thorough clean. This guide provides clear, step-by-step instructions for safely taking apart various components, from user-friendly parts like the dust cup and brush roll to deeper internal sections, ensuring you have the knowledge to tackle common maintenance tasks with confidence. Remember to always prioritize safety by unplugging the unit and using the right tools.
How Do You Take Apart a Shark Vacuum Cleaner
Is your trusty Shark vacuum cleaner losing suction? Are you noticing strange noises, or perhaps a lingering odor that just won’t go away? Before you rush out to buy a new one, consider this: many common vacuum problems can be solved with a little hands-on maintenance, and that often involves knowing how to take apart a Shark vacuum cleaner. It might sound daunting, but with the right guidance and a bit of patience, you can tackle most issues yourself, saving money and extending the life of your appliance.
Taking apart a Shark vacuum cleaner isn’t just for fixing problems; it’s also a crucial part of thorough cleaning and preventative maintenance. Dust, pet hair, and debris can accumulate in hidden crevices, filters, and internal hoses, impacting performance over time. By learning how to access these areas, you can ensure your vacuum operates at peak efficiency, keeping your home spotless and your air cleaner. This comprehensive guide will walk you through the process, from basic, user-friendly disassembly to a deeper dive into internal components, all while emphasizing safety and providing practical tips.
Before we dive into the nitty-gritty, remember that Shark produces a wide range of vacuum models – from the upright Navigator and Lift-Away series to the compact Rocket and powerful Apex and Stratos lines. While the general principles of disassembly remain similar, specific screw types, clip locations, and component layouts will vary. Always refer to your specific model’s user manual for precise instructions if you’re unsure. Our goal here is to provide a universal understanding of the process, empowering you to approach your specific Shark vacuum with confidence.
Key Takeaways
- Safety First: Always unplug your Shark vacuum cleaner from the power outlet before attempting any disassembly to prevent electrical shock or accidental activation.
- Model Variations: Shark vacuum cleaners come in many models (Navigator, Lift-Away, Rocket, Apex, Stratos); specific disassembly steps, screw types, and clip locations will vary, so consult your owner’s manual if unsure.
- Start Simple: Begin by disassembling user-accessible parts like the dust cup, filters, hose, and brush roll. Many common issues like clogs or suction loss can be resolved at this level.
- Organize Components: When performing deeper disassembly, keep track of screws, clips, and small parts. Using a magnetic mat or labeled containers will help immensely during reassembly.
- Gentle Approach: Avoid excessive force when prying open sections or removing parts. Plastic components can break easily. If something feels stuck, double-check for hidden screws or clips.
- Tools Needed: A basic set of screwdrivers (Phillips and sometimes Torx), a pry tool (like a plastic spudger), and potentially needle-nose pliers are generally sufficient for most tasks.
- When to Stop: If you encounter complex electrical wiring, sealed motor components, or feel uncomfortable proceeding, it’s best to stop and consider professional repair or consult Shark’s support to avoid further damage or voiding your warranty.
Quick Answers to Common Questions
What tools do I need to take apart a Shark vacuum?
You’ll primarily need a screwdriver set (Phillips head, possibly Torx), plastic pry tools (spudgers), needle-nose pliers, and a container for organizing screws.
Will taking apart my Shark vacuum void the warranty?
Disassembling user-serviceable parts (like the dust cup or brush-roll cover) typically won’t. However, opening up sealed components or performing extensive, non-authorized repairs might void your warranty. Check your specific model’s warranty terms.
How often should I take apart my Shark vacuum for cleaning?
Basic disassembly for cleaning the dust cup, filters, and brush-roll should be done regularly, perhaps monthly or quarterly, depending on usage and pet hair. Deeper disassembly is only needed if you suspect an internal clog or specific component failure.
What’s the most common problem solved by taking apart a Shark vacuum?
The most common issues resolved by disassembly are loss of suction due to clogged hoses, brush-rolls tangled with hair, or dirty filters. These can often be fixed by accessing user-friendly parts.
Can I wash all the filters in my Shark vacuum?
No, typically only the foam and felt pre-motor filters are washable. HEPA filters are usually not washable and need to be replaced periodically. Always check your specific model’s manual for filter care instructions.
📑 Table of Contents
- Safety First: Essential Preparations Before You Begin
- Basic Disassembly: User-Accessible Parts for Routine Maintenance
- Deeper Dive: Accessing Internal Components (Model-Specific Considerations)
- Troubleshooting Common Issues During Disassembly and Reassembly
- When to Seek Professional Help (And When Not To)
Safety First: Essential Preparations Before You Begin
Before you even think about grabbing a screwdriver, safety must be your absolute top priority. Working with electrical appliances carries inherent risks, and taking proper precautions will protect you and prevent further damage to your vacuum.
Unplugging and Power Safety
This cannot be stressed enough: always, always unplug your Shark vacuum cleaner from the wall outlet before starting any disassembly. This simple step prevents electrical shock and stops the vacuum from accidentally turning on while your hands are inside. Even if you’re just removing the dust cup, make this a habit. There’s no “half-unplugged” – make sure the plug is completely out of the socket.
Gathering Your Tools
Having the right tools makes the job much easier and reduces the risk of stripping screws or damaging plastic parts. You generally won’t need a professional toolkit, but a few basics are essential:
- Screwdriver Set: Most Shark vacuums use Phillips head screws. A set with various sizes will be helpful. Some models might have Torx screws, so a multi-bit driver is a good investment.
- Pry Tools/Spudgers: Plastic pry tools (often used for smartphone repair) are excellent for gently separating plastic casings without scratching or marring the finish. Flathead screwdrivers can work in a pinch, but be careful not to damage the plastic.
- Needle-Nose Pliers: Useful for gripping small parts, removing stubborn hair clogs, or pulling out wires (if you’re going that deep).
- Cleaning Tools: A pair of scissors or a seam ripper for cutting hair from brush rolls, a stiff brush, and maybe a small shop vacuum or compressed air can assist in cleaning.
- Container for Screws: A small bowl, magnetic mat, or even a piece of tape to stick screws onto, will help you keep track of where each screw came from. This is vital for reassembly.
Workspace Preparation
Set up a clean, well-lit, and spacious work area. A table or workbench is ideal, as it allows you to work comfortably and prevents small parts from getting lost on the floor. Lay down a towel or an old sheet to protect both your workspace and your vacuum’s finish. Ensure you have good lighting to see all the small details, especially hidden screws or clips.
Basic Disassembly: User-Accessible Parts for Routine Maintenance
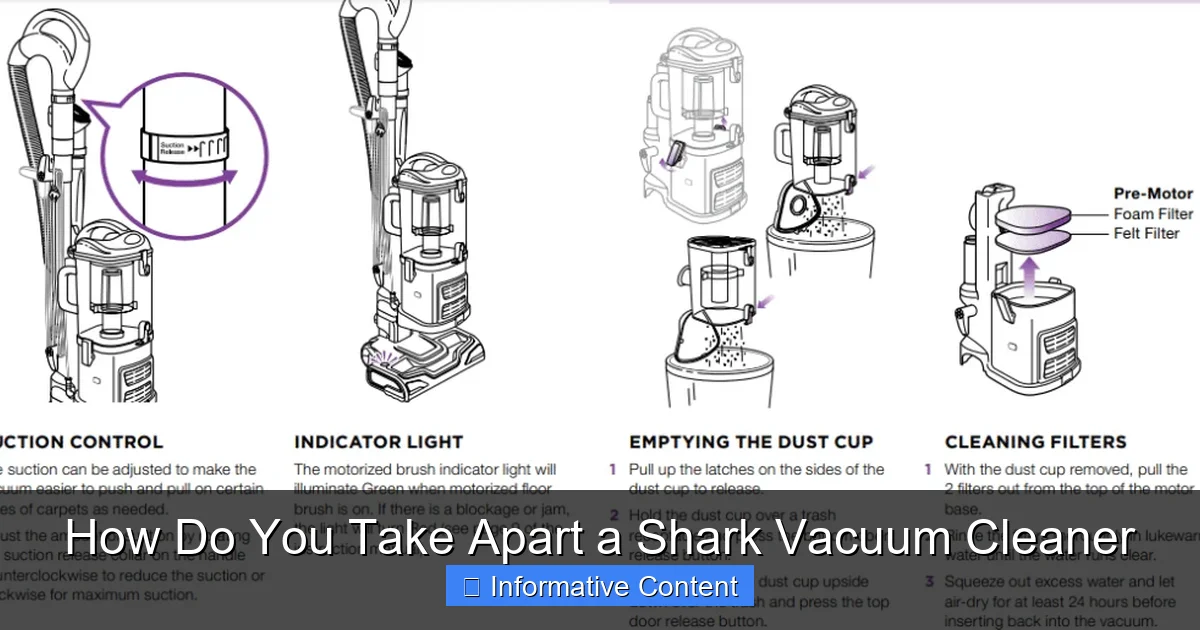
Visual guide about How Do You Take Apart a Shark Vacuum Cleaner
Image source: cleanersadvisor.com
Most common issues with your Shark vacuum can be resolved by cleaning or inspecting the parts designed for user access. These are the components you’ll interact with most frequently for routine maintenance.
Removing the Dust Cup
This is the easiest and most frequent step. Every Shark vacuum has a dust cup that detaches for emptying.
- Locate the dust cup release button or lever, usually found near the top or side of the dust cup.
- Press the button and gently pull the dust cup away from the main body of the vacuum.
- Empty the contents into a trash can.
- Open the bottom of the dust cup (another latch) to ensure it’s completely clear. Some models also allow you to remove the top lid for thorough cleaning.
Tip: Periodically wash the dust cup with mild soap and water, ensuring it’s completely dry before reattaching to prevent mildew or odors.
Accessing the Filters
Shark vacuums typically have multiple filters, all designed to trap dust and allergens. These are crucial for maintaining suction and air quality.
- Foam and Felt Filters (Pre-Motor): These are usually located under the dust cup. Simply lift them out. Rinse these under cool water until the water runs clear. Allow them to air dry completely for at least 24 hours before putting them back.
- HEPA Filter (Post-Motor): Often found near the motor housing, at the bottom or back of the vacuum. It might be behind a small cover with a latch or screw. HEPA filters are usually not washable and need to be replaced periodically (check your manual for replacement intervals).
Tip: Always ensure filters are bone-dry before reinserting them. Damp filters can lead to mold growth and damage the motor.
Detaching the Hose and Wand
Clogs in the hose or wand are incredibly common culprits for lost suction.
- Main Hose: Look for release buttons or clips where the main hose connects to the vacuum body (often near the dust cup) and to the wand/handle. Press the buttons and pull the hose free.
- Wand/Handle: Similarly, the wand often detaches from the main cleaner head and the handle. Press the release button (usually a spring-loaded latch) and pull it apart.
Once detached, inspect all sections of the hose and wand for blockages. A broom handle or a long, blunt object can help dislodge stubborn clogs. You might need to use needle-nose pliers to pull out wads of hair.
Inspecting the Brush-roll and Nozzle
The brush-roll is where a lot of action happens, and it’s prone to tangles.
- Lay the vacuum flat on its back, exposing the underside of the cleaner head.
- On many Shark models, the brush-roll access is fairly straightforward. There might be a cover secured by a few screws or latches. Remove these to expose the brush-roll.
- Lift out the brush-roll. Using scissors or a seam ripper, carefully cut away any tangled hair, string, or debris. Be careful not to cut the bristles themselves.
- Check the end caps of the brush-roll for accumulated debris, which can impede its rotation.
- Inspect the soft felt strips (if present) around the brush-roll area for wear or clogs.
- Also, look into the nozzle pathway leading to the hose for any obstructions.
Tip: Some Shark models feature a “self-cleaning” brush roll (Zero-M technology), but even these can benefit from occasional manual inspection and cleaning.
Deeper Dive: Accessing Internal Components (Model-Specific Considerations)
If the basic cleaning steps don’t resolve your issue, you might need to go deeper into your Shark vacuum cleaner. This is where model differences become more pronounced, and caution is paramount.
Understanding Different Shark Models
As mentioned, Shark has a vast lineup.
- Shark Navigator/Lift-Away: These are often upright vacuums with a detachable canister. Disassembly involves separating the canister from the base, then opening up the cleaner head and potentially the canister itself.
- Shark Rocket: Typically stick vacuums, lighter and more compact. Disassembly usually focuses on the cleaner head and the main motor unit at the handle.
- Shark Apex/Stratos: Premium models with advanced features. They often have more complex interlocking plastic components and sometimes more hidden screws.
Always, always consult your specific model’s manual or look for online disassembly videos specific to your model number. Shark’s website is a great resource.
Opening the Main Body (Screws and Latches)
This is where your screwdriver set comes in.
- Locate All Screws: Carefully examine the entire casing of the section you wish to open. Screws are often visible on the back, sides, and sometimes hidden under stickers or rubber feet. Pay attention to screw types (Phillips, Torx).
- Remove Screws Systematically: As you remove each screw, place it in your organized container. It’s helpful to draw a simple diagram of the component and mark where each screw came from, or take photos with your phone. Different screws might have different lengths or thread types.
- Look for Latches/Clips: Beyond screws, many plastic casings are held together by interlocking plastic latches or clips. These require gentle prying. Use your plastic spudger tool to carefully work around the seams, listening for the ‘pop’ of a clip releasing. Do not force it; if it doesn’t budge, there might be a hidden screw you missed.
- Separate Halves: Once all screws and clips are undone, the plastic halves of the casing should gently separate. Be aware of any wires or small hoses connecting the two halves, as they might still be attached.
Practical Tip: Take pictures at every stage of disassembly. These photos will be invaluable when you put everything back together, serving as a visual map for component placement and screw locations.
Accessing the Motor Housing (Cautionary notes)
For most users, reaching the motor housing is rarely necessary unless you suspect a motor issue or a very deep clog. This is typically the most complex part of how to take apart a Shark vacuum cleaner.
- The motor is usually encased in a sealed unit, sometimes within the main body of the vacuum.
- Accessing it often requires removing several layers of plastic casing and potentially disconnecting wires.
- If you get to this stage, be extremely cautious. Motors are not typically user-serviceable. Tampering with them can void your warranty, lead to electrical hazards, or render the vacuum irreparable.
- Our advice: If you suspect a motor problem (e.g., burning smell, motor not spinning), it’s often best to consult a professional or consider replacement, especially if your vacuum is still under warranty.
Dealing with Internal Hoses and Ducts
Inside the main body, you’ll find various internal hoses and air ducts that channel airflow. These can also become clogged.
- Once the outer casing is open, visually inspect all accessible hoses and ducts.
- These are often flexible tubes or molded plastic pathways. They might be secured with small clips, friction fit, or even small screws.
- Carefully disconnect them and check for blockages. Use pliers or a thin blunt object to clear any debris.
- Ensure all connections are secure when reassembling to maintain proper suction.
Troubleshooting Common Issues During Disassembly and Reassembly
Even with the best intentions, disassembling and reassembling a vacuum cleaner can present its own set of challenges. Knowing what to look out for can save you a lot of frustration.
Dealing with Stubborn Screws
Screws can sometimes be tight, rusted, or have stripped heads.
- Use the Right Bit: Ensure your screwdriver bit perfectly matches the screw head to avoid stripping it further.
- Apply Firm, Even Pressure: Press down firmly while turning counter-clockwise to loosen.
- Penetrating Oil: For rusted screws, a tiny drop of penetrating oil (like WD-40, sparingly applied) can help, but ensure it doesn’t get onto plastic or electrical components.
- Stripped Screws: If a screw head is stripped, you might need a screw extractor kit or use a rubber band over the screw head with your screwdriver to gain some grip. As a last resort, some tiny screws can be drilled out, but this is risky.
Remembering Screw Locations (Tips for Organization)
This cannot be overstated. When you take apart a Shark vacuum cleaner, you’ll often encounter screws of different lengths and sizes.
- Magnetic Mat: A magnetic project mat with grid lines is fantastic for keeping screws in place and noting their original locations.
- Ice Cube Tray/Egg Carton: Use compartments to sort screws by the section they came from.
- Tape and Label: Place screws directly onto a piece of masking tape and write down where they came from.
- Take Photos: As mentioned, snap pictures with your phone at every step. This visual reference is gold during reassembly.
Reassembly Challenges (Hoses, Gaskets, Alignments)
Putting it all back together can sometimes be harder than taking it apart.
- Hoses and Seals: Ensure all hoses are properly reconnected and sealed. Misaligned hoses or loose connections will lead to suction loss. Check for rubber gaskets or O-rings; they must be seated correctly to prevent air leaks.
- Aligning Plastic Halves: When closing the casing, ensure all internal components (like circuit boards, motors, and internal wires) are properly seated and not pinched. The plastic halves should meet flush without force. If they don’t, something is probably misaligned or trapping a component.
- Button and Lever Alignment: Pay attention to how buttons, switches, and levers interact with the internal mechanisms. They need to align perfectly to function correctly.
What to Do If Parts Break
It happens, especially with older, brittle plastic.
- Small Clips: If a small plastic clip breaks, sometimes epoxy glue can repair it. If it’s a non-critical clip, and there are other screws or clips holding the section, you might be able to get by.
- Structural Pieces: If a larger structural piece breaks, assess its importance. If it’s vital for holding the vacuum together or maintaining airflow, you might need to find a replacement part. Shark often sells replacement parts on its website or through authorized dealers.
When to Seek Professional Help (And When Not To)
While disassembling your Shark vacuum cleaner can be empowering, there are times when it’s best to know your limits.
Identifying Your Limits
If you encounter complex wiring, components that seem overly intricate, or sealed units that are clearly not meant for user access, it’s a good time to stop. If you’re unsure how a component works or fear you might cause more damage, err on the side of caution. Your personal safety and the integrity of your appliance are paramount.
Warranty Considerations
Be aware that performing extensive disassembly, particularly of sealed components, might void your Shark vacuum’s warranty. If your vacuum is still under warranty and experiencing a significant issue, your first step should always be to contact Shark customer support. They might offer a repair, replacement, or guide you through troubleshooting steps that don’t void your warranty.
Complex Electrical or Motor Issues
If you suspect the problem is electrical (e.g., burning smell, power issues not related to the cord, motor failure), it’s highly recommended to seek professional help or consider a replacement. Working with internal electrical components without proper knowledge and tools can be dangerous. Motor repairs are often specialized and costly, sometimes exceeding the value of the vacuum itself.
In conclusion, knowing how to take apart a Shark vacuum cleaner can be incredibly beneficial for routine maintenance, clearing clogs, and even performing minor repairs. By approaching the task with patience, the right tools, and a strong emphasis on safety, you can keep your Shark running smoothly for years to come. Remember to start with the simple, user-accessible components and only delve deeper if necessary and you feel confident. Regular cleaning of filters, brush-rolls, and hoses will prevent most issues, ensuring your home stays clean and your vacuum performs at its best. Happy cleaning!
Frequently Asked Questions
How do I know if my Shark vacuum has a clog?
Signs of a clog include reduced suction, the vacuum making a strained or higher-pitched noise, the brush roll stopping, or the vacuum shutting off unexpectedly. Visually inspect the hose, wand, and brush roll area first.
Where are the hidden screws on a Shark vacuum?
Hidden screws can sometimes be found under rubber feet, product labels, or small plastic caps. Thoroughly examine all surfaces and seams for any indication of a screw, and use a small pry tool to gently lift labels if necessary.
Is it safe to use water to clean internal vacuum parts?
Only use water on components explicitly stated as washable in your manual, like some dust cups and foam/felt filters. Never use water on electrical components, motors, or HEPA filters, and ensure all washed parts are completely dry before reassembly.
What should I do if I can’t put my Shark vacuum back together?
Refer to the photos you hopefully took during disassembly. If you’re still stuck, check online forums or YouTube for specific reassembly videos for your model. If all else fails, a small appliance repair shop might be able to help, though this can be costly.
Can I replace parts inside my Shark vacuum myself?
Yes, many common wear-and-tear parts like brush rolls, filters, and sometimes hoses are available for purchase and are designed for user replacement. More complex internal parts, especially electrical ones, are usually best left to professionals or covered by warranty.
Why is my Shark vacuum making a burning smell?
A burning smell often indicates excessive strain on the motor due to a severe clog, a seized brush roll, or a worn-out belt (if your model has one). Immediately unplug the vacuum and thoroughly check for blockages before using it again. If the smell persists, discontinue use and seek professional advice.