Keeping your Shark vacuum cleaner spotless is key to its performance and longevity. Regular cleaning of the dust cup, filters, and brush-rolls prevents clogs, maintains powerful suction, and ensures your home stays truly clean. Follow our detailed guide to learn exactly how do you clean a Shark vacuum cleaner, making maintenance simple and effective.
Welcome, fellow clean-freaks and Shark vacuum enthusiasts! You’ve made a smart choice investing in a Shark vacuum cleaner – they’re renowned for their powerful suction and innovative designs. But just like any hardworking appliance, your Shark needs a little TLC to keep performing at its best. Have you ever wondered, “how do you clean a Shark vacuum cleaner effectively?” You’re in the right place!
Keeping your Shark vacuum in pristine condition isn’t just about making it look nice; it’s about maintaining that incredible suction power, extending its lifespan, and ensuring it continues to keep your home truly clean. Over time, dust, debris, hair, and even microscopic particles can accumulate in various parts of your vacuum, leading to reduced efficiency, unpleasant odors, and even potential damage. A little regular maintenance can go a long way in preventing these common issues.
In this comprehensive guide, we’re going to walk you through every step of cleaning your Shark vacuum cleaner, from emptying the dust cup to deep-cleaning the filters and brush-rolls. We’ll cover essential tools, crucial safety tips, and practical advice to help you restore your vacuum to its original glory. So, grab your cleaning supplies, and let’s dive into making your Shark shine again!
Key Takeaways
- Regular Dust Cup Emptying: Empty the dust cup after every use or when it reaches the MAX fill line to prevent loss of suction and maintain optimal performance.
- Filter Maintenance is Crucial: Wash the foam and felt filters monthly (or more often with heavy use) and replace them every 3-6 months. The HEPA filter typically needs annual cleaning or replacement. Always ensure filters are completely dry before reinserting.
- Brush-Rolls Need Frequent Attention: Regularly check and clear the main brush-roll and soft roller for tangled hair, strings, and debris. This prevents motor strain and ensures effective dirt pick-up.
- Check for Blockages: Periodically inspect the hose, wand, and nozzle for clogs, as these can severely impact suction power. Use a coin or blunt object to dislodge blockages carefully.
- Safety First: Always unplug your Shark vacuum cleaner before performing any cleaning or maintenance to avoid accidental activation and ensure your safety.
- Allow Complete Drying: Any washable components, especially filters, must be 100% dry before being put back into the vacuum. Damp components can lead to mold growth and damage the motor.
Quick Answers to Common Questions
How often should I clean my Shark vacuum filters?
You should wash your foam and felt filters monthly, and the HEPA filter (if applicable) annually. Always check your manual for specific model recommendations.
Can I put my Shark vacuum parts in the dishwasher?
No, you should never put any Shark vacuum parts in the dishwasher. High heat and detergents can damage plastic components and filter materials.
What if my Shark vacuum still has low suction after cleaning?
Double-check all hoses, wands, and the nozzle head for hidden blockages. Ensure all filters are completely dry and correctly reinserted, and that the dust cup is properly sealed.
How do I remove tangled hair from the brush-roll safely?
Always unplug the vacuum first. Use scissors or a seam ripper to carefully cut the tangled hair along the brush-roll, then pull it out by hand. Be gentle to avoid damaging the bristles.
Is it okay to use a hairdryer to speed up filter drying?
No, do not use a hairdryer or any direct heat source to dry filters. This can damage the filter material and compromise its effectiveness. Always allow filters to air dry completely for at least 24 hours.
📑 Table of Contents
Why Regular Cleaning Matters for Your Shark Vacuum
Think of your Shark vacuum as an athlete. Just like an athlete needs to stay in shape to perform, your vacuum needs to be free of clogs and dirt to deliver its best performance. Understanding the “why” behind regular cleaning will motivate you to make it a consistent habit.
Enhanced Performance and Suction Power
This is perhaps the most immediate benefit. When the dust cup is full, filters are clogged, or brush-rolls are tangled, your Shark vacuum has to work harder to pick up dirt. This leads to a noticeable drop in suction power, leaving more dust and debris behind. By regularly cleaning these components, you ensure an unobstructed airflow, allowing your vacuum to maintain its powerful suction and clean effectively with every pass. This is crucial for anyone wondering how do you clean a Shark vacuum cleaner to restore its original pick-up capabilities.
Extending Your Vacuum’s Lifespan
A well-maintained vacuum is a long-lasting vacuum. When your Shark is constantly straining against blockages, its motor is under increased stress, leading to premature wear and tear. Regularly cleaning out debris and maintaining filters reduces this strain, prolonging the life of the motor and other critical components. It’s a small investment of time that can save you significant money on repairs or early replacement.
Improving Air Quality
Your Shark vacuum doesn’t just clean your floors; it also filters the air in your home. Clogged filters, especially the HEPA filter, can become breeding grounds for bacteria or lose their ability to trap allergens and fine dust. This means your vacuum could be recirculating dirty air back into your home. A clean filter system ensures that your Shark is capturing these particles, contributing to a healthier living environment, especially for those with allergies or asthma.
Essential Tools and Safety First
Visual guide about How Do You Clean a Shark Vacuum Cleaner
Image source: wikihow.com
Before you start any cleaning, it’s vital to gather the right tools and, most importantly, prioritize your safety. Knowing what you’ll need and how to stay safe makes the cleaning process much smoother and risk-free.
What You’ll Need
You don’t need a professional kit to clean your Shark. Most of what you need is likely already in your home:
- Scissors or a Seam Ripper: Essential for cutting away tangled hair from brush-rolls.
- Small Brush (e.g., old toothbrush or cleaning brush): Great for dislodging stubborn dirt from crevices and filters.
- Microfiber Cloth or Paper Towels: For wiping down surfaces.
- Mild Dish Soap (optional): For washing specific components like the dust cup and washable filters.
- A Trash Can: To dispose of all the accumulated gunk.
- Protective Gloves (optional): If you prefer not to touch the grime directly.
- A Coin or Flathead Screwdriver: Some Shark models have coin-operated brush-roll covers.
Safety Precautions Before You Start
This cannot be stressed enough:
- Always Unplug Your Vacuum: Before performing ANY maintenance or cleaning, ensure your Shark vacuum cleaner is completely unplugged from the wall outlet. This prevents accidental activation and potential injury.
- Allow Cooling Down: If you’ve just used your vacuum, give it a few minutes to cool down before handling the motor area.
- Read Your Manual: While this guide is comprehensive, always refer to your specific Shark model’s user manual for unique instructions or warnings. Different models might have slight variations in how parts are removed or cleaned.
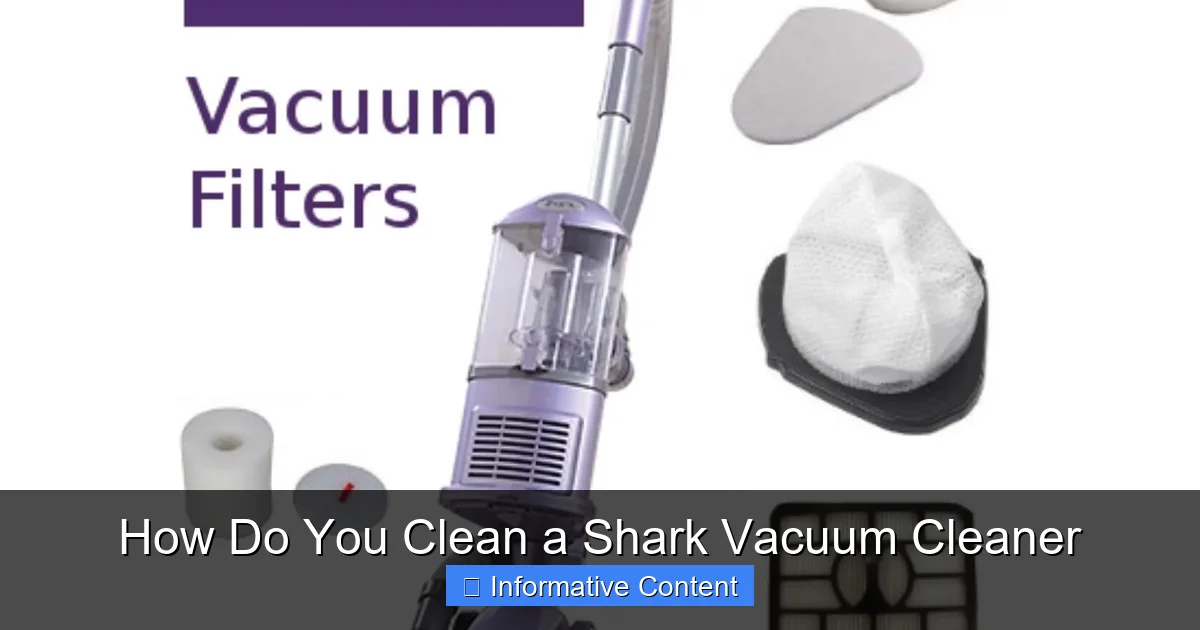
The Heart of the Matter: Cleaning the Dust Cup and Filters
The dust cup and filters are your vacuum’s primary defense against dirt. Keeping them clean is the first and most critical step in maintaining suction and air quality. This is where many begin when they ask, how do you clean a Shark vacuum cleaner?
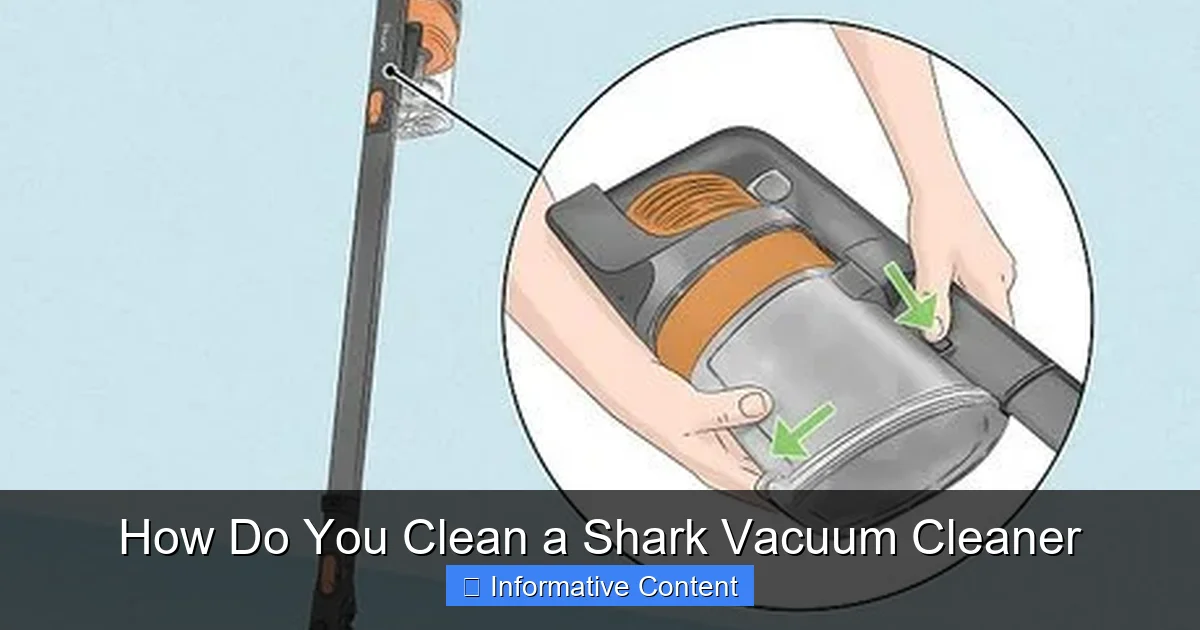
Emptying and Washing the Dust Cup
This should be done frequently, ideally after every use or whenever the debris reaches the MAX fill line.
- Remove the Dust Cup: Locate the release button (usually on the handle or near the top of the dust cup) and press it to detach the dust cup from the vacuum body.
- Empty Contents: Hold the dust cup over a trash can and press the bottom release latch to empty the collected debris. For some models, there might also be a top release latch to open the entire cup for easier access.
- Wipe Down (Optional but Recommended): Once empty, you can wipe the interior of the dust cup with a damp microfiber cloth to remove any lingering dust or fine particles. For a deeper clean, especially if there’s caked-on dust, you can rinse the dust cup with lukewarm water. Use mild dish soap if needed.
- Air Dry Completely: If you’ve washed the dust cup, ensure it is *completely* air-dried for at least 24 hours before reattaching it to the vacuum. Putting a damp dust cup back can lead to mold and potential damage.
Caring for Your Foam and Felt Filters
Most Shark vacuums come with foam and felt filters, usually located within or near the dust cup. These are your first line of filtration.
- Locate and Remove Filters: Open the filter compartment (often found on top of the dust cup or in a separate slot on the vacuum body) and carefully pull out the foam and felt filters.
- Tap Off Loose Debris: Over a trash can, gently tap the filters to dislodge any loose dust and dirt. You’ll be surprised how much comes off!
- Rinse with Water: Rinse both filters under lukewarm running water until the water runs clear. Gently squeeze the foam filter to help release trapped dirt. Avoid using soap, as it can leave residue.
- Air Dry Thoroughly: This is critical! Allow the filters to air dry for *at least 24 hours*, or until they are completely, absolutely dry. Do not use a hairdryer or direct heat, as this can damage the filter material. Place them in a well-ventilated area.
- Reinsert: Once bone dry, reinsert the filters into their designated spots.
Tip: It’s a good practice to clean these filters monthly, or more frequently if you vacuum often or have pets. They typically need replacement every 3-6 months, depending on use.
The HEPA Filter: What You Need to Know
The HEPA (High-Efficiency Particulate Air) filter is your vacuum’s ultimate defense against allergens and fine dust. Not all Shark models have one, but if yours does, it’s usually located in a separate compartment at the bottom or back of the vacuum.
- Locate and Remove: Refer to your manual to find and open the HEPA filter housing. Carefully pull out the filter.
- Clean (If Washable): Some HEPA filters are washable, while others are not. Check your manual! If washable, rinse it under lukewarm water until the water runs clear. Do not use soap. If it’s not washable, simply tap it gently over a trash can to remove loose debris.
- Air Dry (If Washable): Just like the other filters, a washable HEPA filter needs *at least 24-48 hours* to air dry completely.
- Replace: HEPA filters typically need to be cleaned annually or replaced every 1-2 years, depending on usage and whether it’s washable.
Important: Never attempt to wash a non-washable HEPA filter. This will damage it and compromise its filtration capabilities.
Tackling the Brush-Rolls and Nozzle Head
The brush-rolls are where all the action happens on your floor. They pick up debris, but also accumulate hair and string, which can severely impede performance. Knowing how do you clean a Shark vacuum cleaner’s brush-rolls is vital for effective cleaning.
Clearing Hair and Debris from the Main Brush-Roll
The main brush-roll, usually bristled, is prone to tangles.
- Turn Over the Nozzle: Lay the vacuum down or detach the main nozzle head (if applicable for your model) and turn it upside down.
- Access the Brush-Roll: Some Shark models have an easy-access cover that you can open with a coin or screwdriver. Others require you to carefully flip over the entire head.
- Cut Away Tangles: Using scissors or a seam ripper, carefully cut along the length of any tangled hair, string, or carpet fibers. Be extremely careful not to cut the bristles or the brush-roll itself.
- Remove Debris: Once cut, pull out all the loosened debris by hand. You might be surprised at the amount!
- Wipe Clean: Use a damp cloth to wipe down the brush-roll and its housing, removing any remaining dust or grime.
- Reassemble: Close the brush-roll cover or reattach the nozzle head securely.
The DuoClean Advantage: Cleaning Soft Roller Brush-Rolls
If your Shark has DuoClean technology, it means you also have a soft front roller. This roller is excellent for fine dust but can also accumulate debris.
- Remove the Soft Roller: In most DuoClean models, the soft roller can be easily pulled out from the front of the nozzle head.
- Clear Debris: Remove any tangled hair, pet fur, or larger debris that has wrapped around the roller. A small brush can help dislodge stubborn bits.
- Wipe Down: Wipe the soft roller with a damp cloth. You can use a tiny bit of mild soap if it’s particularly grimy, but ensure you rinse it thoroughly.
- Air Dry: Allow the soft roller to air dry completely before reinserting it.
- Check the Roller Compartment: Also, check the compartment where the soft roller sits for any lodged debris and clean it out.
Inspecting and Cleaning the Nozzle Head
Beyond the brush-rolls, the entire nozzle head can harbor dirt.
- Check for Blockages: Look into the suction path (where the dirt enters the nozzle) for any larger items that might be stuck. Remove them carefully.
- Wipe Exterior: Use a damp cloth to wipe down the exterior of the nozzle head, removing dust and scuff marks.
Don’t Forget the Hose, Attachments, and Body
These often-overlooked components are just as important for overall vacuum performance and hygiene. Many people overlook these areas when asking, how do you clean a Shark vacuum cleaner effectively.
Checking and Clearing the Hose for Blockages
A clogged hose can drastically reduce suction.
- Remove the Hose: Disconnect the hose from both ends of the vacuum (where it connects to the main body and the handle/wand).
- Inspect for Clogs: Hold the hose up to a light source and look through it for any obstructions. You can also try dropping a coin through it to see if it passes freely.
- Clear Blockages: If you find a blockage, use a broom handle, a blunt stick, or a plumbing snake to gently push it out. Never use sharp objects that could puncture the hose.
- Wash (Optional): If the hose is particularly dirty or smelly, you can rinse it with warm water and a little dish soap. Ensure it is *completely* dry before reattaching.
Giving Your Attachments a Refresh
Your crevice tool, upholstery tool, and dusting brush also get dirty!
- Remove Debris: Use a small brush or an old toothbrush to dislodge dust, hair, and debris from bristles and crevices of each attachment.
- Wash (If Applicable): Most attachments can be washed with warm water and mild dish soap.
- Air Dry: Allow them to air dry completely before storing them or reattaching them to your vacuum.
Wiping Down the Exterior Body
A clean exterior contributes to the overall hygiene of your vacuum and prevents dust from being kicked back into the air.
- Damp Cloth Wipe: Use a damp (not soaking wet) microfiber cloth to wipe down the entire exterior of your Shark vacuum cleaner. Pay attention to handles, buttons, and any areas that collect dust.
- Dry Thoroughly: Follow up with a dry cloth to prevent water spots and ensure no moisture remains.
Troubleshooting Common Cleaning-Related Issues
Sometimes, even after a thorough cleaning, you might encounter lingering issues. Here’s how to address them.
When Suction Stays Low After Cleaning
If your suction is still weak, double-check these areas:
- Filters: Are they *completely* dry? Even slightly damp filters can restrict airflow. Are they correctly seated?
- Blockages: Re-check all hoses, wands, and the nozzle head. Sometimes small debris can be missed. Pay attention to the flexible hose sections.
- Seals: Ensure the dust cup is properly sealed and clicked into place. Any gaps can lead to suction loss.
- Brush-Roll: Is the brush-roll spinning freely? Is its cover securely fastened?
Dealing with Persistent Odors
A musty smell usually indicates moisture or embedded organic matter.
- Deep Clean Dust Cup: Wash the dust cup thoroughly with warm water and mild dish soap. You can even add a sprinkle of baking soda with water and let it sit for a bit before rinsing.
- Filter Check: If your filters are old and smelly even after cleaning, it’s time to replace them. Odors can cling to filter material.
- Hose Wash: A stinky hose is a common culprit. Wash it out with soapy water and ensure it dries completely.
- Consider Scented Tabs: Once your vacuum is completely clean and dry, you can place vacuum-safe scented tabs in the dust cup area for a fresh scent during use.
The Importance of Dry Time
We’ve mentioned it multiple times, but it bears repeating: proper drying is paramount.
- Prevent Mold and Mildew: Damp filters or components are a perfect breeding ground for mold and mildew, which not only smell bad but can also introduce allergens into your home.
- Protect Electronics: Moisture near electrical components is a serious hazard. Ensure everything is bone dry to prevent short circuits and damage.
- Maintain Filter Efficacy: Damp filters can lose their structure and filtration capabilities, making them less effective at trapping dust and allergens.
Taking the time to understand how do you clean a Shark vacuum cleaner is an investment in your home’s cleanliness and your appliance’s longevity. By following these detailed steps, you’re not just cleaning a machine; you’re ensuring powerful performance, cleaner air, and a healthier living environment for years to come.
Regular maintenance doesn’t have to be a chore; it can be a satisfying part of keeping your home in top shape. So, keep your Shark vacuum purring, and enjoy the sparkling clean results!
Frequently Asked Questions
How do you clean a Shark vacuum cleaner to prevent bad odors?
To prevent bad odors, regularly empty and wash the dust cup with mild dish soap and water. Ensure all washable filters are thoroughly cleaned and completely air-dried before reinserting. Also, check and clean the hose for any trapped debris that might be causing a smell.
What is the recommended schedule for deep cleaning my Shark vacuum?
While emptying the dust cup after every use is recommended, a deep clean involving washing filters, clearing brush-rolls, and checking hoses should ideally be done monthly. For heavy users or homes with pets, consider a deep clean every two to three weeks.
Can I replace filters myself, or do I need professional help?
Yes, replacing filters on your Shark vacuum cleaner is a simple DIY task. Shark filters are designed for easy removal and reinsertion. You can purchase replacement filters directly from Shark or authorized retailers.
How do you clean a Shark vacuum cleaner if it picks up water or wet debris?
Shark vacuums are designed for dry vacuuming only. If your vacuum accidentally picks up water or wet debris, immediately unplug it, remove and thoroughly clean all wet components (dust cup, filters, hose), and allow them to air dry completely for an extended period (48-72 hours). Do not use the vacuum again until everything is bone dry to prevent electrical damage or mold growth.
What should I do if my brush-roll stops spinning after cleaning?
First, ensure the vacuum is unplugged. Check the brush-roll for any remaining hair or debris that might be impeding its movement. Verify that the brush-roll cover is securely closed and that the brush-roll itself is properly seated. If issues persist, consult your manual or Shark’s customer support.
How do you clean a Shark vacuum cleaner’s exterior and attachments?
For the exterior, use a damp (not wet) microfiber cloth to wipe down all surfaces. For attachments, remove any visible debris with a small brush, then wash them with warm water and a little mild dish soap. Always ensure both the exterior and attachments are completely dry before reassembling or storing.