Regularly cleaning your Shark Navigator vacuum cleaner is crucial for maintaining its powerful suction and extending its lifespan. This comprehensive guide walks you through every essential step, from emptying the dust cup and washing filters to untangling the brush roll and clearing blockages, ensuring your vacuum performs at its peak. Keep your home cleaner and your vacuum running smoothly with these simple, effective maintenance tips.
Ah, the trusty Shark Navigator! It’s a fantastic ally in the battle against dust, pet hair, and crumbs, keeping our homes spick and span. But just like any hardworking hero, even your Shark Navigator needs a little TLC to stay at its best. Over time, dust, hair, and general grime can build up in its nooks and crannies, leading to diminished suction, strange smells, and a less-than-stellar cleaning performance.
You might be wondering, “How do you clean a Shark Navigator vacuum cleaner effectively?” It’s a great question, and the good news is, it’s far easier than you might think! Regular maintenance isn’t just about making your vacuum look nice; it’s about preserving its powerful suction, preventing costly repairs, and extending its life so it can continue to serve your home faithfully for years to come. Think of it as a small investment of your time that pays off big in performance.
This comprehensive guide will walk you through every step of giving your Shark Navigator the deep clean it deserves. We’ll cover everything from the simplest task of emptying the dust cup to tackling stubborn blockages and cleaning those vital filters. So, grab your cleaning supplies, and let’s get ready to restore your Shark Navigator to its former glory!
Key Takeaways
- Regular Cleaning is Essential: Consistent maintenance of your Shark Navigator prevents loss of suction, extends the vacuum’s lifespan, and ensures efficient dirt removal.
- Prioritize Filters: Foam and felt filters should be washed monthly and air-dried completely for at least 24 hours. HEPA filters (if present) should be tapped clean annually and replaced every 2-3 years.
- Tackle the Brush Roll: Hair and debris wrap around the brush roll, significantly reducing its effectiveness. Regularly remove these obstructions using scissors or a seam ripper.
- Check for Blockages: The hose, wand, and floor nozzle are common areas for clogs. Disassemble and inspect these components periodically to clear any trapped debris.
- Empty the Dust Cup Frequently: For optimal performance, empty the dust cup after every use or when debris reaches the max fill line.
- Allow for Complete Drying: Never reassemble or use your vacuum with damp filters. Proper drying prevents mold growth and protects the motor.
- Use the Right Tools: A small brush, scissors, a microfiber cloth, and mild soap are typically all you need for a thorough cleaning.
Quick Answers to Common Questions
How often should I clean my Shark Navigator filters?
You should wash your foam and felt filters monthly, or more frequently if you have pets or vacuum often. HEPA filters should be tapped clean annually and replaced every 2-3 years.
Can I put my Shark Navigator filters in the washing machine or dryer?
No, absolutely not. Wash filters by hand with cold water and mild soap, then air dry them completely for at least 24 hours. Using a washing machine or dryer can damage the filters and even lead to mold or motor damage if reinstalled damp.
What if my Shark Navigator’s brush roll isn’t spinning?
First, unplug the vacuum. Then, check the brush roll for excessive hair and debris. Clear any obstructions with scissors. If it’s still not spinning, check for blockages in the nozzle or hose, or inspect the drive belt (if your model has one) for damage.
My Shark Navigator smells bad when I use it. What should I do?
A bad smell usually indicates trapped dirt, pet dander, or mold. Thoroughly clean the dust cup, wash all washable filters, and clear the brush roll and hose of any debris. Ensure all washable parts are completely dry before reassembling.
How do I know when to replace my Shark Navigator’s filters?
Even with regular washing, filters degrade over time. Replace foam and felt filters every 3-6 months. HEPA filters typically last 2-3 years. If your vacuum’s suction isn’t improving after a thorough cleaning, new filters are a good first step.
📑 Table of Contents
Why Regular Cleaning is Your Vacuum’s Best Friend
Before we dive into the nitty-gritty of how do you clean a Shark Navigator vacuum cleaner, let’s chat about why this routine is so important. Many people only think about cleaning their vacuum when it starts to lose suction or emit a funny odor. But waiting for these warning signs means your vacuum has likely been struggling for a while.
The Impact of Dirt Build-up on Performance
Imagine trying to breathe through a clogged nose – it’s tough, right? Your vacuum feels the same way when its filters are choked with dust or its airways are blocked. When dirt, dust, and debris accumulate:
- Reduced Suction Power: This is the most obvious sign. A dirty vacuum can’t pick up as much dirt, leaving your floors less clean. Filters are often the biggest culprit here.
- Overheating Motor: A struggling motor has to work harder to pull air through clogged pathways. This extra effort generates heat, which can lead to the motor burning out prematurely.
- Unpleasant Odors: If you notice a musty or dirty smell while vacuuming, it’s usually a sign that trapped dirt, pet dander, or even mold (from damp filters) is being recirculated into your home’s air. Gross!
- Decreased Air Quality: Vacuums with dirty filters can’t trap allergens and fine dust particles effectively. Instead, they might release these back into the air you breathe, which is especially problematic for allergy sufferers.
- Shortened Lifespan: Simply put, a well-maintained machine lasts longer. Regular cleaning prevents undue stress and wear on internal components, saving you money on replacements or repairs.
So, making a habit of cleaning your Shark Navigator isn’t just about surface appearances; it’s about optimizing its function and protecting your investment.
Gather Your Arsenal: Essential Tools for Cleaning
Before you embark on your cleaning mission, make sure you have a few simple tools on hand. You likely have most of these lying around your house already:

Visual guide about How Do You Clean a Shark Navigator Vacuum Cleaner
Image source: i.ebayimg.com
- Scissors or a Seam Ripper: Absolutely essential for cutting away tangled hair from the brush roll.
- Microfiber Cloths: Great for wiping down surfaces and cleaning attachments.
- Soft Brush (like an old toothbrush or a small utility brush): Perfect for dislodging stubborn dust from crevices and filters.
- Mild Dish Soap: For washing foam and felt filters.
- Running Water: For rinsing filters and some components.
- Trash Can: For emptying dust and debris.
- Protective Gloves (optional but recommended): If you prefer not to touch dust and hair directly.
Once you have your tools ready, let’s get started on how do you clean a Shark Navigator vacuum cleaner!
Cleaning the Dust Cup and Filters: The Heart of Your Vacuum
The dust cup and filters are where your Shark Navigator does its primary job of capturing dirt. Keeping these clean is paramount for maintaining suction power.
Emptying the Dust Cup
This is the simplest, yet most frequently overlooked step. You should aim to empty the dust cup after every use, or at least when the debris reaches the “Max Fill” line. Don’t wait until it’s overflowing!
- Remove the Dust Cup: Press the release button (usually located near the handle or on the canister) to detach the dust cup from the vacuum body.
- Empty Over a Trash Can: Hold the dust cup over a trash can and press the bottom release latch to open the flap and empty the contents. Some models also have a top latch to fully separate the cyclone assembly for deeper cleaning.
- Wipe Down the Interior: Use a dry microfiber cloth or a small brush to wipe away any residual dust or grime clinging to the inside of the dust cup or the central cyclone cone. This prevents build-up that can impede airflow.
- Rinse if Necessary (and allowed): Some Shark Navigator dust cups can be rinsed with water, but always check your specific model’s manual first. If rinsing, ensure it’s completely dry before reattaching.
Washing Foam and Felt Filters
Most Shark Navigator models come with foam and felt filters that are washable. These are usually located above the dust cup. You should wash these at least once a month, or more frequently if you vacuum often or have pets.
- Locate Filters: With the dust cup removed, you’ll typically find a housing that contains the circular foam filter and a flat felt filter. Gently pull them out.
- Rinse Under Cold Water: Hold the foam filter under cold running water until the water runs clear. Gently squeeze it to help dislodge dirt. Do the same for the felt filter, gently rubbing it with your fingers to release trapped dust.
- Use Mild Soap (Optional): If the filters are particularly grimy or smelly, you can use a tiny drop of mild dish soap. Work it into a lather, then rinse thoroughly until no soap residue remains and the water runs perfectly clear.
- Squeeze Out Excess Water: Squeeze the filters firmly to remove as much water as possible.
- Air Dry COMPLETELY: This is critical! Lay the filters flat in a well-ventilated area for at least 24 hours, or until they are bone dry. Never put them in a dryer or use a heat source, and absolutely never put them back in the vacuum damp, as this can lead to mold and damage the motor.
Cleaning the HEPA Filter (If Applicable)
Some Shark Navigator models feature a HEPA filter, often found in a separate compartment at the bottom or rear of the vacuum. This filter is usually not washable.
- Locate HEPA Filter: Check your manual to find its exact location.
- Tap Clean: Gently tap the HEPA filter over a trash can to dislodge accumulated dust. You might do this annually or as recommended by the manufacturer.
- Do NOT Wash: HEPA filters are designed to capture microscopic particles and washing them can damage their delicate structure, making them ineffective.
- Replace When Necessary: HEPA filters typically need to be replaced every 2-3 years, depending on usage.
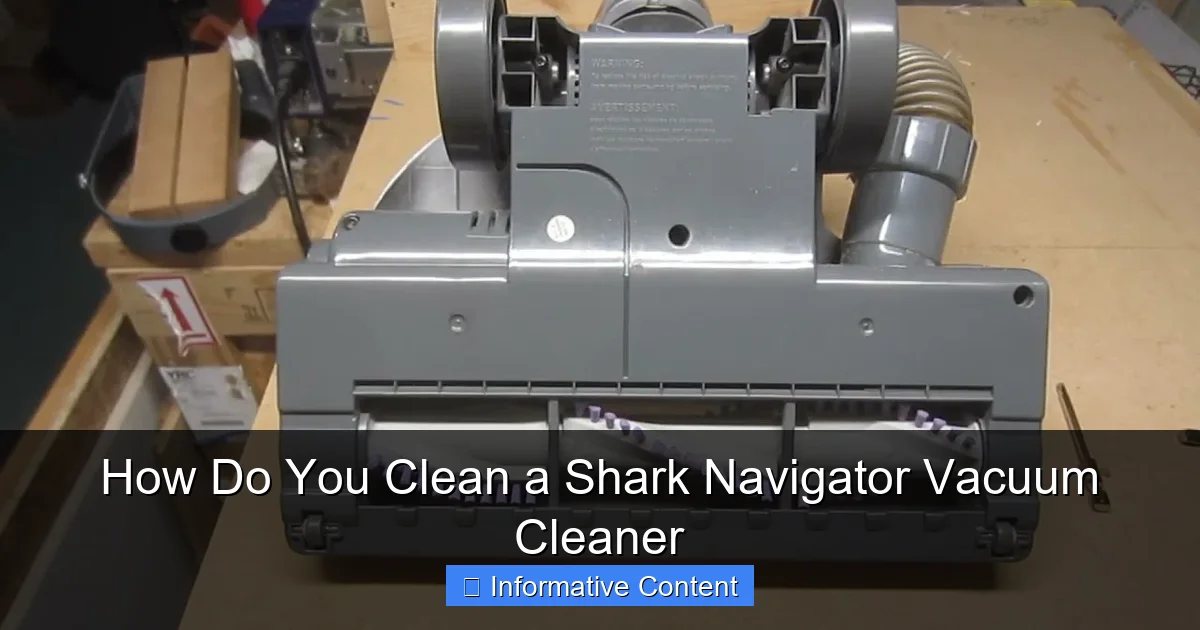
Taming the Brush Roll and Nozzle
The brush roll is the workhorse that agitates carpet fibers and sweeps debris into the suction path. It’s also a magnet for hair, string, and fibers.
Removing Hair and Debris from the Brush Roll
This is perhaps the most satisfying part of cleaning a Shark Navigator, as you’ll often remove a surprising amount of gunk!
- Unplug the Vacuum: Safety first! Always unplug your vacuum before performing any maintenance, especially around moving parts.
- Access the Brush Roll: Lay the vacuum flat on its back. Depending on your specific Shark Navigator model, you might have easy access to the brush roll, or you may need to remove a bottom plate (often held by screws). Consult your manual if unsure.
- Cut Away Tangled Hair: Use your scissors or seam ripper to carefully cut through any hair, string, or fibers wrapped around the brush roll. Be gentle to avoid damaging the bristles or the roll itself.
- Pull Off Debris: Once cut, the tangled debris should be easy to pull off. Work your way around the entire brush roll, ensuring all hair is removed.
- Inspect the Bristles: Check if the bristles are worn down or damaged. If they are severely matted or flattened, it might be time for a replacement brush roll.
Inspecting the Brush Roll Motor and Bearings
While you have the brush roll exposed, it’s a good time to do a quick check:
- Spin Test: Give the brush roll a manual spin. It should rotate freely. If it feels stiff or grinds, there might be deeper issues with the bearings or motor.
- Clear Any Remaining Debris: Use a small brush or a microfiber cloth to wipe away any dust or debris from the brush roll housing and the ends of the brush roll.
Cleaning the Floor Nozzle and Air Path
The floor nozzle, where the brush roll resides, can also accumulate dirt and blockages.
- Remove Visible Debris: Look into the opening of the floor nozzle and remove any visible large debris or clumps of dust.
- Check Air Path: Ensure the air pathway from the nozzle to the hose connection is clear. Sometimes, smaller debris can get stuck here, impeding airflow.
- Wipe Down Exterior: Use a damp cloth to wipe the exterior of the floor nozzle, removing scuffs and dust.
Clearing the Hose and Attachments
A common cause of suction loss in any vacuum, including your Shark Navigator, is a blockage in the hose or wand. These can be surprisingly stubborn!
Checking for Blockages in the Hose
The hose is a prime spot for larger debris like socks, paper, or pet toys to get stuck.
- Disconnect the Hose: Carefully detach the hose from both the vacuum body and the wand/floor nozzle.
- Visual Inspection: Hold one end of the hose up to a light source and look through the other end. Can you see light clearly? If not, you have a blockage.
- Manual Probe: If you spot a blockage, use a broom handle, a straightened wire hanger, or a long, blunt object to gently push the obstruction out. Be careful not to puncture or damage the hose. Work from both ends if necessary.
- Shake and Flex: Sometimes, vigorously shaking and flexing the hose can dislodge smaller clogs.
- Check the Wand and Handle: Don’t forget to check the rigid wand (extension tube) and the handle assembly for blockages too, using the same methods.
Cleaning Vacuum Attachments
Your Shark Navigator comes with various attachments (crevice tool, upholstery tool, dusting brush) that also collect dirt and dust.
- Wipe Down: Use a damp microfiber cloth to wipe down all your attachments, removing dust and grime.
- Clear Openings: Ensure the openings of the crevice tool and other attachments are free of debris. Use a small brush or toothpick if needed.
- Wash if Permitted: Some attachments can be rinsed under water. If you do, make sure they are completely dry before storing them.
Exterior Care and Final Checks
Now that the internal components are sparkling, let’s give the exterior some love and perform a few final checks.
Wiping Down the Exterior
A clean exterior makes your vacuum feel new again!
- Use a Damp Cloth: Take a slightly damp microfiber cloth (you can add a tiny bit of mild all-purpose cleaner if you like) and wipe down the entire body of your Shark Navigator.
- Pay Attention to Crevices: Get into the nooks and crannies, around buttons, and along seams where dust tends to settle.
- Dry Thoroughly: Follow up with a dry cloth to prevent water spots.
Cord Maintenance
Your power cord is often overlooked but important for safety and function.
- Inspect for Damage: Check the entire length of the power cord for any cuts, fraying, or exposed wires. If you find any, have it professionally repaired or consider replacing the vacuum for safety reasons.
- Wipe Clean: Use a damp cloth to wipe the cord free of dust and grime.
- Store Properly: When done vacuuming, carefully wrap the cord around the designated cord hooks. Avoid yanking the plug from the outlet by the cord itself.
When to Replace Parts
While cleaning extends the life of components, some parts eventually wear out and need replacing:
- Filters: Even washable filters degrade over time. Replace foam and felt filters every 3-6 months, and HEPA filters every 2-3 years, or sooner if they appear damaged or excessively dirty even after cleaning.
- Brush Roll: If bristles are significantly worn, matted, or if the brush roll isn’t spinning freely even after cleaning, it’s time for a new one.
- Belts: If your Shark Navigator has drive belts (some models do, some are direct drive), check them for wear and tear. A stretched or broken belt will cause the brush roll to stop spinning.
Consult your Shark Navigator manual or the manufacturer’s website for specific replacement part numbers and recommendations.
There you have it! A complete guide on how do you clean a Shark Navigator vacuum cleaner. By following these steps regularly, you’re not just cleaning your vacuum; you’re ensuring it continues to be an effective, reliable tool for keeping your home spotless. A clean vacuum is a happy vacuum, and a happy vacuum means cleaner floors for you!
Frequently Asked Questions
How often should I empty the dust cup on my Shark Navigator?
For optimal performance, you should empty the dust cup after every use or whenever the debris reaches the “Max Fill” line. Overfilling can reduce suction and strain the motor.
Is it safe to use water to clean the inside of the dust cup?
Yes, many Shark Navigator dust cups can be rinsed with water. However, always check your specific model’s manual to confirm, and ensure the dust cup is completely dry before reattaching it to the vacuum.
What’s the best way to remove tangled hair from the brush roll?
The best tools for removing tangled hair are scissors or a seam ripper. Carefully cut along the length of the hair wrapped around the brush roll, then pull the cut sections free by hand. Remember to unplug the vacuum first!
My Shark Navigator’s suction is weak even after cleaning the filters. What else could be wrong?
If weak suction persists after cleaning the filters, check for blockages in the hose, wand, and floor nozzle. Large debris can get trapped in these areas, significantly impeding airflow. Also, inspect the brush roll for excessive wear or damage.
How long does it take for Shark Navigator filters to dry completely?
Washable foam and felt filters need to air dry completely for at least 24 hours. Ensure they are bone-dry before reinserting them into your vacuum to prevent mold growth and potential damage to the motor.
Can I clean the exterior of my Shark Navigator with any cleaning product?
For the exterior, a damp microfiber cloth is usually sufficient. You can use a tiny amount of mild, all-purpose household cleaner if needed, but avoid harsh chemicals or abrasive cleaners that could damage the plastic or finish.