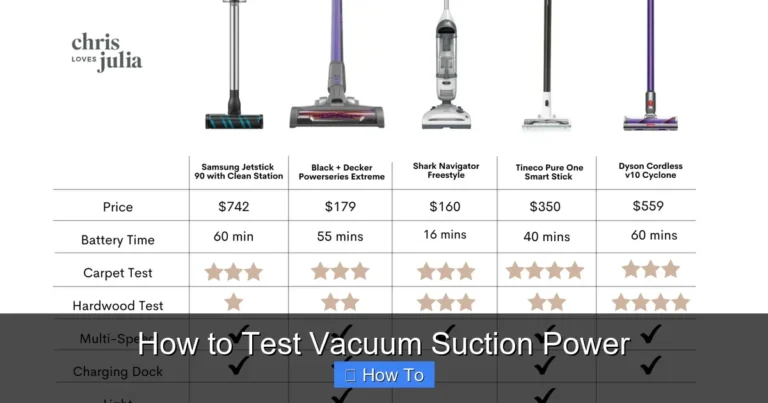
How to Clean Your Vacuum Cleaner Brush in 2025 Easy Guide
Keeping your vacuum cleaner brush clean is essential for optimal performance and a longer lifespan. This easy-to-follow guide for 2025 shows you how to effectively remove tangled hair, dust, and grime, ensuring your vacuum maintains powerful suction. Boost your cleaning efficiency and enjoy a healthier home with a sparkling brush roll, making every vacuuming session more productive.
How to Clean Your Vacuum Cleaner Brush in 2025 Easy Guide
Welcome to 2025! While our homes might be getting smarter with AI-powered devices and robotic helpers, one truth remains: a well-maintained vacuum cleaner is still a cornerstone of a clean living space. And at the heart of your vacuum’s performance lies its brush roll. That spinning wonder is designed to agitate carpets and sweep debris into the suction path. But over time, it becomes a magnet for hair, threads, dust, and all sorts of gunk. A dirty brush roll can drastically reduce your vacuum’s effectiveness, making your cleaning efforts feel pointless.
You’re here because you want to restore your vacuum to its prime, and you’ve come to the right place. This comprehensive guide will walk you through everything you need to know about how to clean your vacuum cleaner brush thoroughly and safely. We’ll cover everything from basic hair removal to tackling stubborn grime, no matter if you have a traditional upright, a cutting-edge cordless stick vacuum, or even a robot cleaner. For more detailed maintenance tips, check out our guide on how to clean a vacuum cleaner. By the end of this guide, you’ll have the knowledge and confidence to make your vacuum cleaner brush look and perform like new. Let’s get that brush roll sparkling!
Key Takeaways
- Safety First: Always unplug your vacuum cleaner before attempting any cleaning or maintenance to prevent accidents and electrical hazards.
- Gather the Right Tools: Having the correct tools like scissors, a seam ripper, a comb, and mild soap will make the brush cleaning process much easier and more effective.
- Detach for a Deep Clean: Removing the brush roll from your vacuum is crucial for a thorough cleaning, allowing access to all sides and ends where debris accumulates.
- Focus on Tangled Hair: The most common problem is tangled hair and fibers. Use sharp tools carefully to cut and pull these away, ensuring the brush can spin freely.
- Don’t Forget Deeper Grime: Beyond hair, dust and embedded grime can also hinder performance. Gentle washing or wiping with a damp cloth can remove stubborn dirt from the bristles.
- Thorough Drying is Essential: If you wash your brush, ensure it is completely dry before reattaching it to prevent mold, mildew, or damage to your vacuum’s internal components.
- Regular Maintenance Pays Off: Incorporate regular brush cleaning into your routine (e.g., monthly) to maintain peak suction power, extend your vacuum’s life, and improve indoor air quality.
Quick Answers to Common Questions
What’s the best way to cut tangled hair off the brush?
Using small, sharp scissors or a seam ripper is ideal. Carefully slide the tip under the tangled hair and snip along the length of the brush, being cautious not to cut the bristles or the brush’s core. A seam ripper is especially safe for this task due to its design.
Can I wash my vacuum cleaner brush with water?
It depends on your vacuum model. Some brush rolls are safe to wash with mild soap and water, especially soft roller brushes. However, many traditional brushes have metal parts or bearings that can be damaged by water. Always consult your vacuum’s user manual first to confirm if it’s safe to wet your specific brush roll.
How often should I clean my vacuum’s brush roll?
The frequency depends on usage and if you have pets or long hair in your household. For homes with pets or long hair, aim for every 2-4 weeks. For lighter use or primarily hard floors, every 2-3 months might be sufficient. Always check visually before or after vacuuming.
My brush isn’t spinning after cleaning. What should I do?
First, ensure the vacuum is unplugged. Then, check if the brush roll is correctly reinstalled and fully seated. If your vacuum has a belt, confirm it’s properly attached and not twisted or damaged. Also, re-inspect for any small, stubborn debris still jamming the ends or bearings of the brush roll. For more troubleshooting help, see our vacuum cleaner repair guide.
Is it okay to use harsh cleaners on my brush roll?
No, it’s best to avoid harsh chemical cleaners, abrasive scrubbers, or bleach. These can damage the bristles, plastic components, or rubber parts of your brush roll. Stick to mild dish soap diluted in lukewarm water if washing is safe for your brush, or simply use dry methods and a damp cloth for wiping.
Safety First: Power Down!
Before you even think about touching your vacuum cleaner’s brush, the very first and most critical step is to ensure it’s completely safe. This isn’t just a suggestion; it’s a non-negotiable rule. Working on any appliance with power connected can lead to serious injury or electrical shock.
Unplug Your Vacuum
For corded vacuums, simply unplug it from the wall outlet. Make sure the cord is completely disconnected. For cordless stick vacuums or robot vacuums, remove the battery pack if possible. If the battery is integrated and not easily removable, ensure the vacuum is powered completely off and disconnect it from its charging base. This prevents accidental activation, which could cause the brush to suddenly spin while your fingers are near. Always prioritize your safety above all else when you prepare to clean vacuum cleaner brush components.
Gather Your Tools for a Sparkling Brush
You wouldn’t start a home improvement project without the right tools, right? Cleaning your vacuum cleaner brush is no different. Having everything ready beforehand makes the process smoother, quicker, and more effective. Many of these items you likely already have around the house in 2025!
Essential Cleaning Arsenal
- Scissors or a Seam Ripper: These are your best friends for cutting through tangled hair and threads. Small, sharp scissors work wonders, and a seam ripper is excellent for getting under tightly wound strands without damaging bristles.
- Stiff-Bristled Brush or Old Toothbrush: Perfect for scrubbing away embedded dust and dirt from the bristles and housing.
- Small Comb or Pet Hair Remover: A fine-toothed comb can help pull out stubborn hair that scissors might miss. Dedicated pet hair removers often have tiny hooks designed for this task.
- Microfiber Cloths or Paper Towels: For wiping down surfaces and drying.
- Mild Dish Soap or All-Purpose Cleaner: For a deeper clean if the brush is washable. Avoid harsh chemicals that could damage plastic or rubber parts.
- Container (Optional): If you plan to wash the brush, a small basin or bucket for your cleaning solution will be useful.
- Screwdriver (Optional): Some vacuum models, especially older ones or those requiring a deeper disassembly, might need a Phillips or flathead screwdriver to remove the brush roll cover. Consult your manual!
- Gloves (Optional but Recommended): Protect your hands from grime and potential sharp edges.
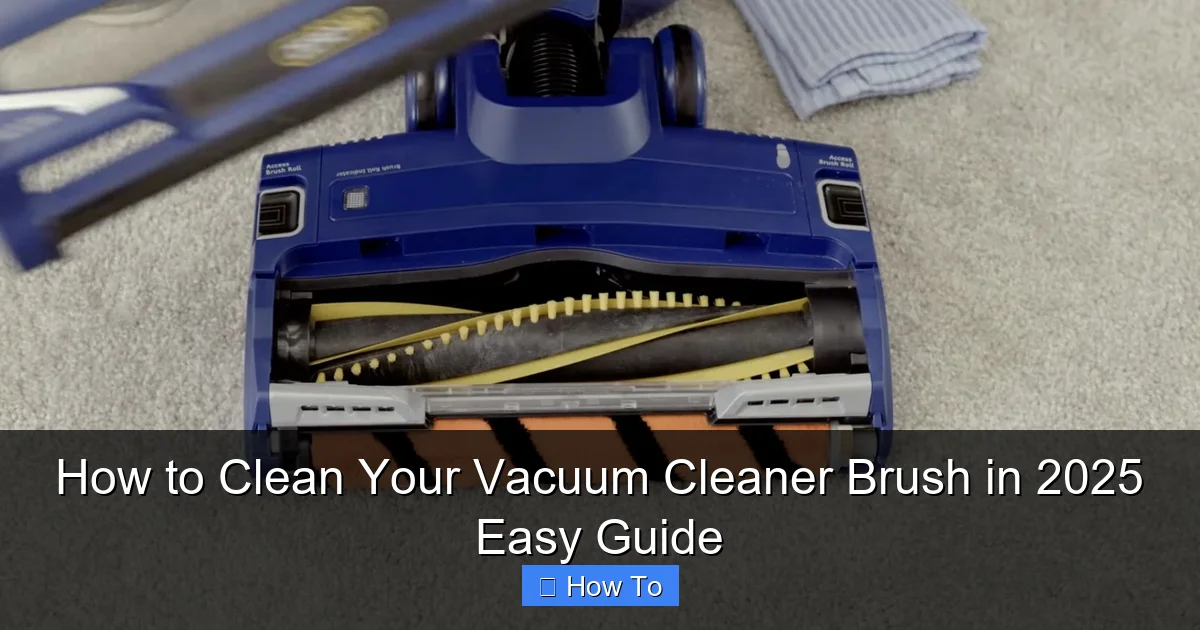
Visual guide about How to Clean Your Vacuum Cleaner Brush in 2025 Easy Guide
Image source: cleanerstalk.com
Step 1: Detach the Brush Roll (The Foundation of Cleaning)
To truly clean your vacuum cleaner brush effectively, you almost always need to remove it from the vacuum itself. This provides full access to all sides of the brush roll and allows for a more thorough job. Don’t worry, it’s usually simpler than it sounds.
Consult Your Vacuum’s Manual
This is the golden rule for any appliance maintenance. Your vacuum’s manual will have specific instructions for how to remove the brush roll for your particular model. In 2025, many manuals are digital, accessible via a QR code on the vacuum or on the manufacturer’s website. A quick search for “how to remove brush roll [your vacuum model]” online can also yield helpful video tutorials. Different vacuum brands (Dyson, Shark, Miele, Roomba, etc.) have varying designs, so what works for one might not work for another.
Locate Release Latches or Screws
Most modern vacuums are designed for user-friendly maintenance. Look for obvious latches, clips, or buttons on the underside of the vacuum head that secure the brush roll cover. You might see arrows or “OPEN” indicators. For some models, you might need a screwdriver to undo a few screws that hold a plate or cover in place. The brush roll itself is usually held in by end caps or a simple sliding mechanism. Take note of how everything fits together – perhaps even snap a photo with your phone – so you can easily reassemble it later.
Carefully Remove the Brush Roll
Once the cover or securing mechanism is disengaged, gently lift or slide the brush roll out. Be mindful of any belts, gears, or electrical connections. If there’s a belt, notice its path so you can reattach it correctly. Some cordless stick vacuums have soft roller brushes that pop out with a simple push of a button. Handle the brush roll carefully to avoid bending any bristles. You are now ready to truly clean vacuum cleaner brush surfaces.
Step 2: Tackle Tangled Hair and Fibers (The Main Event)
This is where most of the gross stuff happens! The main reason your vacuum cleaner brush loses effectiveness is the accumulation of hair, pet fur, carpet fibers, and threads. These get tightly wound around the brush roll, preventing it from spinning freely and effectively agitating dirt.
Use Scissors or a Seam Ripper
Lay the detached brush roll on a clean, flat surface. Take your scissors or seam ripper. Carefully insert the tip of your tool under the tangled hair and fibers. Try to cut along the length of the brush roll, making small snips. Be very careful not to cut the bristles themselves or the plastic core of the brush roll. The seam ripper is especially useful here because its small, hooked blade can slide under tight tangles without a high risk of damaging the bristles. Work your way around the entire brush, cutting through all visible tangles. As you cut, the tension will release, making it easier to pull the hair away.
Employ a Pet Hair Remover or Comb
After cutting, start pulling the loosened hair and fibers off the brush. A small comb, especially a fine-toothed one or a pet hair remover tool, can be very effective at raking out the cut strands. Run the comb through the bristles, working from one end to the other. You’ll be surprised how much debris comes off. For very stubborn, matted areas, you might need to go back in with your scissors for another round of careful cutting. The goal is to leave no strand behind when you clean vacuum cleaner brush bristles.
Don’t Forget the Ends and Bearings
Hair and debris love to collect at the very ends of the brush roll, often getting wrapped around the bearings or end caps. These small components are crucial for the brush to spin smoothly. Carefully pick out any hair or gunk from these areas. You might need to use a toothpick or a small screwdriver to gently pry out compacted debris. Make sure the end caps can spin freely or that any bearing wheels are clear. If these areas are clogged, the brush might squeak or simply not spin properly, even after you’ve cleaned the main bristles.
Step 3: Remove Dust and Grime (For a Deeper Clean)
Once all the tangled hair is gone, you’ll likely see a layer of fine dust and possibly some embedded grime on the bristles and the brush roll’s core. This step addresses that.
Dry Dusting and Wiping
First, use a dry stiff-bristled brush or an old toothbrush to thoroughly brush down the entire brush roll. This will dislodge dry dust and loose dirt that’s stuck between the bristles. Hold the brush roll over a trash can as you do this. Then, take a dry microfiber cloth and wipe down the plastic core and any non-bristle parts of the brush. You’ll be amazed at how much fine dust comes off. This is a crucial part of how to clean vacuum cleaner brush thoroughly without moisture.
Gentle Washing (If Applicable)
Important Note: Not all brush rolls are designed to be washed with water. Some contain metal components, electronics, or non-water-resistant materials that could be damaged. If your brush roll has electrical connections or feels particularly delicate, stick to dry cleaning. Always consult your manual. If your manual confirms it’s safe for washing:
Preparing the Cleaning Solution
Fill a small basin or sink with lukewarm water and add a few drops of mild dish soap. Swirl it gently to create some suds. Avoid using too much soap, as it can leave a residue.
Scrubbing and Rinsing
Dip your stiff-bristled brush (like an old toothbrush) into the soapy water and gently scrub the bristles of the vacuum cleaner brush. Pay attention to areas where dirt might be embedded. You can also lightly rinse the brush under a slow stream of lukewarm water. Be very careful to keep water away from the ends of the brush roll where bearings or motor connections might be, unless your manual explicitly states it’s waterproof. Don’t submerge the entire brush roll unless specifically instructed by the manufacturer. The goal is to clean vacuum cleaner brush bristles, not soak internal mechanisms.
Thorough Drying is Key
If you did wash your brush roll, this is a critical step. Any moisture left behind can lead to mildew, odors, or damage to your vacuum cleaner’s motor or other components when reassembled.
- Shake Off Excess Water: Vigorously shake the brush roll to remove as much water as possible.
- Towel Dry: Use a clean, dry microfiber cloth or paper towels to pat the entire brush roll dry. Blot between the bristles.
- Air Dry Completely: Place the brush roll in a well-ventilated area for at least 24-48 hours. Standing it upright or placing it on a drying rack allows air to circulate around all sides. Do not use a hairdryer or direct heat, as this can warp plastic or damage bristles. It must be bone dry before you even think about putting it back into your vacuum. Patience is key here; rushing this step can cause more problems than it solves.
Step 4: Inspect and Maintain Bearings/Components (Preventative Care)
While the brush roll is out, take a moment to give the rest of the brush head area a quick once-over. This is a perfect opportunity for preventative maintenance.
Check for Wear and Tear
Look at the bristles of the brush roll. Are they worn down, flattened, or missing in places? If so, it might be time to consider replacing the brush roll, as worn bristles won’t agitate carpets effectively. Also, inspect the belt (if your vacuum has one) for cracks, stretching, or damage. A worn belt can prevent the brush from spinning or cause it to slip. For help replacing belts, visit our guide on how to replace a vacuum cleaner belt.
Lubrication (If Recommended)
Some older or commercial vacuum models might have specific points that require a drop of lubricant. However, for most modern household vacuums, especially cordless models from 2025, lubrication is rarely needed or recommended for the brush roll bearings by the user. Applying lubricant where it’s not intended can actually attract more dirt and cause problems. If your manual doesn’t explicitly tell you to lubricate, don’t do it.
Clear Any Remaining Debris
Before reinserting the brush, use your small brush or an old toothbrush to clean out any dust, pet hair, or debris that might have collected within the brush roll housing inside the vacuum head itself. A quick wipe-down with a damp cloth can also refresh these areas. Ensure the airway leading to the main suction path is clear.
Step 5: Reassemble Your Vacuum Cleaner (Putting It All Back Together)
Once your brush roll is completely clean and dry, it’s time to put everything back together. This step is usually the reverse of removal.
Align and Secure the Brush Roll
Carefully place the brush roll back into its housing. If there’s a belt, make sure it’s properly seated around the brush roll and the motor spindle. Ensure the end caps align with their respective slots or bearings. Gently push or slide the brush roll into place until it clicks or sits securely. Reattach any covers, latches, or screws you removed earlier. Make sure everything is tight and secure; a loose brush roll can cause rattling noises or poor performance.
Test Your Vacuum
Before you dive into a full cleaning session, plug your vacuum back in (or reinsert the battery) and turn it on. Listen for any unusual noises and watch to ensure the brush roll spins smoothly and freely. If it sounds normal and the brush is spinning, congratulations! You’ve successfully learned how to clean your vacuum cleaner brush.
Advanced Tips for Specific Brush Types in 2025
Vacuum technology has evolved, and with it, different brush roll designs. Here are a few specialized tips for common brush types you’ll encounter in 2025:
Soft Roller Brushes (e.g., for hard floors)
Many modern stick vacuums feature soft roller brushes, particularly effective on hard floors. These are often made of a velvety material. While they don’t get tangled with hair as severely, they can still collect fine dust and oils.
- Cleaning: These are usually detachable and often washable. Remove any larger debris by hand. Then, gently wash them under lukewarm water with a tiny bit of mild soap. Squeeze out excess water and air dry completely, as described in Step 3. Avoid scrubbing too harshly, as it can damage the delicate material.
Motorized/Self-Cleaning Brushes
Some high-end vacuums in 2025 boast “tangle-free” or “self-cleaning” brush rolls. While these significantly reduce hair tangles, they aren’t entirely maintenance-free.
- Cleaning: Even self-cleaning brushes can accumulate some debris, especially on the ends. Periodically remove them and check for any stubborn tangles the mechanism missed. Wipe down the self-cleaning elements themselves with a damp cloth to ensure they can continue their job effectively.
Robot Vacuum Brushes
Robot vacuums (like Roomba, Roborock, etc.) typically have smaller, often dual-brush systems.
- Cleaning: Robot vacuum brushes are usually very easy to remove, often just popping out with latches. They accumulate a lot of hair. Use your scissors and comb to de-tangle them frequently. Also, pay close attention to the small side brush (if your robot has one) and its axle, as hair loves to wrap around it, preventing it from spinning.
Troubleshooting Common Brush Cleaning Issues
Sometimes, things don’t go perfectly. Here are a few common hiccups and how to fix them after you clean vacuum cleaner brush components.
Brush Not Spinning After Cleaning
- Check the Belt: If your vacuum has one, ensure it’s properly seated around both the brush roll and the motor spindle. A twisted or dislodged belt is a common culprit.
- Reassembly: Double-check that the brush roll is fully seated and that any end caps or latches are securely fastened.
- Obstruction: Even after cleaning, a tiny piece of debris or a stubborn hair strand could be jamming a bearing or the brush roll. Re-inspect closely.
- Motor or Electrical Issue: If all else fails, and the brush still isn’t spinning, there might be an internal motor or electrical issue that requires professional repair.
Lingering Odors
- Drying: Odors, especially musty ones, often indicate that the brush roll wasn’t dried completely after washing. Remove it again and allow for another 24-48 hours of air drying in a very well-ventilated space.
- Deep Clean the Vacuum Head: The odors might be coming from other parts of the vacuum head, not just the brush. Wipe down the entire housing, suction port, and any filters you can access.
- Baking Soda: For persistent odors, you can lightly sprinkle baking soda on a dry brush roll, let it sit for an hour, then brush it off.
Difficulty Detaching/Reattaching
- Consult the Manual (Again): Seriously, your vacuum’s manual is your best friend. Different models have unique quirks.
- Don’t Force It: If something feels stuck, don’t use excessive force. You might break a plastic tab or component. Re-read the instructions and look for hidden clips or release buttons.
- Check Alignment: When reattaching, ensure all parts are perfectly aligned. Sometimes it just needs a gentle wiggle or a specific angle to slide into place.
How Often Should You Clean Your Vacuum Brush?
The frequency of cleaning depends on several factors:
- Pet Owners: If you have pets that shed, aim to clean your brush roll every 2-4 weeks. Pet hair is the ultimate brush clogger.
- Long Hair Households: Similar to pets, long human hair wraps around brushes quickly. A monthly clean is recommended.
- Heavy Usage: If you vacuum daily or frequently, clean it monthly.
- Light Usage/Hard Floors: For occasional vacuuming or primarily hard floors (less tangling), every 2-3 months might suffice.
- Visual Check: Always give your brush roll a quick visual check before or after each use. If you see visible tangles or reduced performance, it’s time for a clean, regardless of your schedule.
Regular cleaning not only keeps your vacuum performing optimally but also extends its lifespan and contributes to a cleaner, healthier home environment. It’s a small effort with big rewards!
Conclusion
Congratulations! You’ve successfully navigated the ins and outs of how to clean your vacuum cleaner brush in 2025. You’ve learned the importance of safety, gathered your tools, meticulously removed hair and grime, and reassembled your vacuum, ready for action. Keeping your brush roll in tip-top shape isn’t just about superficial cleanliness; it’s about maintaining peak suction power, extending the life of your appliance, and ensuring your home truly feels fresh and clean.
Remember, a little regular maintenance goes a long way. Make cleaning your vacuum cleaner brush a part of your routine, and you’ll enjoy a more efficient, powerful cleaning experience every time. Go ahead, give that sparkling clean brush roll a spin, and enjoy the satisfaction of a job well done and a cleaner home!
🎥 Related Video: How to Clean or Replace the Motorized Brush on a Dyson Vacuum | Easy Step-by-Step Guide
📺 ElineParts
Is your Dyson motorized brush not spinning or making strange noises? It might be time for a deep clean or a quick repair.