How to Clean a Dyson Animal Vacuum Cleaner: Your Complete Guide
To clean a Dyson Animal vacuum cleaner, you’ll generally need to empty and wipe the dust bin, wash the washable filters (typically pre-motor, and sometimes post-motor) with cold water and allow them to air dry for at least 24 hours, and remove and clear hair and debris from the brush bar. Regularly checking for and removing blockages in the hose and wand also keeps it performing optimally.
Keeping your Dyson Animal vacuum clean isn’t just about making it look nice; it’s essential for maintaining its powerful suction and extending its lifespan. This comprehensive guide will walk you through each step of cleaning your Dyson, from emptying the bin and washing the filters to clearing the brush bar and checking for stubborn blockages, ensuring your vacuum always performs at its best.

Image source: Bing
📋 Table of Contents
- 🔹 What Does Cleaning Your Dyson Animal Vacuum Involve?
- 🔹 Why is Cleaning Your Dyson Animal Vacuum So Important?
- 🔹 Step-by-Step Guide: How to Clean a Dyson Animal Vacuum Cleaner
- 🔹 How Often Should You Clean Your Dyson Animal Vacuum?
- 🔹 Common Mistakes to Avoid When Cleaning Your Dyson Animal
- 🔹 Practical Tips for a Spotless Dyson Animal
- 🔹 Frequently Asked Questions About Cleaning Dyson Animal Vacuums
- 🔹 Conclusion: Maintaining Your Dyson Animal for Peak Performance
You’ve got a Dyson Animal vacuum, which means you likely have pets, and that brings a lot of fur, dander, and general mess. These vacuums are designed to handle tough jobs, but even the best tools need a little TLC to keep working their magic. Cleaning your Dyson Animal vacuum cleaner isn’t a chore; it’s an investment in keeping your home spotless and your vacuum in top shape. It’s a straightforward process that anyone can do, and it makes a huge difference.
What Does Cleaning Your Dyson Animal Vacuum Involve?
When we talk about cleaning a Dyson Animal vacuum, we’re really focusing on a few key areas that can get clogged or dirty over time. It’s not just about wiping the outside; it’s about getting into the parts that do the heavy lifting.
Essentially, cleaning your Dyson involves:
- Emptying and Wiping the Dust Bin: This is the most frequent task.
- Washing the Filters: Many Dyson models have washable filters that need regular cleaning.
- Clearing the Brush Bar: Pet hair, human hair, and threads love to get tangled here.
- Checking for Blockages: Hoses, wands, and attachments can get jammed.
- Wiping Down the Exterior: Keeping the outside clean too, of course!
Each of these steps plays a vital role in ensuring your vacuum performs efficiently, just like it did on day one.
Why is Cleaning Your Dyson Animal Vacuum So Important?
You might wonder if a quick empty of the bin is enough. The truth is, a deeper clean offers several significant benefits that impact both your vacuum and your home environment.
- Maintains Suction Power: Over time, dust and debris can build up in filters and block airways. This directly reduces your vacuum’s suction, making it less effective at picking up dirt and pet hair. A clean vacuum means maximum suction.
- Extends Lifespan: Regular cleaning prevents your vacuum’s motor from working harder than it needs to. When filters are clogged and brush bars are tangled, the motor struggles, which can lead to overheating and premature wear and tear.
- Improves Air Quality: Dyson Animal vacuums are known for their advanced filtration systems, often capturing allergens and microscopic dust. However, if the filters are dirty, they can’t do their job effectively. A clean filter ensures clean air is expelled back into your home.
- Prevents Unpleasant Odors: Pet dander and dust trapped inside a vacuum can start to smell over time, especially if it gets damp. Cleaning helps eliminate these odors, leaving your home smelling fresh.
- Avoids Costly Repairs: Ignoring blockages or dirty filters can put a strain on internal components, potentially leading to expensive repairs down the line. Regular maintenance is a much cheaper solution.
Think of it like tuning up your car; a little preventative care goes a long way in keeping things running smoothly.
Step-by-Step Guide: How to Clean a Dyson Animal Vacuum Cleaner
Ready to give your Dyson Animal the spa treatment it deserves? Let’s go through the process step by step. Always refer to your specific model’s manual for any unique instructions, as Dyson offers many variations.
Safety First: Preparing Your Vacuum
Before you begin any cleaning, safety is key. You’ll be dealing with electrical components, so always:
- Unplug your Dyson: Make sure the vacuum is completely disconnected from the power outlet. This prevents accidental starts and protects you from electrical hazards.
- Gather your tools: You’ll typically need a coin or flathead screwdriver for some models, scissors or a seam ripper, a soft cloth, and access to a sink with cold water.
Emptying and Cleaning the Clear Bin
This is often the first and most frequent step.
- Remove the Bin: Detach the clear dust bin from the main body of the vacuum. How this is done varies slightly by model, but usually involves pressing a release button.
- Empty the Contents: Hold the bin over a trash can and press the release latch at the bottom to open the base. All the dust and debris should fall out. Give it a few shakes.
- Wipe it Down: Use a damp (not wet) cloth to wipe the inside of the bin, especially around the shroud (the cone-shaped part inside). You can also use a small brush to dislodge any stuck-on dust or hair.
- Dry Thoroughly: Ensure the bin is completely dry before reattaching it.
Washing the Filters
Most Dyson Animal vacuums have at least one washable filter. Some older models might have a pre-motor filter and a non-washable post-motor HEPA filter, while newer models often have both washable pre- and post-motor filters. Always check your user manual to confirm which filters are washable for your specific model.
Pre-Motor Filter
This filter is usually located near the dust bin or at the top of the cyclone assembly.
- Locate and Remove: Twist or pull to remove the pre-motor filter. It often looks like a cone or cylinder.
- Rinse with Cold Water: Hold the filter under a cold water tap. Don’t use soap or detergents; just plain cold water.
- Squeeze and Rinse: For cylindrical filters, gently squeeze the filter to work out the dirt. For other types, rinse until the water runs clear.
- Shake Off Excess Water: Give it a good shake to remove as much water as possible.
- Air Dry Completely: This is the most crucial step. Place the filter in a warm, dry place with good airflow for at least 24 hours, or until it’s absolutely bone dry. Placing it near a heat source is not recommended as it could damage the filter material.
Post-Motor Filter (if washable)
If your Dyson Animal has a washable post-motor filter (often located at the back or side of the machine, sometimes behind a cover), the cleaning process is similar:
- Remove the Filter: Twist or pull to remove it.
- Rinse with Cold Water: Rinse it under cold water until the water runs clear.
- Dry Completely: Again, ensure it is completely dry for at least 24 hours before putting it back.
Important Note: Never put filters in a washing machine, dishwasher, tumble dryer, microwave, or near an open flame. Extreme heat can damage the filter material, rendering it ineffective.
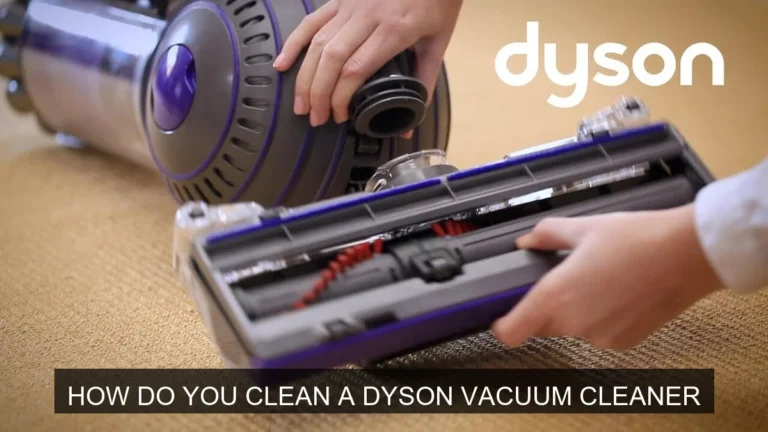
Cleaning the Brush Bar (Motorhead)
The brush bar is a magnet for hair, especially in homes with pets. A tangled brush bar can drastically reduce cleaning performance.
- Detach the Cleaner Head: Remove the main cleaner head from the vacuum wand.
- Access the Brush Bar: Depending on your model, you might need a coin or a flathead screwdriver to unlock a cover on the side of the cleaner head to release the brush bar. Some newer models have a simple clip.
- Remove Hair and Debris: Use scissors or a seam ripper to carefully cut away any tangled hair, string, or fibers wrapped around the brush bar. Be careful not to cut the bristles themselves.
- Clean the Housing: Wipe down the inside of the cleaner head housing where the brush bar sits, removing any accumulated dust or dirt.
- Reinstall: Once clean, reinsert the brush bar and secure any covers or clips. Make sure it clicks firmly into place.
Wiping Down the Exterior and Attachments
While the internal parts are drying, you can tackle the rest of the vacuum.
- Wipe the Body: Use a slightly damp cloth to wipe down the exterior of the vacuum cleaner. Avoid getting water into any electrical openings.
- Clean Attachments: Detach all smaller tools and attachments. Wipe them clean with a damp cloth or use a soft brush to remove dust and debris from crevices. Ensure they are dry before reattaching.
Checking for Blockages
Even a clean vacuum won’t perform if there’s a blockage somewhere in the airway. This is often indicated by a sudden loss of suction or an unusual noise.
- Remove Attachments and Hoses: Take off the main cleaner head, wand, and hose.
- Visually Inspect: Look through the wand, the main hose, and any smaller hoses. Dyson parts are often clear or semi-transparent, making blockages easier to spot.
- Use a Blunt Object: If you see a blockage, use a broom handle, a long stick, or another blunt object to gently push it through. Never use anything sharp that could pierce the hose.
- Check Airflow: After clearing, feel for airflow by blowing gently through the hose to confirm it’s clear.
Reassembling Your Vacuum
Once all parts are clean and completely dry (especially the filters!), put your Dyson back together. Make sure every part clicks securely into place. Reattaching a damp filter can cause mold growth and damage to your vacuum’s motor, so patience with drying is key!
How Often Should You Clean Your Dyson Animal Vacuum?
The frequency of cleaning depends on how often you use your vacuum and how much pet hair and dirt it’s exposed to. Here’s a general guideline:
| Component | Recommended Cleaning Frequency | Notes |
|---|---|---|
| Dust Bin | After every use or when full | Empty and wipe down as needed. |
| Washable Filters | Every 3 months (minimum) | More often if used heavily or in homes with many pets. |
| Brush Bar | Every 1-3 months | Check regularly for tangled hair. |
| Hoses & Airways | Every 6 months or when suction drops | Check for blockages. |
| Exterior & Attachments | As needed (e.g., monthly) | Keep them free of dust and debris. |
Common Mistakes to Avoid When Cleaning Your Dyson Animal
While cleaning your Dyson is relatively simple, there are a few pitfalls to steer clear of that could potentially damage your vacuum or reduce its effectiveness.
- Not Drying Filters Completely: This is arguably the biggest mistake. A damp filter can lead to mold and mildew growth, produce foul odors, and even damage the vacuum’s motor when it tries to draw air through a waterlogged filter. Always allow at least 24 hours, or more, for filters to air dry completely.
- Using Soap or Detergent on Filters: Dyson filters are designed to be cleaned with plain cold water only. Soaps, detergents, or harsh chemicals can break down the filter material, making them less effective or even damaging them permanently.
- Forcing Parts: Dyson vacuums are designed for easy disassembly and reassembly. If something isn’t coming apart easily, don’t force it. You might be missing a release button or a twist mechanism. Forcing parts can lead to breakage.
- Neglecting Blockages: Thinking a dirty filter is the only reason for low suction can be a mistake. Often, a blockage in the wand, hose, or cleaner head is the culprit. Always check these areas if suction decreases.
- Using Heat to Dry Filters: As mentioned, never use a tumble dryer, microwave, or direct heat source to speed up filter drying. This can warp or melt the filter material, ruining it.
- Cleaning Electrical Components with Water: Only washable filters should come into contact with water. Never submerge or spray water directly onto the main body, motor, or any electrical parts of your vacuum.
Practical Tips for a Spotless Dyson Animal
Here are a few extra tips to make your Dyson Animal cleaning routine even more effective and hassle-free:
- Set a Reminder: Mark your calendar or set a recurring reminder on your phone for filter cleaning. This ensures you don’t forget this crucial maintenance step.
- Clean in a Well-Ventilated Area: Especially when dealing with a dusty bin or brush bar, work in a garage, outside, or a well-ventilated room to avoid kicking dust back into your living space.
- Keep a Dedicated Tool Kit: Have a pair of small scissors, a seam ripper, and a sturdy coin handy. Store them near your vacuum or cleaning supplies so they’re always ready when you need to tackle the brush bar.
- Consider a Second Set of Filters: If you find it inconvenient to wait 24+ hours for filters to dry, having a spare set means you can swap them out immediately after washing, allowing you to use your vacuum without interruption.
- Don’t Overfill the Bin: Empty your dust bin regularly, even if it’s not completely full. An overfilled bin can reduce suction and put strain on the cyclone system.
- Gentle is Best: When clearing blockages or cleaning sensitive parts, always be gentle. You don’t want to accidentally damage any internal components.
Frequently Asked Questions About Cleaning Dyson Animal Vacuums
Can I use soap or detergent to clean my Dyson Animal’s filters?
No, you should only use cold water to clean your Dyson Animal’s filters. Soaps, detergents, or other cleaning solutions can damage the filter material and make them less effective at trapping dust and allergens.
How long do Dyson filters take to dry completely?
Dyson filters typically need at least 24 hours to air dry completely. In humid environments, it might take even longer, up to 48 hours. It’s crucial that they are bone dry before being reinserted into the vacuum to prevent mold growth and motor damage.
What tools do I need to clean the brush bar?
You’ll primarily need a coin or a flathead screwdriver to open the brush bar housing (depending on your model) and a pair of scissors or a seam ripper to carefully cut away tangled hair and fibers. A soft brush can help clear debris from the housing.
Is it normal for my Dyson to smell after cleaning?
If your Dyson Animal still smells after cleaning, it’s often due to filters not being completely dry, allowing mold or mildew to form, or a lingering blockage of organic material. Ensure filters are totally dry, and thoroughly check all hoses and airways for any hidden debris.
What if I can’t remove a stubborn blockage?
If a blockage is particularly stubborn, try disassembling as many parts as possible to get a better angle. Use a blunt object like a broom handle to push it through. If it persists, consulting your Dyson user manual for specific troubleshooting tips for your model, or reaching out to customer support, might be helpful.
Conclusion: Maintaining Your Dyson Animal for Peak Performance
Cleaning your Dyson Animal vacuum cleaner might seem like an extra step, but it’s a simple, effective way to ensure your powerful machine continues to tackle pet hair and dirt with ease. By regularly emptying the bin, washing the filters, clearing the brush bar, and checking for blockages, you’re not just cleaning a vacuum; you’re preserving its suction power, extending its life, and maintaining a healthier home environment.
Make these steps a regular part of your home cleaning routine, and your Dyson Animal will reward you with consistent, high-performance cleaning for years to come. A little effort now means a lot less hassle and a much cleaner home later.