How to Replace Vacuum Cleaner Belt
Replacing your vacuum cleaner belt is a straightforward maintenance task that can significantly improve your vacuum’s performance. This guide provides a detailed, step-by-step walkthrough, covering everything from diagnosing the problem and gathering tools to safely installing a new belt and performing post-replacement checks. With a little care and the right instructions, you can easily restore your vacuum’s suction power and keep your home sparkling clean.
There’s nothing quite like the satisfaction of a freshly vacuumed home – the clean lines on the carpet, the dust-free floors, the feeling of accomplishment. But what happens when your trusty vacuum cleaner suddenly starts sounding… off? Perhaps it’s leaving behind more debris than it picks up, or worse, there’s a strange burning smell in the air. Chances are, your vacuum cleaner belt might be the culprit. Don’t worry, you don’t need to rush out and buy a whole new machine! Learning how to replace vacuum cleaner belt is a surprisingly simple and empowering DIY task that can save you money and bring your vacuum back to life.
Many people hesitate to tackle vacuum repairs, thinking they require specialized skills. But replacing a vacuum cleaner belt is one of the most common and easiest fixes. It’s a vital component, responsible for transferring power from the motor to the brush roll, the part that agitates carpets and sweeps debris into the suction path. When this belt stretches, breaks, or slips, your vacuum loses its ability to deep clean. This comprehensive guide will walk you through every step of how to replace vacuum cleaner belt, making sure you feel confident and prepared. Let’s get your floors sparkling clean again!
Key Takeaways
- Diagnosis is Key: Understand that a burning smell, a non-spinning brush roll, or poor suction are common signs your vacuum cleaner belt needs replacing.
- Safety First: Always unplug your vacuum cleaner before attempting any repairs or maintenance to prevent electrical shocks or accidental starts.
- Get the Right Belt: Ensure you purchase the correct replacement belt for your specific vacuum model; consult your owner’s manual or the manufacturer’s website.
- Gather Your Tools: Basic tools like screwdrivers (Phillips and flathead), needle-nose pliers, and gloves will make the replacement process much smoother.
- Follow Steps Carefully: The process typically involves accessing the brush roll, removing the old belt, stretching and installing the new one, and then reassembling the vacuum.
- Test Thoroughly: After replacing the belt, always test your vacuum’s functionality to ensure the brush roll spins correctly and suction is restored.
- Preventative Maintenance: Regularly check and clean your brush roll to prevent hair and debris buildup, which can prematurely wear out your new vacuum cleaner belt.
Quick Answers to Common Questions
How often should I replace my vacuum cleaner belt?
It depends on usage, but typically a vacuum cleaner belt should be checked every 3-6 months and replaced annually, or immediately if you notice signs of wear like poor brush roll performance or a burning smell.
Can I use any belt for my vacuum cleaner?
No, you must use a belt specifically designed for your vacuum cleaner’s make and model. Belts vary in size, thickness, and material, and using the wrong one can lead to poor performance or further damage.
What causes a vacuum cleaner belt to break?
Common causes include normal wear and tear over time, hair and debris getting tangled in the brush roll causing it to jam, or vacuuming up large or inappropriate items that put excessive strain on the belt.
Is it difficult to replace a vacuum cleaner belt myself?
Not at all! For most models, replacing a vacuum cleaner belt is a straightforward DIY task that requires basic tools and about 15-30 minutes, even for beginners. This guide breaks it down step-by-step.
Will replacing the belt improve my vacuum’s suction?
Replacing a worn or broken belt will primarily restore the brush roll’s spinning action, which greatly improves deep cleaning on carpets and can give the *impression* of better suction because more dirt is agitated and picked up. For true suction issues, also check filters and hoses.
📑 Table of Contents
Understanding Your Vacuum Cleaner Belt and Why It Fails
Before we dive into the “how-to,” let’s quickly understand the unsung hero of your vacuum cleaner: the belt. This simple rubber band-like component is crucial. It connects the motor to the rotating brush roll (also known as the beater bar). As the motor spins, it turns the belt, which in turn spins the brush roll, helping to lift dirt, dust, and pet hair from your carpets and hard floors. Without a functional belt, your brush roll won’t spin, drastically reducing your vacuum’s cleaning effectiveness.
Common Signs of a Failing Belt
- No Brush Roll Movement: This is the most obvious sign. If your vacuum is on, but the brush roll isn’t spinning, it’s almost certainly a broken or severely stretched belt.
- Poor Suction/Cleaning Performance: Even if the brush roll is moving sluggishly, a stretched or slipping belt won’t transfer enough power, leading to ineffective cleaning. You might notice your vacuum isn’t picking up as much as it used to.
- Burning Rubber Smell: A very common indicator. If the belt is slipping but not fully broken, the friction can generate heat and a distinctive burning rubber odor. This often means the belt is severely worn and about to snap.
- Loud Noises: Sometimes a deteriorating belt can make squealing or slapping noises as it struggles to maintain tension or gets caught on other components.
Why Do Belts Break or Stretch?
Vacuum cleaner belts are wear-and-tear items. They are designed to eventually fail. Here’s why:
- Normal Wear and Tear: Over time, the rubber naturally degrades, stretches, and becomes brittle due to constant use, friction, and heat.
- Obstructions: Hair, strings, carpet fibers, and other debris can get wrapped around the brush roll, causing it to seize up. When the motor tries to turn a jammed brush roll, it puts immense strain on the belt, often causing it to break.
- Age: Even if your vacuum isn’t used frequently, the rubber can still dry out and crack over time.
- Overheating: Extended use or blockages can cause the motor to overheat, which can also accelerate belt degradation.
Recognizing these signs early can save you frustration and maintain your vacuum’s efficiency. Now that you know *why* your belt might be failing, let’s get ready to replace vacuum cleaner belt.
Gathering Your Tools and the Right Replacement Belt
Preparation is key for any DIY project, and learning how to replace vacuum cleaner belt is no exception. Having the right tools and, most importantly, the correct replacement belt will make the process smooth and quick.
Visual guide about How to Replace Vacuum Cleaner Belt
Image source: bissell.com
Finding the Right Replacement Belt
This is arguably the most crucial step. Vacuum cleaner belts are not universal. Different vacuum models, and even different models from the same brand, require specific belt types and sizes. Using the wrong belt can lead to poor performance, further damage, or simply won’t fit.
- Check Your Owner’s Manual: This is your best friend. It will clearly state the specific part number or type of belt required.
- Look for Model Number: If you don’t have the manual, find your vacuum cleaner’s model number (usually on a sticker on the back or bottom of the unit). You can then search online for “replacement belt for [your vacuum brand] [your model number]”.
- Examine the Old Belt (if possible): Sometimes, the old belt (if it’s not completely shredded) might have a part number printed on it. If it’s intact enough, you can also take it to a hardware or vacuum repair store to match it. Note if it’s a flat belt, round belt, or V-belt.
Pro Tip: Always consider buying a multi-pack if available. Having a spare belt on hand means you won’t have to wait for a new one when the next replacement is due.
Essential Tools You’ll Need
Most vacuum cleaner belt replacements require only basic household tools:
- Screwdrivers: You’ll likely need both Phillips-head and flathead screwdrivers to open the vacuum’s base plate.
- Gloves: Work gloves or even disposable latex gloves are recommended. This protects your hands from dirt, dust, sharp edges, and any grease.
- Scissors or Utility Knife: Useful for cutting away tangled hair or string from the brush roll.
- Needle-Nose Pliers (Optional but Helpful): Can be useful for gripping small parts or pulling out stubborn debris.
- Flashlight: Helps illuminate hard-to-see areas inside the vacuum.
- Cleaning Cloth/Paper Towels: For cleaning the brush roll and surrounding areas while you have it open.
Safety First: Preparing for the Replacement
Before you even think about touching a screwdriver or the vacuum’s internal components, remember this golden rule: safety first! Neglecting proper safety precautions can lead to electrical shock or injury.
Unplug Your Vacuum Cleaner!
This cannot be stressed enough. Always, always, always unplug your vacuum cleaner from the wall outlet before you begin any inspection, cleaning, or repair work. This eliminates any risk of electrical shock or the vacuum accidentally turning on while your hands are inside the unit. Even if you think it’s off, always unplug it.
Clear Your Workspace
Find a well-lit, clean, and spacious area to work. A kitchen table, workbench, or even a cleared section of the floor will do. Lay down an old towel or newspaper to protect your work surface from dirt and dust from the vacuum. Having enough space allows you to lay out tools and components systematically, making reassembly easier.
Prepare for Dust and Debris
Vacuums are designed to collect dirt, so expect some mess! Have a trash can nearby for disposing of the old belt and any accumulated dust, hair, and debris you’ll be removing from the brush roll area. Wearing gloves also helps keep your hands clean.
Step-by-Step Guide to Replacing Your Vacuum Cleaner Belt
With your tools ready and safety precautions in place, it’s time to learn how to replace vacuum cleaner belt. While specific steps might vary slightly between models, the general process is very similar for most upright and canister vacuums with a rotating brush roll.
1. Accessing the Brush Roll Area
First, lay your vacuum cleaner on its side or back, exposing the underside where the brush roll is located. Most vacuums have a removable base plate that covers the brush roll. This plate is usually held in place by several screws.
- Locate Screws: Identify all the screws holding the base plate. These are typically Phillips-head screws, but some models might use flathead or even proprietary screws (though less common for belts).
- Remove Screws: Carefully unscrew them. Keep them in a small container or a magnetic tray so they don’t get lost.
- Remove Base Plate: Once all screws are removed, gently lift off the base plate. It might snap into place in some areas, so a little gentle prying with a flathead screwdriver might be needed.
- Remove Wheels (if necessary): On some models, especially those with small wheels on the base, you might need to remove these first to fully access the belt and brush roll.
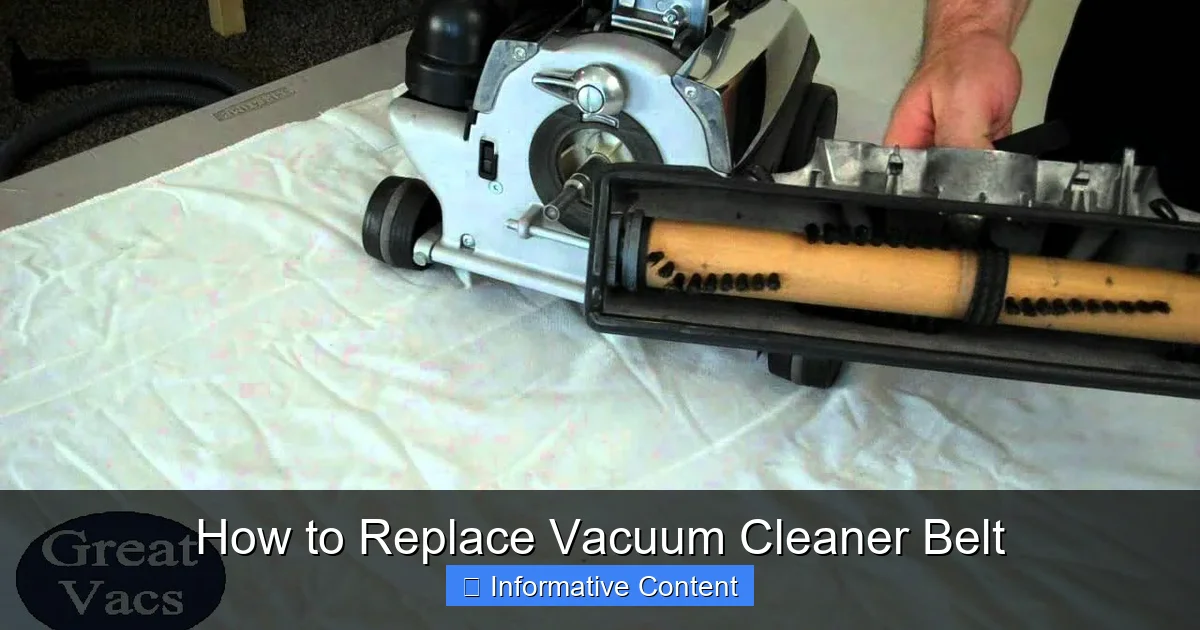
2. Removing the Old Belt and Cleaning the Brush Roll
With the base plate off, you should now clearly see the brush roll and the belt.
- Inspect the Old Belt: Observe how the old belt is routed around the motor shaft and the brush roll. This will help you remember how to install the new one. Is it broken? Stretched? Shredded?
- Remove the Brush Roll: Gently lift the brush roll out of its housing. It usually has ends that fit into slots or bearings. Sometimes one end is fixed, and you pivot it out.
- Remove the Old Belt: If the belt is still intact, simply slide it off the motor shaft and the brush roll. If it’s broken, remove any remaining pieces.
- Clean the Brush Roll: This is a crucial step! Take your scissors or utility knife and carefully cut away any tangled hair, string, carpet fibers, or other debris wrapped around the brush roll. This buildup is a primary cause of belt failure and reduced performance. A clean brush roll will prolong the life of your new vacuum cleaner belt. Also, check the bearings at the ends of the brush roll for any obstructions.
- Clean the Belt Pathway: While you have everything open, use a cloth or paper towel to wipe away any dust, dirt, or debris from the vacuum’s base, especially around the motor shaft and where the brush roll sits.
3. Installing the New Vacuum Cleaner Belt
Now for the main event: installing your new vacuum cleaner belt.
- Position the New Belt: Loop the new belt around the brush roll first. Make sure it sits in the groove designed for it on the brush roll.
- Reinsert the Brush Roll: Carefully place the brush roll back into its housing. One end usually has a cap that fits into a bearing, and the other end allows for the belt to stretch over the motor shaft.
- Stretch and Attach to Motor Shaft: This is often the trickiest part as new belts are tight. With the brush roll in place and the belt looped around it, stretch the belt over the motor shaft (the small metal rod protruding from the vacuum’s motor). You might need to gently rotate the brush roll or the motor shaft to help the belt seat correctly. Ensure the belt is centered and not twisted.
- Check Tension: Once installed, the belt should be taut but not overly strained. Give the brush roll a manual spin; it should turn freely with a good amount of resistance from the belt.
Pro Tip: If the belt feels too tight to stretch by hand, you can sometimes use a flathead screwdriver or the blunt end of a pair of pliers to gently pry and guide the belt over the motor shaft. Be careful not to damage the belt or the motor shaft.
4. Reassembling Your Vacuum
Almost there! Now, put everything back together in reverse order.
- Reattach Base Plate: Carefully position the base plate back onto the vacuum’s underside. Ensure it aligns correctly with all the screw holes.
- Secure Screws: Reinsert and tighten all the screws you removed earlier. Don’t overtighten, as this can strip the plastic. Just snug them up securely.
- Reattach Wheels (if removed): If you removed any wheels, put them back on now.
Testing and Post-Replacement Checks
After all that hard work, it’s time for the moment of truth: testing your vacuum with its new belt.
Initial Power-Up and Brush Roll Check
- Plug It In: Reconnect your vacuum cleaner to the power outlet.
- Turn It On: Switch your vacuum on. Listen for any unusual noises.
- Check Brush Roll: Observe the brush roll. It should now be spinning vigorously. If your vacuum has a brush roll indicator light, it should be green (or whatever color indicates proper function).
- Floor Test: Briefly run the vacuum on a carpeted or hard floor. Listen to the sound and feel the suction. Does it sound powerful again? Is it picking up debris effectively?
Troubleshooting Common Issues
- Brush Roll Still Not Spinning:
- Is the belt installed correctly? Unplug and recheck that the belt is properly seated on both the brush roll and the motor shaft.
- Is it the right belt? If the belt is too loose, it won’t grip; if too tight, it might be preventing the brush roll from turning or straining the motor.
- Is there still a blockage? Unplug and re-examine the brush roll and housing for any residual hair or debris.
- Motor issue? If the belt is definitely correct and installed properly, but nothing happens, there might be a deeper motor issue, which would require professional repair.
- Burning Smell Returns:
- This can happen if the new belt is still slipping or if there’s an obstruction causing too much friction. Unplug immediately and recheck the brush roll for debris. Ensure the belt is not twisted and is properly seated. If the smell persists after clearing any issues, consult a professional.
- Reduced Suction:
- While replacing the vacuum cleaner belt fixes brush roll issues, poor suction can also be caused by clogged filters, a full dust bin/bag, or a hose blockage. Check these components as well if suction is still low.
Maintenance Tips to Prolong Belt Life
You’ve successfully learned how to replace vacuum cleaner belt! Now, let’s talk about how to keep your new belt and your vacuum running smoothly for as long as possible.
Regular Brush Roll Cleaning
This is paramount. Make it a habit to regularly inspect and clean your brush roll. Hair, thread, and string are the biggest culprits for tangling and causing belt strain. Use scissors to carefully cut and remove any wrapped debris. Do this every few weeks or whenever you notice a decline in performance.
Avoid Vacuuming Certain Items
Try to avoid vacuuming up large items, socks, small toys, or excessive amounts of loose string. These can easily get jammed in the brush roll and cause instant belt breakage or strain.
Don’t Force Your Vacuum
If your vacuum feels like it’s struggling on a particular type of carpet or rug, don’t force it. Lift the brush roll (if your model allows) or check for obstructions. Forcing it puts unnecessary stress on the belt and motor.
Replace Filters Regularly
Clogged filters make your vacuum work harder, putting more strain on the motor and potentially generating more heat, which can affect belt longevity. Follow your manufacturer’s recommendations for filter replacement.
Consider Genuine Replacement Parts
While generic belts might be cheaper, genuine manufacturer belts are often designed to precise specifications, ensuring a better fit and potentially longer life. When you replace vacuum cleaner belt, prioritize quality.
By following these maintenance tips, you can significantly extend the life of your new vacuum cleaner belt and ensure your vacuum continues to deliver powerful, effective cleaning for years to come. Congratulations on mastering a valuable household skill!
Frequently Asked Questions
What are the first signs my vacuum cleaner belt might be failing?
The earliest signs often include a burning rubber smell while vacuuming, a brush roll that spins slowly or not at all, or a noticeable decrease in your vacuum’s ability to pick up debris, especially on carpets. You might also hear unusual slapping or squealing noises.
Where can I find the model number for my vacuum to buy the correct belt?
Your vacuum cleaner’s model number is usually located on a sticker or label on the back, bottom, or side of the unit. Sometimes it’s under the dustbin or within the owner’s manual. It’s crucial for purchasing the exact replacement belt.
Do all vacuum cleaners have a belt?
Most upright and canister vacuums with a rotating brush roll will have a belt. However, some newer stick vacuums, robotic vacuums, or older straight-suction models without a brush roll may not use a belt for their cleaning mechanism.
What type of screwdrivers do I typically need for this job?
For most vacuum cleaner models, you’ll typically need a Phillips-head screwdriver to remove the screws holding the base plate. A flathead screwdriver can also be useful for gently prying open covers or guiding the new belt into place, but Phillips is usually the primary tool.
How can I make sure the new belt lasts longer?
To prolong the life of your new vacuum cleaner belt, regularly inspect and clean the brush roll to remove tangled hair and debris. Avoid vacuuming large objects or strings, and keep your filters clean to prevent the motor from working too hard, which can overheat the belt.
Can I clean a vacuum belt instead of replacing it?
While you can clean a belt if it’s just dusty, cleaning won’t repair a stretched, cracked, or broken belt. Once a belt loses its elasticity or integrity, it needs to be replaced entirely to ensure proper brush roll function and effective cleaning.