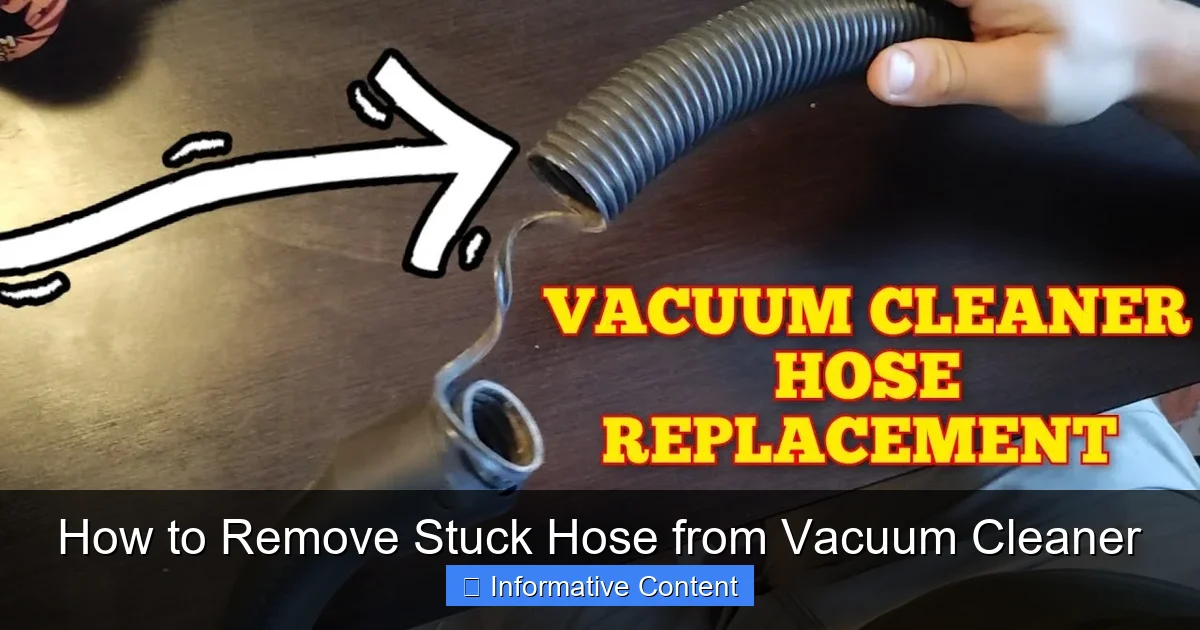
How to Remove Stuck Hose from Vacuum Cleaner
A stuck vacuum hose can be incredibly frustrating, but removing it safely and effectively requires patience and the right approach. Always disconnect power first to ensure safety. Then, use gentle wiggling, twisting, or even warming methods to free the hose, avoiding brute force that could cause permanent damage. Regular maintenance and understanding your vacuum’s connection points can help prevent future occurrences, keeping your cleaning routine smooth and hassle-free.
How to Remove Stuck Hose from Vacuum Cleaner
We’ve all been there. You’re in the middle of a cleaning spree, feeling productive, when suddenly your vacuum cleaner hits a snag. Not a literal snag, but a metaphorical one: the hose is stuck. It won’t budge. You pull, you twist, you maybe even grunt a little, but that hose is as stubborn as a mule. It’s frustrating, it’s annoying, and it brings your cleaning efforts to a grinding halt.
A stuck vacuum hose isn’t just an inconvenience; it can be a real headache. Whether it’s jammed by debris, a tight connection, or a tricky locking mechanism, trying to force it off can often do more harm than good. You could bend plastic, strip threads, or even crack the vacuum casing. But don’t despair! With the right approach and a bit of patience, you can successfully remove stuck hose from your vacuum cleaner without causing any damage.
This comprehensive guide will walk you through everything you need to know about how to remove stuck hose from your vacuum cleaner. We’ll cover why hoses get stuck, essential safety precautions, gentle techniques for common jams, more advanced methods for stubborn cases, and crucial tips for preventing this problem in the future. So, take a deep breath, put down that wrench, and let’s get your vacuum back in action!
Key Takeaways
- Safety First: Always unplug your vacuum cleaner from the power source before attempting any repairs or hose removal to prevent electrical hazards.
- Avoid Brute Force: Applying excessive force can damage the hose, the connection port, or even internal vacuum components, leading to costlier repairs.
- Gentle Wiggle and Twist: Most stuck hoses can be freed by gently wiggling, twisting, and applying consistent pressure, mimicking an unscrewing motion.
- Inspect for Obstructions: Before applying force, visually check for any visible debris, hair, or objects causing the hose to jam. Clearing these can often resolve the issue.
- Consider Warmth or Lubrication: For stubborn connections, gently warming the plastic with a hairdryer or applying a small amount of dish soap can help loosen the connection.
- Understand Your Vacuum Type: Different vacuum models (upright, canister, handheld) may have unique hose locking mechanisms. Familiarize yourself with yours.
- Prevent Future Issues: Regular cleaning of the hose and connection points, proper storage, and mindful vacuum use can significantly reduce the chances of a hose getting stuck again.
Quick Answers to Common Questions
How do I know if my vacuum hose is truly stuck or just tight?
A truly stuck hose won’t budge even with gentle twisting and pulling. A merely tight hose will feel very firm but might give a little with consistent, gentle effort. Always start with the assumption it’s just tight and avoid excessive force.
Can I use pliers to remove a stuck hose?
You can, but only with extreme caution. Wrap the hose connection in a cloth to protect it, and use pliers to gently grip and twist for leverage. Never squeeze hard, as this can easily crack or deform the plastic.
Is it safe to use WD-40 on my vacuum cleaner?
Use WD-40 very sparingly and only on the exterior of the connection point. Be extremely careful to prevent it from getting inside the vacuum’s motor or electrical components, as it can damage them. Dish soap and water are often safer alternatives for lubrication.
What if I hear a clicking sound but the hose still won’t come off?
A clicking sound might indicate that an internal locking mechanism is trying to release but is still obstructed or jammed. Continue with gentle wiggling and twisting, and inspect the area for any visible debris that might be catching.
How often should I clean my vacuum hose connection?
It’s a good practice to visually inspect and wipe down your hose connection points every few uses, or whenever you notice significant debris accumulation or a slight difficulty in attaching/detaching the hose.
📑 Table of Contents
- Understanding Why Your Hose Gets Stuck (and What to Avoid)
- Safety First: Essential Preparations Before You Start
- The Gentle Approach: Basic Methods for Most Stuck Hoses
- Tackling Stubborn Hoses: Advanced Techniques and Tools
- When All Else Fails: Troubleshooting and Professional Help
- Preventing Future Hose Headaches
Understanding Why Your Hose Gets Stuck (and What to Avoid)
Before we dive into the “how-to,” it’s important to understand the “why.” Knowing the common reasons a vacuum hose gets stuck can help you diagnose the problem and approach it correctly. It also highlights why using brute force is almost always a bad idea.
Common Culprits: Debris, Twist-Locks, Suction Seal
There are a few usual suspects when your vacuum hose refuses to disconnect:
- Debris Buildup: Over time, dust, pet hair, lint, and even small objects can accumulate around the connection point where the hose meets the vacuum body. This buildup acts like a glue or a wedge, making it incredibly difficult to remove the stuck hose.
- Tight Suction Seal: When you turn off your vacuum, sometimes the powerful suction creates a very strong vacuum seal between the hose and the port. This seal can be surprisingly strong and make it feel like the parts are welded together.
- Twist-Lock Mechanisms: Many modern vacuum cleaners use a twist-lock or snap-on mechanism to secure the hose. If these aren’t aligned correctly or if they’ve become stiff with age and grime, they can become very difficult to release.
- Friction and Age: Plastic and rubber components can become less pliable over time. Friction can increase, making connections tighter and harder to separate.
The Dangers of Force: Why Patience is Key
It’s incredibly tempting to just yank on a stuck vacuum hose. However, this is one of the quickest ways to cause permanent damage. Applying excessive force can lead to:
- Cracked Plastic: The plastic housing of your vacuum or the hose connection port can easily crack or break under too much stress.
- Stripped Threads: If your hose uses a screw-on mechanism, forcing it can strip the threads, rendering the connection unusable.
- Damaged Locking Tabs: Snap-on hoses rely on small plastic tabs. Too much force can break these off, meaning your hose will never properly secure again.
- Internal Damage: In some cases, pulling too hard can dislodge internal components or wiring, leading to more complex repairs.
The primary goal is to remove the stuck hose without causing further damage. Patience and a methodical approach will save you time, money, and frustration in the long run.
Safety First: Essential Preparations Before You Start
Visual guide about How to Remove Stuck Hose from Vacuum Cleaner
Image source: laughingsquid.com
Before you even think about how to remove stuck hose from your vacuum cleaner, safety must be your absolute priority. Ignoring these steps could lead to electrical shocks or other injuries.
Unplugging is Non-Negotiable
This is the golden rule. No matter how simple the task seems, always unplug your vacuum cleaner from the electrical outlet before attempting any kind of maintenance or repair. This eliminates the risk of accidental power activation or electrical shock. Think of it as hitting the “reset” button for your own safety.
Clearing Your Workspace and Gathering Tools
Once the power is off, set up a clear, well-lit workspace. You’ll want enough room to maneuver the vacuum and inspect the hose connection from all angles. Having the right (or at least helpful) tools at hand can make the process smoother. Consider having:
- A flashlight: For inspecting tight spaces and identifying debris.
- Small flathead screwdriver or butter knife: For gently prying open latches (use with extreme care).
- Gloves: To protect your hands, especially if you suspect sharp debris.
- Warm water and dish soap: For lubrication.
- Hairdryer: For gently warming plastic.
- Pliers (with padded jaws or a cloth): For stubborn cases, used with immense caution.
The Gentle Approach: Basic Methods for Most Stuck Hoses
Most stuck hoses can be freed with a combination of gentle manipulation and observation. Start with these less invasive techniques. Remember, the key is finesse, not force.
Wiggling and Twisting (The “Unscrew” Motion)
Often, a hose feels stuck because it’s just really tight or slightly misaligned.
- Grasp Firmly: Hold the vacuum body steady with one hand and the hose connection point with the other.
- Gentle Twist: Apply gentle twisting pressure, as if you were trying to unscrew a bottle cap. Try twisting in both clockwise and counter-clockwise directions.
- Wiggle and Pull: While twisting, gently wiggle the hose from side to side and try to pull it outwards. Don’t yank. Think of it as working the connection loose, little by little.
This method is particularly effective for hoses that use a friction fit or a simple twist-lock mechanism that has just become stiff.
Applying Gentle Pressure (Pushing In, Then Pulling Out)
Sometimes, a stuck vacuum hose needs to be pushed *further in* before it can come out. This can help to release internal locking tabs or break a strong suction seal.
- Push In: With both hands, gently but firmly push the hose further into the vacuum cleaner’s port. You might hear a faint click or feel a slight give.
- Twist and Pull: While maintaining slight inward pressure, try the wiggling and twisting motion described above, then gently pull the hose outwards.
This technique is often successful with hoses that have internal locking mechanisms that require a slight inward push to disengage.
The “Tug-and-Twist” Combo
This is a variation of the above, combining the actions for maximum effect without resorting to brute force.
- Hold Firm: Stabilize the vacuum.
- Simultaneous Action: As you twist the hose (try both directions), apply a consistent, gentle outward pulling pressure. The key is *consistent* pressure, not a sudden, violent yank.
- Listen and Feel: Pay attention to any sounds or changes in resistance. A slight pop or shift often indicates the connection is loosening.
Inspecting for Visible Obstructions
If your vacuum hose is stuck, always take a moment to look closely at the connection point. Use your flashlight if needed.
- Look for Debris: Are there visible clumps of hair, dust bunnies, or small pieces of debris wedged in the gap between the hose and the vacuum port?
- Check Locking Tabs: If your vacuum has visible locking tabs, ensure they aren’t bent or obstructed.
- Clear Obstructions: If you spot anything, use a pair of tweezers, needle-nose pliers, or even a sturdy toothpick to carefully remove the blockage. Be careful not to push the debris deeper into the vacuum.
Sometimes, simply clearing a wad of pet hair is all it takes to learn how to remove stuck hose from vacuum cleaner.
Tackling Stubborn Hoses: Advanced Techniques and Tools
If the gentle methods haven’t worked, it’s time to step up your game. These techniques involve a bit more intervention but are still designed to be non-damaging if performed carefully.
Loosening with Warmth (Hairdryer Method)
Plastic components can expand slightly when warmed, which can help loosen a tight connection.
- Grab Your Hairdryer: Set your hairdryer to a low or medium heat setting. Do not use high heat, and keep it moving.
- Apply Heat: Direct the warm air around the connection point where the hose meets the vacuum body. Keep the hairdryer moving in circles, never focusing on one spot for too long, to prevent melting or warping the plastic. Aim for about 30-60 seconds.
- Attempt Removal: Immediately after warming, try the gentle wiggling, twisting, and pulling motions again. The slight expansion might be just enough to break the seal or loosen the components.
This method can be surprisingly effective for how to remove stuck hose from a vacuum cleaner where friction or a tight seal is the primary issue.
Lubrication for the Win (Dish Soap or WD-40)
A little bit of lubrication can go a long way in reducing friction.
- Choose Your Lubricant: For most plastic connections, a few drops of liquid dish soap mixed with a tiny bit of water is ideal. For more stubborn metal-on-plastic connections, or if you suspect corrosion, a very small amount of WD-40 or silicone spray can be used, but be extremely careful not to get it inside the vacuum’s motor or electrical components.
- Apply Sparingly: Apply a tiny amount of your chosen lubricant around the entire circumference of the connection point. Let it sit for a few minutes to seep into the tight gaps.
- Work It In: Gently wiggle and twist the hose to help the lubricant penetrate deeper.
- Attempt Removal: Once the lubricant has had a chance to work, try pulling and twisting the hose again.
Remember to wipe away any excess lubricant once the hose is free to prevent slipperiness or attracting more dirt.
Using Pliers (with Caution and Protection)
This is a last resort before considering professional help and must be done with extreme care to avoid damage.
- Protect the Surface: Wrap the hose connection point or the vacuum port with a thick cloth or several layers of masking tape. This will protect the plastic from the pliers’ jaws.
- Grip Gently: Use channel-lock pliers or adjustable pliers to gently grip the *sturdy* part of the hose collar or the vacuum port. Do not squeeze hard enough to deform the plastic.
- Twist and Pull: Use the pliers to provide extra leverage for twisting the hose. While doing this, gently pull outwards. The goal is to assist your hands, not to crush the components.
Only use pliers if you are confident you can apply consistent, gentle pressure without deforming or breaking the parts.
Addressing Specific Vacuum Types (Canister, Upright, Handheld)
While the general principles apply, specific vacuum designs might require slight variations:
- Canister Vacuums: Often have a friction-fit or twist-lock hose that connects to the main body. Check for any release buttons or levers near the connection.
- Upright Vacuums: The hose usually connects to the main body for attachments, and sometimes a second connection runs down to the brush head. Inspect both connections. Some uprights have a “hose release” button or lever on the main body.
- Handheld Vacuums: These usually have very simple friction-fit connections. Inspect closely for any debris.
Consult your vacuum cleaner’s user manual if you’re unsure about specific release mechanisms.
When All Else Fails: Troubleshooting and Professional Help
Sometimes, despite your best efforts, the hose just won’t budge. When you can’t seem to remove stuck hose from your vacuum cleaner, it’s time to consider other options.
Checking Internal Mechanisms and Latches
If your vacuum has visible latches or buttons to release the hose, ensure they are fully engaged or disengaged. Sometimes, these mechanisms can get jammed internally. You might need to use a small screwdriver to gently pry around the edge of a button or latch to see if it’s catching. Be extremely careful not to force anything. If there are screws holding the connection port in place, you might consider carefully unscrewing them to inspect the internals, but this should only be done if you are comfortable with minor disassembly and can remember how to put it back together.
Identifying Potential Damage
As you try to remove stuck hose, look for signs of damage that might be making it impossible to separate the parts:
- Deformed Plastic: Is the plastic around the connection point bent, warped, or melted? This might indicate that too much force was applied previously or that there’s an internal heat issue.
- Broken Tabs: Are any locking tabs visibly broken or sheared off? If so, the hose might be stuck on a broken piece, or the connection is already compromised.
- Cracks: Look for hairline cracks on either the hose or the vacuum body near the connection. These can make separation difficult and indicate structural weakness.
If you see significant damage, pushing further might only worsen the problem.
Knowing When to Call a Pro or Consider Replacement
There comes a point where DIY efforts can cause more harm than good. If you’ve tried all the gentle and advanced methods, and the hose is still firmly stuck, it might be time to:
- Consult a Professional: A vacuum repair shop has specialized tools and experience. They might be able to free the hose without damaging the unit, or they can properly assess if a replacement part is needed.
- Consider Replacement: If the vacuum is old, constantly struggling, or if the cost of professional repair approaches the cost of a new, entry-level vacuum, it might be more economical to invest in a new machine. This is especially true if the stuck hose has caused irreparable damage to the vacuum body.
Preventing Future Hose Headaches
An ounce of prevention is worth a pound of cure, especially when it comes to keeping your vacuum cleaner in top shape. By taking a few simple steps, you can significantly reduce the chances of ever having to remove stuck hose from your vacuum cleaner again.
Regular Cleaning and Debris Removal
The most common cause of a stuck vacuum hose is debris buildup.
- Regular Inspection: Every few cleanings, or if you notice a drop in suction, visually inspect the hose connection points.
- Clear Accumulations: Use a damp cloth to wipe away dust, hair, and grime from the inside and outside of the hose connection ports on both the vacuum and the hose itself.
- Check for Blockages: If you’ve vacuumed up something particularly fibrous or large, check the hose and connections immediately after use.
Proper Storage Techniques
How you store your vacuum can also play a role.
- Avoid Kinking: Store your vacuum hose in a way that prevents kinks or sharp bends. Kinks can deform the plastic over time, making connections tighter.
- Store Disconnected (if applicable): If your vacuum model allows for easy hose disconnection for storage, consider doing so. This relieves constant pressure on the connection point and allows it to breathe.
- Keep Dry: Store your vacuum in a dry environment. Moisture can lead to slight swelling of plastic or even corrosion on metal parts, making connections more difficult.
Understanding Your Vacuum’s Connections
Take a moment to read your vacuum cleaner’s user manual, especially the section on attaching and detaching the hose and attachments.
- Learn the Mechanism: Understand if your hose uses a twist-lock, snap-on, or friction-fit connection. Knowing this will help you apply the correct removal technique.
- Practice Removal: Occasionally, practice removing and reattaching the hose when it’s not stuck. This keeps the mechanism moving and prevents it from seizing up.
By following these simple preventive measures, you can ensure your vacuum hose remains easy to connect and disconnect, saving you from future frustration.
A stuck vacuum hose doesn’t have to be the end of your cleaning routine, or worse, the end of your vacuum cleaner. By understanding why hoses get stuck, prioritizing safety, and using gentle, systematic techniques, you’re well-equipped to remove a stuck hose from your vacuum cleaner effectively. Remember, patience is your most valuable tool. And with a little regular maintenance, you can keep your vacuum hose free and flexible, ensuring your home stays spick and span without any unexpected snags!
Frequently Asked Questions
What causes a vacuum hose to get stuck most often?
The most common culprits are accumulation of dust, pet hair, and small debris around the connection point, creating friction or a physical blockage. A strong suction seal or a stiff twist-lock mechanism can also make it difficult to disconnect.
Can I use boiling water to loosen a stuck hose?
No, you should never use boiling water. Extreme heat from boiling water can easily melt, warp, or permanently damage plastic components. Stick to a hairdryer on a low or medium setting for gentle warming.
My vacuum has a release button, but the hose is still stuck. What now?
If the release button isn’t working, it might be jammed by debris or have a broken internal mechanism. Try pushing the hose slightly further in while pressing the button, then twisting and pulling. Inspect the button area for any visible obstructions.
How can I tell if the hose or the vacuum body is damaged?
Look for cracks, bends, or missing plastic pieces around the connection points on both the hose and the vacuum. If you see signs of deformation or breakage, the part might be damaged beyond simple unsticking and could require replacement.
Is it better to pull or twist a stuck hose?
It’s best to do both. A combination of gentle twisting (like unscrewing) and steady, consistent pulling pressure is usually most effective. Avoid sudden, forceful yanks, as these are likely to cause damage.
What type of lubrication is safest for plastic vacuum parts?
For plastic parts, a few drops of liquid dish soap mixed with a small amount of water is generally the safest lubricant. It provides enough slip to loosen connections without damaging the plastic or leaving a harmful residue. Apply sparingly and wipe away excess.