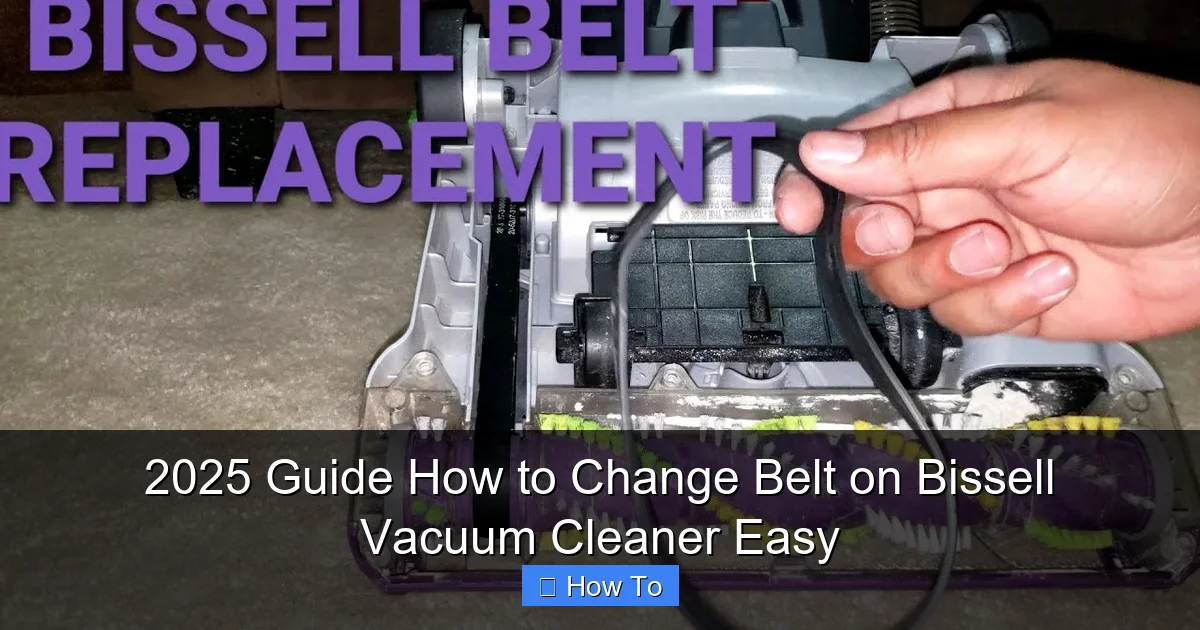
2025 Guide How to Change Belt on Bissell Vacuum Cleaner Easy
Is your Bissell vacuum’s brush roll no longer spinning, or is suction weak? It’s likely time to change the belt on your Bissell vacuum cleaner. This 2025 guide provides a straightforward, step-by-step walkthrough, helping you easily identify the problem, gather necessary tools, and replace the belt yourself. By following our clear instructions, you’ll restore your vacuum’s peak performance in no time, saving you money on repairs and extending its lifespan.
2025 Guide How to Change Belt on Bissell Vacuum Cleaner Easy
Welcome, fellow homeowners and DIY enthusiasts! Is your trusty Bissell vacuum cleaner not performing quite like it used to? Perhaps the brush roll has stopped spinning, or you’ve noticed a distinct lack of suction, especially on carpets? Chances are, you might have a worn-out or broken belt. But don’t despair! Learning how to change the belt on your Bissell vacuum cleaner is one of the easiest and most common repairs you can tackle yourself.
In this comprehensive 2025 guide, we’re going to walk you through everything you need to know, from identifying the problem to successfully installing a new belt, and even some troubleshooting tips. You’ll save money on professional repairs, extend the life of your appliance, and gain a satisfying sense of accomplishment. We’ll break down each step with clear, friendly language, making sure you feel confident throughout the process. Let’s get your Bissell vacuum back to its dirt-busting best!
Key Takeaways
- Safety First: Always unplug your Bissell vacuum cleaner before attempting any maintenance or belt replacement to prevent electric shock or accidental startup.
- Identify the Right Belt: Before you begin, ensure you have the correct replacement belt specifically designed for your Bissell vacuum cleaner model. This is crucial for proper fit and function.
- Accessing the Belt: Most Bissell models require removing the bottom plate and brush roll to access the old belt. Keep track of all screws and parts for easy reassembly.
- Clean While You’re There: Use the opportunity during belt replacement to thoroughly clean the brush roll, brush roll housing, and motor pulley area of any hair, string, or debris that can hinder performance.
- Proper Installation is Key: Ensure the new belt is correctly stretched and seated around both the motor pulley and the brush roll. A twisted or improperly tensioned belt won’t work effectively and can quickly fail.
- Test After Repair: After changing the belt and reassembling your vacuum, always perform a quick test run to confirm the brush roll spins correctly and the vacuum operates as expected.
Quick Answers to Common Questions
How do I know what belt my Bissell vacuum needs?
The most reliable way is to check your vacuum’s user manual or look for a model number sticker, often found on the back or bottom of the unit. Use this model number to search for the specific replacement belt online or at a local store. There are many different types (flat, V-belt, geared), and getting the right one is crucial.
Can I use any universal vacuum belt?
It’s highly recommended to use a belt specifically designed for your Bissell model or a high-quality aftermarket equivalent. Universal belts rarely provide the correct tension, size, or durability, which can lead to poor performance or even damage to your vacuum’s motor.
How often should I change the belt on my Bissell?
The lifespan of a vacuum belt varies based on usage and vacuuming habits. As a general rule, it’s good practice to inspect your belt every 6-12 months. Replace it immediately if you notice signs of wear, stretching, or if it breaks. Heavy users might need to change it more frequently.
What if the new belt feels too tight to install?
A new belt should feel snug and require some stretching to get it onto both the motor pulley and the brush roll. This tension is necessary for it to work effectively. If it feels impossible, double-check that you have the correct belt for your specific Bissell model; a wrong size will either be too tight or too loose.
My brush roll is still not spinning after replacing the belt, what’s wrong?
First, re-check that the vacuum is unplugged. Then, ensure the belt is not twisted and is properly seated in the grooves of both the motor pulley and the brush roll. Also, check for any remaining hair or debris wrapped around the brush roll ends or motor shaft that might be preventing free movement. Make sure the brush roll itself is correctly aligned and seated in its housing.
When to Change Your Bissell Vacuum Belt
Recognizing the signs of a failing vacuum belt is the first step to getting your Bissell back in top shape. Here are the common indicators:
- Brush Roll Not Spinning: This is the most obvious sign. If your vacuum is on, but the brush roll (also known as the agitator bar) isn’t rotating, a broken or stretched belt is almost always the culprit. Without the brush roll, your vacuum won’t effectively lift dirt and debris from carpets.
- Loss of Suction (on carpets): While a clogged filter or hose can also cause this, if your brush roll isn’t spinning, it drastically reduces the vacuum’s ability to clean carpets effectively, mimicking a loss of suction.
- Burning Rubber Smell: A slipping or partially broken belt can create friction, leading to a strong, unpleasant burning rubber odor. If you smell this, turn off your vacuum immediately.
- Visible Damage: Sometimes, you can visually inspect the belt and see cracks, fraying, or if it’s completely snapped. This is easiest to do when you’ve already opened up the brush roll housing.
- Unusual Noises: A loose or damaged belt can sometimes cause grinding or whining noises as it struggles to turn the brush roll.
It’s a good idea to inspect your vacuum belt every 6-12 months, even if you don’t notice any immediate problems. Proactive maintenance can prevent unexpected breakdowns and keep your cleaning routine smooth.
Gather Your Tools and Supplies
Before you begin the process to change the belt on your Bissell vacuum cleaner, ensure you have all the necessary items. Being prepared makes the job much smoother and quicker.
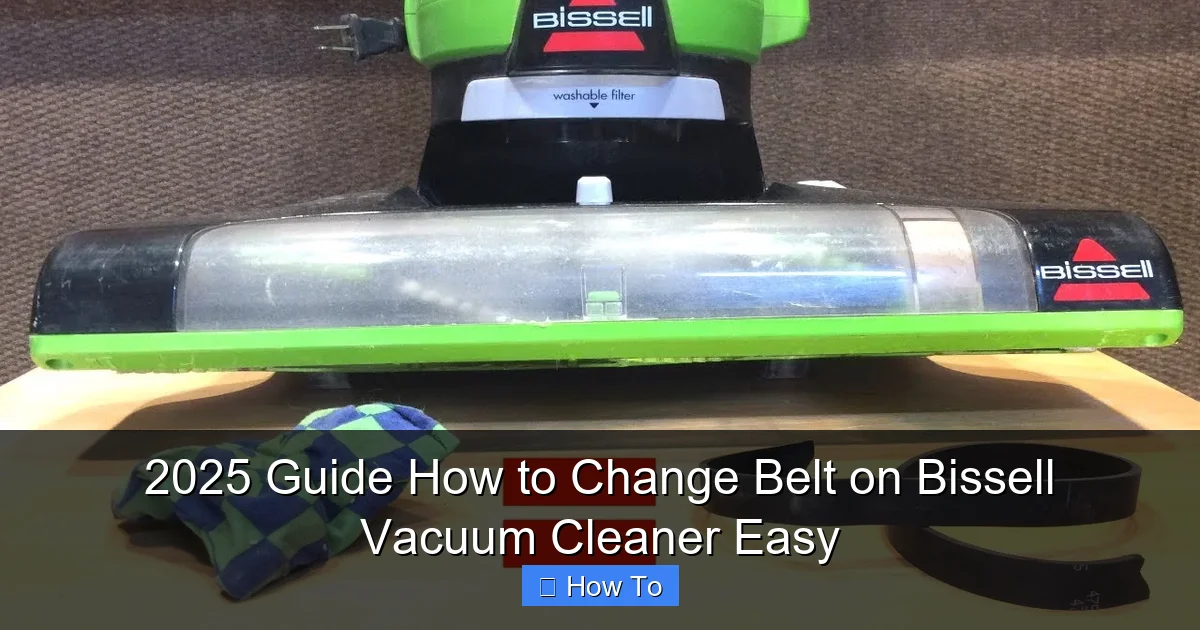
- New Replacement Belt: This is the most crucial item! You MUST purchase the correct belt for your specific Bissell vacuum model. Check your vacuum’s user manual, look for a sticker on the vacuum itself (often on the bottom plate), or search online using your model number. Bissell belts come in different sizes and types (flat, V-belt, geared), and using the wrong one can cause damage or simply not work.
- Phillips Head Screwdriver: Most Bissell vacuum cleaners use Phillips head screws to secure the base plate.
- Flathead Screwdriver or Pry Tool: Occasionally, a flathead screwdriver or a thin pry tool might be helpful for gently prying open stubborn covers or dislodging parts.
- Scissors: Useful for cutting away a stubborn or tangled old belt, especially if it’s melted or fused to the motor shaft.
- Gloves (Optional): The underside of a vacuum can be quite dirty and dusty. Gloves can keep your hands clean.
- Shop Towel or Rag: For cleaning debris from the brush roll area and other components.
- Safety Glasses (Optional): To protect your eyes from dust or small flying debris, though generally not strictly necessary for this task.
Visual guide about 2025 Guide How to Change Belt on Bissell Vacuum Cleaner Easy
Image source: i.ytimg.com
Safety First! Essential Precautions
We cannot stress this enough: safety is paramount when working with any electrical appliance. Please follow these precautions diligently every time you change the belt on your Bissell vacuum cleaner.
-
UNPLUG THE VACUUM!
This is the absolute most important step. Before you do anything else – before you even think about touching a screw – make sure your Bissell vacuum cleaner is completely unplugged from the wall outlet. This prevents accidental startup and eliminates any risk of electric shock.
-
Allow to Cool:
If you’ve just used your vacuum, give it a few minutes to cool down. The motor and other components can get warm during operation.
-
Work in a Well-Lit Area:
Good lighting will help you see small screws, debris, and the proper positioning of the new belt.
-
Clear Your Workspace:
Remove any clutter from your work area. You’ll be dealing with small screws and components that can easily get lost.
Step-by-Step Guide: How to Change Belt on Bissell Vacuum Cleaner
Now that you’re prepared and prioritized safety, let’s dive into the core of the task: learning how to successfully change the belt on your Bissell vacuum cleaner.
Step 1: Prepare Your Vacuum
The initial setup is crucial for easy access and a smooth repair process.
- Unplug the Vacuum: We’re repeating this for emphasis! Double-check that the power cord is entirely disconnected from the electrical outlet.
- Lay it Down: Gently lay your Bissell vacuum cleaner on its back, with the floorhead (the part with the brush roll) facing upwards. This gives you direct access to the bottom plate and the belt housing. You might want to place a towel or old blanket underneath to prevent scratching your floor or the vacuum.
Step 2: Access the Brush Roll and Belt
This step involves removing the cover that protects the brush roll and belt mechanism.
- Locate the Base Plate Screws: Look for screws on the bottom plate of your vacuum cleaner. These are typically Phillips head screws. The number and location can vary slightly between Bissell models, but they are usually clearly visible around the perimeter of the plate.
- Remove the Screws: Using your Phillips head screwdriver, carefully unscrew all the retaining screws. It’s a good idea to place these screws in a small bowl or on a magnetic tray to prevent them from rolling away and getting lost.
- Remove the Base Plate: Once all screws are out, gently lift off the bottom plate. It might be slightly snug, but it should come off without excessive force. If it’s stuck, check for any hidden clips or tabs. Sometimes, a flathead screwdriver can help to gently pry it up, but be careful not to damage the plastic. Set the base plate aside.
Step 3: Remove the Old Belt
With the base plate removed, you now have clear access to the brush roll and the old belt.
- Identify the Components: You’ll see the brush roll (a cylindrical brush), the motor pulley (a small, often ribbed wheel connected to the motor), and the belt connecting them.
- Lift Out the Brush Roll: Carefully lift the brush roll out of its housing. It usually has end caps that fit into specific slots. Be mindful of any bearings or washers on the ends of the brush roll – try to keep them in place if they don’t easily come off.
- Remove the Old Belt: Once the brush roll is out, you can easily remove the old belt. It might be broken, stretched, or simply loose. If the belt is snapped or tangled around the motor shaft, you might need scissors to cut it away. Ensure no remnants of the old belt are left behind.
Step 4: Clean the Area
This is an excellent opportunity for a mini-maintenance session.
- Remove Debris: Take a moment to thoroughly clean the brush roll housing, the brush roll itself, and around the motor pulley. Hair, string, carpet fibers, and other debris can accumulate here, causing friction, hindering the brush roll’s movement, and even leading to premature belt wear. Use your hands, a small brush, or even a vacuum cleaner hose (if you have another one!) to clear out all the gunk.
- Inspect the Brush Roll: While it’s out, check the brush roll for wear. If the bristles are heavily matted, worn down, or if the brush roll itself is bent or damaged, you might consider replacing it as well for optimal performance.
Step 5: Install the New Belt
This is where your new replacement belt comes into play. It might feel a bit tight, which is normal.
- Position the Belt on the Motor Pulley First: Take your new Bissell vacuum belt and loop it around the small motor pulley. Make sure it’s seated correctly in the groove of the pulley and isn’t twisted.
- Loop Around the Brush Roll: Now, carefully guide the other end of the belt around the center of the brush roll. Ensure the belt is straight and not twisted.
- Prepare for Reinstallation: With the belt on both the motor pulley and the brush roll, hold the brush roll in one hand and prepare to place it back into its housing.
Step 6: Reinstall the Brush Roll
This step requires a little bit of dexterity to ensure the belt is properly tensioned.
- Align and Seat the Brush Roll: Carefully lower the brush roll back into its designated slots in the vacuum’s floorhead. You’ll need to stretch the belt slightly to get the brush roll into place. Ensure that the ends of the brush roll fit securely into their respective slots or bearings.
- Verify Belt Placement: Once the brush roll is seated, double-check that the new belt is still properly wrapped around both the motor pulley and the brush roll. It should be taut, but not excessively strained. Give the brush roll a gentle spin by hand to ensure it rotates freely and the belt stays in place. The belt should look flat and untwisted.
Step 7: Reattach the Base Plate
You’re almost done! Now, it’s time to put everything back together.
- Align the Base Plate: Carefully place the bottom plate back onto the vacuum’s floorhead, aligning it with the screw holes.
- Replace the Screws: Reinsert all the screws you removed earlier. Start by hand-tightening them to ensure they are properly threaded, then use your screwdriver to tighten them securely. Be careful not to overtighten, as this can strip the plastic threads. The base plate should sit flush with the vacuum body.
Step 8: Test Your Vacuum
The moment of truth!
- Plug In: Carefully plug your Bissell vacuum cleaner back into a power outlet.
- Turn On and Observe: Turn on the vacuum. Listen for any unusual noises and visually check if the brush roll is spinning correctly. It should rotate smoothly and consistently. If it spins, congratulations! You’ve successfully managed to change the belt on your Bissell vacuum cleaner.
- Brief Test Run: Do a quick test on a carpeted area to ensure proper suction and cleaning action.
Tips for Success and Longevity
To ensure your newly installed belt lasts and your Bissell vacuum performs optimally, consider these additional tips:
- Use Genuine or Quality Belts: Always opt for genuine Bissell replacement belts or high-quality aftermarket equivalents specifically designed for your model. Cheap, generic belts may not fit correctly, can stretch quickly, or break prematurely.
- Regular Cleaning: Make it a habit to regularly check and clean your brush roll. Removing hair, string, and debris prevents tangles that can put excessive strain on the belt and motor.
- Avoid Obstructions: Be mindful of what you’re vacuuming. Large objects, coins, socks, or thick cords can jam the brush roll, causing the belt to snap or the motor to overheat.
- Check for Wear Annually: Even if your belt isn’t broken, it can stretch over time. A stretched belt won’t provide enough tension for effective brush roll rotation. A quick annual inspection can help you catch this before it becomes a problem.
- Proper Storage: Store your vacuum in a place where it won’t be knocked over or have heavy objects placed on it, which could potentially damage internal components or stress the belt.
Troubleshooting Common Issues
Even with the best instructions, sometimes a little glitch can happen. Here are a few common issues and their solutions after you change the belt on your Bissell vacuum cleaner:
-
Brush Roll Still Not Spinning After Replacement
- Belt Twisted: Double-check that the belt is not twisted anywhere along its path between the motor pulley and the brush roll. A twisted belt won’t allow free rotation.
- Belt Not Seated: Ensure the belt is sitting correctly in the grooves of both the motor pulley and the brush roll.
- Wrong Belt Size: If the belt is too loose, it won’t grip; if it’s too tight, it could snap or prevent the brush roll from turning. Make sure you bought the exact model-specific replacement.
- Debris Remaining: A small piece of tangled hair or string might still be jamming the brush roll or motor pulley. Re-open and clean more thoroughly.
- Brush Roll Not Seated Correctly: Ensure the ends of the brush roll are properly aligned and seated in their slots.
-
Burning Smell Persists
- New Belt Too Tight: While a new belt should be taut, if it’s excessively tight (perhaps the wrong size), it can cause friction and heat.
- Remaining Obstruction: Even a tiny obstruction can cause drag.
- Motor Issue: In rare cases, if the smell persists and the brush roll still isn’t spinning, there might be a more serious motor issue requiring professional repair.
-
Vacuum Still Not Picking Up Debris (beyond brush roll issue)
- Clog in Hose or Filters: A broken belt only affects the brush roll. If suction is generally poor, check the main hose for clogs and ensure all filters (pre-motor and post-motor) are clean or replaced as per your vacuum’s manual.
- Full Dust Bin/Bag: A simple oversight! Make sure your dust bin is empty or your bag is not full.
Conclusion
Congratulations! You’ve successfully navigated our 2025 guide on how to change the belt on your Bissell vacuum cleaner. This essential maintenance task might have seemed daunting at first, but with a little patience and the right instructions, you’ve proven it’s a completely manageable DIY project.
By taking the time to replace a worn or broken belt, you’ve not only restored your vacuum’s cleaning power and extended its lifespan but also saved yourself money on potential repair shop visits. Regular maintenance, including checking and changing your belt when needed, is key to keeping your Bissell vacuum running efficiently for years to come. Now, go forth and enjoy a cleaner home with your revitalized vacuum cleaner!
🎥 Related Video: How to change the Belt on Proheat 2X Revolution | BISSELL
📺 BISSELL
This video gives you a step-by-step guide to change the belt on your Proheat 2X Revolution. Get your carpet clean with the …